
To see if this custom-fit item will work for you please tell us what vehicle you'll use it with.


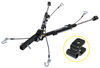
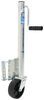
Custom designed to fit your vehicle so it can be safely towed behind your RV, this base plate has easily removable arms that offer a seamless look when you're not flat towing. Base plate bolts directly to your chassis, so no welding is required.
Features:
Specs:
This base plate's hidden design creates a clean and seamless look. The bracket arms are easily removable, creating a slick appearance when you're not flat towing. Because the arms can be removed, you also won't have to worry about banging your leg into any protruding arms when you walk by.
Attaching and removing the bracket arms is a breeze. To attach the arms to the base plate, simply insert them into the receivers and rotate them until they lock into place. Once you're finished towing and want to remove the arms, pull the pin to disengage the lock, rotate the arms, and remove them from the receivers. Finally, plug up the now empty receivers with the included receiver covers to help keep dirt and debris out of the base plate and provide a finished look.
Flat towing your vehicle is much more convenient than using a trailer or a tow dolly. These other options take up much more storage space, leaving you less room both at home and at the campsite. In addition, securing your vehicle to a trailer or tow dolly can be a hassle and more time consuming than hooking up with a tow bar.
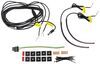
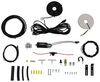
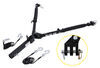
There are 5 basic components needed when flat towing a vehicle: a tow bar, a base plate kit, a safety cable set, tow bar wiring, and a supplemental braking system.
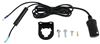
The tow bar links your towed car to your motorhome. It attaches to the custom-fit base plates that install on the frame of your towed car. Safety cables ensure that your towed car does not separate from your motorhome in the event that your tow bar becomes detached. Tow bar wiring allows your towed vehicle's signal lights to sync up with your motorhome's tail lights, which is required by law in most states. Finally, the supplemental braking system - also required in most states - brakes your towed car when the brakes in your motorhome are activated, preventing wear on the motorhome and decreasing braking distance for your entire setup.

California residents: click here
Videos are provided as a guide only. Refer to manufacturer installation instructions and specs for complete information.
Hello neighbors, it's Brad here from etrailer. And today we are taking a look at installing the Blue Ox Base Plate on a 2025 Lincoln Nautilus. And this is gonna be the first step and really set the tone for the rest of your flat tow set up on your Nautilus because this base plate is not only gonna allow you to tow this down the road, but also give you mounting points for some of your other components. So let's take a closer look at it. When it comes to flat towing your Lincoln Nautilus down the road, there's gonna be five minimum main requirements that you need. And that's gonna include the base plate, which will be the structural mounting point for everything.
The tow bar will connect your base plate to the hitch on the RV. And just like towing a trailer, we're gonna have safety cables that will go from the hitch to our base plate. That way if anything was to disconnect, it's still gonna hold it all together. You're also gonna need lighting functions. So diode wiring, we'll see that we have our umbilical here will transfer that light signal from the seven-way to the taillights on the vehicle through the six-way.
You're also gonna have a braking system. So that's what our breakaway switch is here. The breakaway switch is the last line of defense. If everything was to fail, it'll pull this cable applying the brakes on the vehicle and that way it's not rolling down the road. Now here we have air brakes on ours, so that's why we have this extra cable.
But that's gonna be the basics. There are maybe a few things that you may want to add in. One of those would be a charge line. That's something that's super easy to add on that's gonna trickle charge your battery. But beyond that, those will at least get you started on getting this flat towing down the road.
And when you have your base plate installed, this is what the finished product is going to look like. And overall they did a really good job of keeping the base plate in this lower grill. So you will have to trim out to gain access to your plug to be able to feed through as well as your safety chain loops, as well as your arm attachments and your diode wiring. But overall finished product, I think it turned out really well. The arm attachments don't protrude out too far and neither do the safety chain. So overall, when you're not flat towing the vehicle, it still has a decent look to it. Now you'll see that there are caps included here that you can put in your receiver. That way if you're just driving down the road, we're not getting any road grime in there. And that's gonna keep it nice and clean for when we are ready to flat tow. These arms are removable and super easy to put in as well. You'll just push in, quarter turn, that'll snap it and it's ready to go. To remove it, it's equally the same. You just pull this pin, twist it, and it'll pop out. They do have a tab welded onto the base plate for your breakaway switch, which is a really nice addition. You don't have to fabricate anything up. And there's also a mounting point for our diode wiring. Now on this one, the brackets that go off of the base plate are relatively short. So it was pretty tight getting this on, but either way we still had a mounting point. So definitely takes a lot of the fabrication and guesswork on how to mount everything out properly. And overall, the installation wasn't terribly hard to do. This vehicle, it takes a little bit to get everything off. And I do recommend doing all of your flat tow components at the same time. And as far as trimming, I really tried to get this as clean as possible. I did notice after the fact that I had to trim out just a small section here that was pressed against the grill. But beyond that, it looks really good and it's really not that hard of an install. Now when you are ready to flat tow your vehicle, or even if you haven't hooked up to it yet, something that's gonna be important is making sure that your tow bar is as level as possible. So what does that mean Well, you're gonna want to take the measurement from the ground to our arm attachment. And this one, it comes in right at 16 inches. You're then gonna go to the hitch on your RV, measure from the ground to the center of the hitch pin hole. And between those measurements, if it's more than three inches of difference, you're gonna want a high low adapter. In our case today, we're actually at 19 inches on our RV, but we're using a tow bar with a built-in high low adapter. At the end of the day, we just want everything as level as possible going down the road. And speaking of flat towing the vehicle, let's get this moved a little bit closer to our RV and I'll show you how to hook everything up. Now when you are ready to hook this up, I suggest just going across the base plate and you should have something attached from the side of your car to the RV. So just double-check yourself as you go through. The first thing we're gonna get attached is our tow bar. Now we have the etrailer XHD, which is a great option, and we attached a Blue Ox connector. So this adapter allows us to really use any tow bar. But when picking up a tow bar, you don't necessarily need a Blue Ox for it to align. You can get a Roadmaster, you can get a different brand, you just need to make sure that the adapters will bolt up to the specific Blue Ox arms. We have all of those adapters available here at etrailer. So I'll get my other side pinned up as well. And then we have our safety cables. Again, I like how far this sticks out. It's nice and easy to hook up, but it's also, you know, not protruding too much to where it looks terrible. We then have our diode wiring. And in our case, we have air brakes on our RV. So I have my air fitting right here. So we'll get that attached. And then your breakaway switch from your braking system will also get attached. And then just our other side. Now once everything's in place, you can then get your vehicle in flat tow mode and then you're gonna be ready to hit the road. So as I mentioned that level, you know, that three-inch variance, if you maybe are out of tolerance by an inch or so, you don't necessarily need to get a high low adapter. I mentioned that some tow bars do have that built-in rise or drop. And the etrailer XHD as well as the etrailer SD have those built in. It's a inch and a half drop. So that really put us into a nice plane where everything's gonna be in that tolerance without having to get that high low adapter. Now in terms of installation, I mentioned the base plate's not terribly hard to do. Some vehicles are just gonna be more difficult than others, but most of them are gonna require the fascia coming off and that wasn't too terrible. There is quite a bit of trimming that's gonna happen behind the fascia just to get everything to mount up, and then also on the fascia to get everything to work. But beyond that, it's really not that terrible. If you're somewhat mechanically inclined, I'll walk you through step by step so you can get your base plate installed. But as I'll probably mention in the video is while you have your fascia off, you wanna knock out the rest of your flat tow components. It's a lot easier to route everything and make it nice and clean when that fascia is taken off. Now with this vehicle, these are generally pretty tricky. This is the new body style and this is my first time working on one of these. But the older Lincoln Nautilus tend to run into some electrical issues when it comes to diodes where you end up needing six of them. And we've yet to do that setup on this vehicle, so we called Roadmaster and they recommended to get the stick-on lights. It's a universal style and makes it to where you don't have to tap into your electrical components on the vehicle. And I would probably suggest that, just because these lights get a little bit tricky, you need to run a separate power wire to a separate diode. So something I would recommend if you're building out your entire flat tow setup. And throughout the process of the base plate installation or watching any of our videos for braking systems or whatever it may be as far as flat tow components on this vehicle, if throughout the process you're maybe stuck and feeling like this isn't something that you wanna tackle on your own, I completely understand. Flat tows are kind of a unique setup and can take a little bit of, you know, knowledge, and we're here to help you. So feel free to call into our customer service line. But also if you want someone else to take care of the install for you and you wanna be out there flat towing without having to rip your car apart, feel free to use our dealer locator. There's a list of shops close to you. You can find them by using your zip code and they can take care of that flat tow installation as well as any other accessories you may be putting on the vehicle. With that being said, let's take a look at the video and see what we're getting into. Now before we get into the installation, there's a few things that I want to address just to make everything a little bit easier for your whole flat tow setup. The first one is there's a lot of hardware that's gonna be coming off in order for the fascia to be removed and our base plate to go on. So with that being said, have a nice organized spot to keep all of your hardware. It'll make reinstallation a lot easier. Another thing that's gonna be important is while you're doing your base plate and the fascia's off, it's a really good time to get the rest of your components set up, so your diode wiring and getting that all ran. And on our braking system today, we're gonna have airlines. So to be able to route that clean while the fascia's off really makes it a lot easier than trying to do it after the fact. So if you are gonna be setting this up for flat towing, I do recommend trying to do all of those components at once and not kind of chip away. It can get a little bit difficult that way. With that being said, let's hop into it. So the first thing is really gonna be getting our fascia taken off, and the first step will be to get our plastic push pins taken off of our shroud here. So these all have slots in them. And having a trim panel tool is really helpful for these because it's kind of wedged to where you can get in there and pop up that center button. A flathead screwdriver's also a good option here. So you don't need a trim panel tool but they really are helpful for these. So if you gonna pull that center section up, you should be able to get the whole thing to pop up. If it does separate, just make sure you have both of the pieces. And for this panel, there should be a total of 10. You just kind of work your way across here, making sure that we get all of them removed, and then we can pull this panel up. And also if that little inset to where to pry that center part is off, you can rotate these a little bit that way you're not marring up your plastic. Once you get your plastic push pins out, this should just pop off pretty easily. So we'll set this aside. With that cover out of the way, that's gonna give us access to the 10-millimeter bolts. These are gonna be the ones that are at the top of the grill. There's seven of them. So just go across straight line, get those removed. (tool whirring) Next we're gonna need to go to each of our wheel wells. And this plastic wheel well trim, we're gonna peel this back just about to here. That way we can eventually separate our fascia from our quarter or our front fender here. Now there are gonna be plastic clips along here, so take your time. And really try not to crease this too far because if you put a harsh bend on the plastic, it's gonna probably leave a light mark that's gonna be there permanently. So take your time. What I do is just kind of reach on the backside, and if you can get a finger on the bottom here, you'll start popping those clips off. And just keep pressure. There's trim panel tools that are plastic that you can use as leverage here to pop them out. But really if you just kind of work your way up, it should be fairly easy. Now I did struggle, I did the other side already. And right here there's an alignment pin and then a clip. So it might be easy to just kind of reach up here and pinch that clip rather than fight it and risk breaking. You can put a set of pliers, I'm just using my fingers to kind of pinch this together. Sometimes you can get a small socket and slide it over. But get that popped off, if any of the clips stay in the vehicle, just put those back on that fender liner here so we have that ready. And then I just rolled up some shop towels. I'm gonna prop this in here and that way we have a nice gap that'll leave that open us and also not put a bend here. So you can repeat that same exact step on the other side. Because once we get these popped off, that's gonna give us access to our plastic push pins, which will be the next thing that we remove. So just work your way up this fender liner or the inner fender liner here. And we're just gonna be popping these out. It does look like there's gonna be one here on our mud flap too that we're gonna remove. But as I go up, well, there's one here, one here. And we'll probably leave this one here. That should be enough 'cause we're just trying to peel this back to gain access to hardware. Now once you get those all taken out, you'll just reach behind the fender liner, the fabric here, and just kind of peel this back. It's got some plastic that holds it in place. But we're just gonna want to get that to where it's nice and separated. And then from here, we're gonna go underneath where we're gonna be removing some hardware. Now underneath the vehicle, you're gonna want a seven-millimeter socket. And that's going to be removing the screws from this underbody plastic. You'll notice that on the outside, so you do have this kind of triangulated piece that goes in with the mud flap, that is gonna be separate. So we'll get that removed first. So you can actually get this from the outside of the vehicle without having to be underneath it. (tool whirring) There's also one that's kind of tucked back here, so make sure you get that one. (tool whirring) Put that hardware out. We can grab this and set it aside. We'll repeat on the other side. There's this panel that's very similar to this. And then we'll come back and we'll just hit the ones that are all in here. So there's a decent amount of them, so just take your time, make sure you get all those screws. (tool whirring) Next we'll need to unplug some electrical connections that way the fascia can be removed. And in the instructions, they're gonna say that there's three of them. I think depending on your trim, you may or may not have three. We just have the one center one, but it does look like these are spots where those plugs would go. So if you do have those plugs located right here, you can separate those. I believe them to be pretty similar to what we have here. So just push on the tab and get this to separate. Now there are gonna be more electrical connections from the fascia to the chassis. And those are gonna be a little bit more accessible once we start pulling the fascia off. So keep that in mind as we start to pop this off, don't pull too hard 'cause those connections will still be there. But also now's a great time to grab an extra set of hands. Pulling a fascia off, they're not particularly hard, but they're pretty large and pretty cumbersome for one person to do, especially if you're trying to unplug things while holding it. So get a place set up to store your fascia where it's not gonna fall or get scratched during the process 'cause it'll be off for a little bit. Another thing that I like to do is grab some painter's tape and I run it along the edge of the fender and our fascia. And that way as we start to pull it apart, any friction's not gonna scratch our clear coat. And also when we put it back, it really reduces the chance for any scratching. So I've gotten Aidan to help me with the fascia here. And what you're gonna wanna start doing first is on each corner, start to peel the fascia off. There's just gonna be clips along the fascia and fender. It's just kind of like that wheel weld trim that we looked at earlier. But if you reach back here and just start kind of pulling straight back and keep pressure along these, it should just kind of unclip as we go. And do that on both sides 'cause you're gonna want, we're gonna work our way towards the middle. Now along the grill section here, these kind of lock into place. So as we start to pull this back, keep pressure on here, and that way it can all kind of get removed here. Now that electrical connection that I have that we unplugged, this is still attached with just like a plastic Christmas tree push pin and that may be the case for those other two if you have those. So I'm gonna grab my trim panel tool and pry this off. Okay. And then as we pull back, good chance to see if we've missed anything. So far, so good. Now these electrical connections are pretty short here so don't pull back too far. Aidan's supporting the middle of it for me. So what we're gonna do is undo this brown connector as well as this large harness. The brown connector, we should just push on the middle of the tab and we can get this to separate. And then this large harness, it's got this handle, this snaps it all together and really attaches it all. So what you'll do is pull the handle back. There is a clip here that kind of you wanna push down. These can be tricky here so take your time. Once you kind of get it to this point, when you pull this all the way back, that'll unlock it and then you can get this harness to separate, and our fascia is free. So now we can set this aside. And with the fascia off, you're gonna see that this is a pretty tight spot with everything in place. And so it is gonna require some modification and removal of parts for our base plate to live up front. And the first thing that we're gonna do is this brace that attaches our bumper beam to this lower support has four bolts. These are gonna be a 13-millimeter socket and we have one of these plates on each side. So we'll remove the four bolts on each and once the plate comes out it will not be going back on. So you can hold onto it, you can discard it, you can do whatever you want with it. (tool whirring) Our lower bumper is going to be removed. And the way that we're gonna do that is we'll find that we have two nuts on each side where it attaches to the frame. These are a 15 millimeter. So with the socket, I'm just gonna go in here, get these taken off. And there's gonna be two more on the other side. So get all four of the nuts taken off. (wrench clicking) Now the lower bumper is still attached by two 10-millimeter bolts. So there's one here and one here. That's gonna allow us to remove this. Now we are gonna be reinstalling this one later. But for now, we're gonna take these off and set it aside. (tool whirring) Next thing we're gonna do is gonna be some trimming of our shutter air dam that we have here. We're just gonna be taking off this outside flap on each side, and that's gonna allow access of our, eventually our base plate to live here. So I've marked this out with a paint marker but it's pretty simple. You're gonna find this inside kind of corner here that we have between the plastics. I'll just cut through here, same on the bottom, and then we'll repeat on the other side. And they say use a reciprocating saw. I personally, I use a multi-tool or an oscillating blade on a lot of the trimming of plastics. It gives you a nice clean cut. But really whatever method you have. This is kind of a weird rubberized plastic so if you use a pair of like tin snips or something, just be careful when you get to this hard plastic. If you crush down too hard on it, a lot of times it'll split and kind of go off to where you don't want it. So maybe grab whatever cutting tool you have necessary. But either way we'll cut these out. (tool whirring) Now there is gonna be a clip on the outside so if you've clip or cut all the way through, you should be able to separate this. You just push that kind of clip towards the outside. And I have a little bit more attached up here so I'm just gonna trim through here. But it can get a little bit tight here just because of the shutters. And if you don't wanna make contact with that and get that clean cut, you have similar style clips here that you could just pull this out. And that way you can get it away from that plastic as you trim it. (tool whirring) And we're gonna begin to get our base plate mounted up. And we're gonna be using those studs that we took the hardware off of and we're gonna reuse the nuts that came with it. But there is gonna be one more attachment point that's a little higher up. So if you kind of go right behind our inner cooler here on this mounting point on the frame, we're gonna take that nut off. And we'll be using that to mount up our side-specific base plate. So now we'll get this taken off first. (tool whirring) And then finding which side is the correct one is pretty easy. You can really only go one way. So your mounting holes, we'll go through the studs here, this will curve around your inner cooler or this plastic housing and this will be where we just remove that nut. So we're gonna slide this on. And eventually we're gonna put Red Loctite on all of these, but we wanna leave this loose for adjustment. So if you wanted to put it on the threads, now you can. I normally wait till the very end so I don't have to fight it, but we'll get that one in place. And then the other two existing nuts that we had hand tightened on here, Now, you may not have used a whiz nut before but this is how we're going to bolt up through the hole here. We have, our bolt that we have, you're gonna look in the kit and find that there's two of them that are shorter. And we're gonna be using the first one of those and we'll have a split washer. But what we'll do is take the whiz nut and we're gonna feed it from back here there's a gap. And we're gonna put this in place in the frame rail to where we can fill this bolt through and get that snug down. Now something that you're gonna wanna do first is the holes don't perfectly line up no matter how you move the base plate. So we're gonna enlarge that with a half-inch drill bit. You can go a little bit larger if you want. But what I'd recommend doing is as you're drilling it out, once you've drilled it, take your bolt and it should pass through pretty easily. That'll make it a lot easier to get this all started. So first thing, get this drilled out. Now be careful, the wires are here. You could unplug this if you want. I'm just gonna keep my drill bit out of the way and get this all enlarged. (tool whirring) So that passes in nice and easy. And I am gonna put thread lock on here, we're not gonna tighten this down, but it's gonna be really hard to get this one with thread lock on once it's started. So you can do it on the whiz nut if you want and that's not a bad way to do it. But as far as getting this up and in place, we are gonna be putting some bends in here. So let's first take a look at the access spot where we're gonna be feeding this through. And the access spot is, it's not tricky and it's really not that far that we have to feed this. But to find it, you're just gonna peel back this underbody panel here. And right where the bottom frame is and this gusset or the support is, this gap here, this is where we're gonna feed in our whiz nut and then get this aligned with that hole. So we will be putting about a 90-degree bend give or take. My goal is to try to get this as flush as possible with the inside section of the metal. That way when we thread this in, it'll start pretty easy. So you may have to do a few small bends on here, but you can do this by hand pretty easily. And what I like to do is kind of guide this in and then look on the outside and make sure that this is lined up. It'll make it a lot easier to feed this in. Now this may take some patience as you're kind of feeding this in if you need to make more bends. Main thing is is do this tightening by hand. Don't use any impacts 'cause you can really, well, you can pop off that weld nut or the whiz nut and really make for a rough time. But we don't wanna cross thread this one. So got my thread started, I'm just gonna kind of snug that down by hand and we'll leave it like that. At this point, since we have that in place, we're gonna take those lower nuts off 'cause we are eventually gonna put that rear bumper or that lower bumper in place again. So we'll just get ourselves set up, we'll take these off, and now we can head over to the driver's side where we can get that bracket put in place. Now our driver's side's gonna be essentially the same except we have this in the way. So obviously, we can't gain access to put a drill bit in here. So we're gonna be removing this CCU. And this is bolted up to the frame by three different spots that we need to attack. So the first one's gonna be this 10-millimeter nut. Super easy to gain access to that. (tool whirring) And the other two are gonna be a little bit trickier. You're gonna have to reach behind where this fender liner is and the first one you'll see up top has a wire loom that's popped onto the stud. So we'll pull that off first. So there's our first 10 mil. And then if you go a little bit lower, there's gonna be one that's located right down here. So that's a bolt that goes in. Whereas this one, this might be a threaded stud that's a bolt on both sides. But either way, we'll remove this with the 10 mil. And then this lower one, just make sure it's the bolt that's going, you know, towards the middle of the vehicle. (tool whirring) So as I mentioned, this one is a stud so it's not just a nut. So we'll get that whole thing taken off. And if I can move this a little bit. Yeah, it's not gonna really offer us any more space to gain access to this. So it is tight. So I might swap over to a ratcheting 10 mil wrench to get this last 10 mil. So with those removed, I did end up using on that back one my swivel head 10. It's tricky but just take your time, whatever you need to do to get this taken off. And from here, we'll just slide this out. And there's quite a bit of wire harness still attached so I'm gonna start prying some of this off. So our main plug that we have here, it looks like we have two plastic Christmas trees, three of them. So if we pop that off, that should really give us that space to be able to kind of at least mitigate this, get it out of the way. So I'll pop those off first. Now this one, it does slide off, so you don't necessarily need to pry that one. The center one here, you can just slide it off the clip. But if you remove it, it's gonna do the same thing. So we'll get this bottom one. And then from here, we can kind of pull this down. And it looks like there's another zip-tied Christmas tree attachment here. So if you pry this one on the back side of the frame out, this is what we're looking to do because that way we can get our drill in here. And I think this should work out well. I'm gonna probably zip tie this so it stays out of the way as I'm drilling. And before I do zip tie this up though, just like the other side, we'll have that nut up here that we need to remove and then we're gonna put our bracket in place so we can get that template made. (tool whirring) So I got the whiz nut all started with our hardware just like the other side. And from here, we're gonna remove these bottom nuts just like the last time. Now we can get the center section of our base plate put up. And I'd recommend grabbing your half-inch bolts that look like this. Put a split washer on there and then have a nylon lock nut ready to go. And we're gonna do that one on each side just to hold it up and it'll make it a lot easier to get the rest of this in. Now with nylon lock nuts, more times than not you really don't need Loctite but you can put that on there if you'd like. And to get this raised up, just make sure that you have these tabs facing up. This cutout here is gonna go around the adaptive cruise control box. So we'll just slide this up and it'll kind of go behind that ACC. And those top holes should align with the holes on the bumper. So once raised up, we're gonna grab that bolt, feed one in here. I'm just gonna get a few threads started and that'll hold up that side. And then I'm just gonna repeat on the other in that way it's self-supporting. And then we'll, we're just gonna do that same hardware combo for the remaining two holes and the other ones on the other side. Now the next thing we're gonna wanna do with it loosely in place is get this centered up. I went off the gaps that are on the cutout here with our ACC, that's kind of the first way. And then also the holes up here, they're not gonna be perfectly centered, but I have them mirrored. So you can see kind of a moon shape on the outside of this hole. The same as on the other side. So center that up as much as possible before getting our bolt, which we're gonna place under here in place. So, yeah, if you need to, I used the dead blow hammer and just kind of knocked it along and that should scoot it as necessary. The next thing we're gonna do is grab our long bolt that we have and put a split washer on there. And then I have a flat washer and a nylon lock nut. And this is gonna pass, there's a bottom hole here that should go through the top section here. Now it aligns pretty close, and they said that you may have to drill it out, which I could probably agree with that. But before I drill anything, we still have this loose so I might snug that down and see if it closes that gap to where I can just pass the bolt through. But same thing like before, we're just gonna make sure that this passes all the way straight through. So again, I'm just gonna tighten this down, see if it works. If not, we'll just drill it. (wrench clicking) So I snugged it down and it didn't quite get it all the way to where I can pass the bolt up, so I am gonna just drill this out. (tool whirring) With that passed up, I'll put my flat washer, my nylon lock nut on, and then we're just gonna repeat that same process on the other side. So with everything loosely in place, we're ready to tighten and torque the bolts that we've put in place. And the first thing that we're gonna do is start with the top nut that we have here. So that's that factory one. So as far as the torque setting on that, there's really nothing for the OEM hardware. I would say if you do it, maybe a little bit less than these bolts, that should be more than plenty. Really just snugging it down with hand tools on that one will be fine. But a torque wrench really makes sure that we're tightening it down the proper amount to where it's not gonna become loose after, you know, towing down the road. But also it's not gonna be too tight putting stress anywhere where it doesn't need to be and maybe risking the hardware being damaged. So a torque wrench is going to be required to get this all torque down. So if you don't have one, we have them here at etrailer. You can generally go to an auto parts store and rent one for free. But you'll dial in your torque setting that's found in their chart in the instruction manual and that way you can properly torque everything. So as far as the order, to make sure everything cinches up properly, we'll start with the top bolt back here. So we'll get that factory one. Then we will go to our whiz nut that we fed in. And then we're gonna go to our three front ones. And then finally, the bottom. Now on these ones, you're gonna wanna grab that. It's a 3/4, so 3/4-inch socket. A lot of times I try to use the torque wrench on the nut side if you can, but have a 3/4-inch wrench holding the head of the bolt so it's not spinning on you. So we'll go through that process and do that on both sides and then we'll continue on. (torque wrench clicking) (torque wrench beeps) (torque wrench clicking) (torque wrench beeps) So with everything torqued down, the next thing that we're gonna attack is gonna be the holes that go through our bumper beam up top. Now as I mentioned, I tried to center them up, really I can't get any of them gonna pass through. So we are gonna be drilling that out with a 3/8 drill bit. And this will pass through and then we'll bolt it up. So the combination is gonna be a split washer on the head, and then if there's a gap between them, that's where we're gonna put one flat washer. Now you may not have a gap, you may kind of depends on how it all evens out. And then once passed through, we'll finish it up with a flat washer and our nylon lock nut. So we'll be doing that for all four holes. So if you need to drill them out, go ahead and do that now. (tool whirring) So the base plate we have officially installed. Now we do put the lower bumper back on. So with this, we're gonna guide these over those studs. So that's why we left those nuts off. And then these spots, if you look at where that 10 millimeter was, it's gonna slide in there. So just gonna make sure that you have that all lined before tightening it back up. And I would recommend on these ones to put some Loctite on those nuts. And we'll get these snug down as well as those 10 millimeters that go under here and we're in the home stretch. Now something that Blue Ox does with their base plates as well as some other manufacturers is you have these safety cables that attach with a quick link. And this one, there's actually a hole on our base plate. And what this is gonna do, in case all of our hardware was to fail and this base plate starts to rip forward, we don't ever want it to detach from the vehicle and have this rolling down the road. So this is kind of the last last line of defense and hopefully they never have to be used. But this will attach to the base plate and then wrap around this frame structure before looping back and attaching it with the quick link. So what I like to do is just kind of route this around. And make sure that it's not gonna rub against any moving components in the engine bay, whether it be belts or whatever it may be. But this side is pretty open. And I'll just feed this through here. And there's no perfect way to do this. The main thing is is, again, it's not gonna get caught on anything moving. But make sure that you're wrapping around the frame rail and attaching it to the base plate and that should be about it. So it is a little tight to feed through here. And you may have excess, that is totally fine. If you wanted to wrap it around a little extra, you can absolutely do that. But I'm gonna put this one around here. So again, it's just wrapped around the entire base plate nice and structural. And then we'll get it all linked up. Once you have this tightened down and you're happy with it, if this is, I mean it's a pretty, it's got some tension on the just from the body of it, if you wanted to, you could go through and zip tie it all up to get it out of the way of things. Again, this is just last line of defense. Few zip ties will keep everything nice and tidy. So we are gonna wanna make sure that we put the one on the other side as well. And then that just leaves a little bit of cleanup work as far as before getting our fascia put back on. And that's gonna include getting that black computer panel kind of all bolted up. I would maybe recommend doing that before doing the cable on that side so you can get a clean run after it's all in place that way you don't have to move the cable to get it to fit. Another thing I'll point out is those whiz nuts, those handles, since it's all torqued down, you can leave them there. They're not gonna hurt anything. But if you wanted to, you can cut them, or a lot of times if you just kind of wiggle them back and forth aggressively, eventually that weld will pop off on it and then it'll pull that handle out. But again, it's not completely necessary to, but just for that nice clean look, I'm gonna get this one removed. So as I mentioned before, now's a great time to get the rest of your flat tow component set up, including your diode wiring, your breakaway switch, as well as any other components you're gonna be putting in place. As you can see, it's a lot easier to route all of that, make it look pretty. And then we'll come back a little bit later once I have all that installed. And I'll show you how to trim out the fascia to get everything to slide back in place. With my components installed, now we're getting ready to get our fascia put back on. And we're just gonna mock this up because as you probably notice, we are gonna have to trim quite a bit of the grill out for everything to fit. So these upper snaps, if you can kind of get that on there, that's a good start. And we can kind of make sure that these, the side is kind of fitting. But it's not gonna draw in because it's gonna be hitting resistance against our components here. So what I like to do is that resistance will show us roughly where we need to cut. So I have my air fitting here, I know I'll need to cut here. I'm gonna have to cut out enough for our diode wiring as well as our safety chain loops and our arm receptacles. So what I like to do is cut the highest point and then slowly draw it back, and as it hits resistance, cut those off, that way you're only cutting what's necessary. 'Cause I could cut this whole thing but that might ruin the look of it. And as far as cutting, you can use a pair of side cutters. I like my oscillating tool. This really gets it nice and clean. So I'll go through here and start trimming it out as we go. Make sure everything's drawing up nicely. And if we cut it out properly, everything should pretty well go back in its normal spot. So I'll get it trimmed out and show you what I came up with. (tool whirring) I got it trimmed out and got it to draw back. And something that I noticed is off of this, off the base plate here, there is a spot on both sides that really rubs against this plastic. And I really don't want to just start cutting lines here. I was able to get the fascia to snap back on. Now it is gonna be pretty tight I think when getting everything to cinch up, but I do think it will go back together being that I could get the sides to pop in. But again, if worst-case scenario, if we can't get it to draw back, you would just follow this until we get that relief. And that's why having this to mock it up and let the pressure come to dictate what we're cutting really makes it to where it's gonna be a clean cut. So hopefully I don't have to end up cutting this, but overall, everything looks pretty good, you know. For as many cuts as we made, I think this blends it pretty well. And I mean everything's really where it needs to be. Now something I did notice too is when mounting up this six pole, I ended up having to extend it out a little bit. And that's just because these arms are not that long. So when I attach the plug, it puts the wires right against the base plate and really makes it pretty tight. So that's why this sticks out maybe a little bit further than you might expect. And also I have an extra bracket on there. So all of that kind of plays into that sticking out. I don't think that's necessarily a bad thing either. It makes it a little bit easier to gain access to your plug and your maybe potentially airline that you have. So once you're happy with the cuts, if everything fits pretty well together, you can start getting this all put back in the reverse order that we took it off. Things to consider are gonna be all the electrical connections that we unplugged, make sure that you get those plugged back in. And then from there, yeah, take your time, get it all snapped back together, and then you're ready to flat tow your vehicle down the road. And that was a look at installation of the Blue Ox Base Plate on a 2025 Lincoln Nautilus. Hopefully this video was helpful in getting your base plate installed on your Lincoln. With that being said, thanks for joining us.
Customer Satisfaction Score:
98% were satisfied with this product
2% of customers were not satisfied
Ratings & Reviews

Great service

Fast shipping, good price, good product, easy install.
Delivered promptly!
Got package as told
AWESOME THANKS AGAIN!
Info for this part was:
At etrailer we provide the best information available about the products we sell. We take the quality of our information seriously so that you can get the right part the first time.


Thank you! Your comment has been submitted successfully. You should be able to view your question/comment here within a few days.
Error submitting comment. Please try again momentarily.