

")


")

")

")


")


")

")


")

")
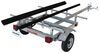
Tired of balancing your kayak on a cooler and a lawn chair to work on it? These padded stands lift your boat to a better height, protect the hull, and fold flat when you're done. Now you can stop worrying about your yak falling off of a DIY rig.
Dragging your kayak onto the driveway to rinse it off works, until your back has something to say about it. This stand lifts your boat to a workable height so you can clean, dry, rig, or repair it without kneeling on pavement or balancing it across lawn chairs.
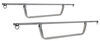
Touring kayaks, rec boats, and sit-on-tops all rest comfortably on these cradles without squeezing or wobbling. Great for cleaning, repairing, or just keeping your kayak off the ground between trips.

California residents: click here
Videos are provided as a guide only. Refer to manufacturer installation instructions and specs for complete information.
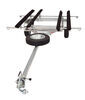
Hi everyone, I'm Evangeline right here at etrailer. Today, we are taking a look at our Malone Horizontal Kayak Rack. This can be used as a storage rack or a work rack where you can just load up your boat to different shape sizes where you. So you have a large canoes or smaller creek kayaks, like what I have here today. You can store it on here, or if you're like me where you drag through rocks pretty often and you need to make repairs, you can do so. This offers a really stable foundation that, with the included rollers, you can also use to just roll around your garage so that you can work on your kayak in the best space possible.
So let's talk about some of its features, and I'll also give you a brief look at how to get this all assembled. I personally love to kayak, but there's some parts of kayaking that I really don't enjoy, like transporting the kayak, storing the kayak, working on the kayak. Pretty much everything that involves kayak not in the water. So having a storage stand or work bench like this is really helpful. For one, if I use this as a storage stand, I don't have to lift the kayak as high up.
If I had a heavy fishing kayak, this would be great. This is about six feet long, so I can carry even the large and heavy boats on here. You have these straps that keep the kayak stored when you have this on here. But let's say I needed to do some work on our keel or the bottom of the kayak. This doesn't have to be strapped down.
We still have a really sturdy and stable fit. If I want to, let's say I don't need to roll this around all the time in the garage, I can always just hit the brakes on the casters and we are locked into place. There are two ways you can store your kayak on this stand. I like to store it this way with a hole facing up because that's usually the area that I need to work on on the kayak. Also, that is a habit that I've developed.
If I was to use a storage stand outside, just that rain water doesn't fill up inside. So we have these foam rollers, they're foam on the inside, and you have your canvas material on the outside, which I think make it easier to just slide the kayak up and over onto the stand. But you have an alternate option. You can switch those rollers out with these foam blocks. (foam block clattering) These are gonna be very similar to the blocks that you'll see on some Malone kayak carriers on top of the vehicle roof. These have an angle to them. Just better support the shape of your kayak or your canoe hole. So if I wanted to work on, let's say, changing out the seat in the kayak, all I need to do is flip the kayak over and install these blocks. The foam block just pushes onto the crossbar. Put both of those in, and then you are good to go and load up your kayak or your canoe. If you're familiar with Malone kayak trailers, which Malone is pretty popular for because they're small, compact trailers, easy way to carry on kayaks. This has a very similar concept. You have this good support for even your heavier kayaks. This makes things so much more maneuverable around your garage or around your shed, but it also doesn't take up too much space and it really isn't that heavy. So if you're willing to go through the process of setting up this stand or this rack, then it may be very helpful for you for getting your kayak a little bit closer to the ground, much easier to store and much easier to work on. And you can see how easy it is to load the kayak up and onto our stand with the hole facing down onto these foam blocks. So, this stand, work bench, whatever you wanna call it, because it does fill different needs, is really straightforward. Once you get it all assembled, you now have a really usable surface for you and for your kayak and canoe. Now, if you're curious about anything, whether it's the specs, like how high or how long does this actually sit, check out our product page. We have all that information right here for you. If you're looking for advice on what is a good fit for you and your kayak, maybe you're looking for a rolling stand like this, maybe you're looking for a more stationary stand because you might have multiple kayaks or a kayak and a paddleboard, we have all that information. I'd love to help you out for your next kayaking adventure for getting the right fit for you. Now, I mentioned the assembly process in this video and some things to keep in mind is it does take a long time the first time, but after that, it's pretty straightforward. You can also customize the stand either with a different foam blocks or foam pads. We can even switch out the casters for a screw-on leveler, which is just a foot that stands steady in case you have a really specific spot you wanna put your kayak on. I'm not gonna install or assemble the whole thing right here on camera, but we will do a little run through for you to help guide you through that process. So if you're curious about that, well, stick around, let's get to it. The instructions we had to put this together could be a little confusing, so let's break it down. The tools I used to put this all together were two 13-millimeter wrenches, and an 18-millimeter wrench to tighten down the casters. And the first thing you want to start with is the base. Your long beams gonna consist of two shorter beams secured together. So you're gonna have triangular collar pieces. So one, two collar pieces will surround those beams, and then you're gonna secure them with one, two, three, four bolts. The bolts will go all the way through both collar pieces. Now, these bolts are gonna be the same bolts that you use through most of this stand, and now you're gonna have two long beams. At each end of the long beam, you're going to see this very obvious spot for your casters or for your feet. This is what you can then secure the caster to. This is what the feet look like. They all just screw in by hand and then even tighten down with your 18-millimeter wrench. You are not going to connect your long beams with your two support beams. They'll actually have a thread on each end, which you can then secure your bolt that came without a nut to it. You're gonna use a 13-millimeter wrench to tighten those down. And then you're gonna start adding your support struts. So this will be a tall beam here with an end cap up top. And then you also have this welded stand on the bottom. So go ahead and secure your two bolts for the end. You're then going to have these corner panels. This will secure to the long beam, one and two, and then they're gonna secure up top with a single bolt. This is when you're also going to use your other 13-millimeter wrenches to tighten these down. Those other bolts are gonna be your regular-sized bolts, but those top bolts are going to be the longer bolt in the package. And there should just be four of those bolts for these top pieces. Once you're done with that, then you're just gonna finish off the installation with your what's technically called crossbars. So the crossbars are gonna go to these top pieces. They're gonna have a thread on the end, just like the support beam did, and then you're gonna attach whichever accessory you need. So, if it's a foam block or it's those foam rollers, those are just gonna fit around those square crossbars on both sides. Once you have it all assembled, that's it. You really shouldn't have to go through that process anymore after this, other than switching out those foam blocks, or attaching or taking off the included straps. You can just store this somewhere in your garage or in your shed. Now, I do understand a lot of people do get confused with getting this put together, so please follow the instructions included with your kit very carefully. If you have any questions, feel free to reach out to us. I wanna make sure that you get the right fit for you. But today, this was a look at the Malone kayak stand, or storage, or work rack here at etrailer.com. My name is Evangeline, I hope you enjoyed this journey.

Info for this part was:
At etrailer we provide the best information available about the products we sell. We take the quality of our information seriously so that you can get the right part the first time. Let us know if anything is missing or if you have any questions.


Thank you! Your comment has been submitted successfully. You should be able to view your question/comment here within a few days.
Error submitting comment. Please try again momentarily.