

Does The Hydrastar Brake Actuator HBA16 Need To Be Bled Manually?
Updated 10/01/2025 | Published 09/30/2025
Products Featured in This Question
Question:
What is the correct way to bleed the hydraulic system on the HSE7K-T1 EOH brake upgrade? I recently had this installed on my Grand Design Solitude 310GK and I am experiencing a delay of over 1 second before the trailer brakes start functioning...not good at all. Can I bleed using a vacuum brake bleeder or do I have to use the Hydrastar hydraulic pump to bleed?
asked by: Victor B
Expert Reply:
Hi Victor!
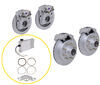
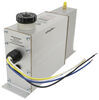
The Hydrastar Disc Brake Kit w/ Actuator for Tandem Axle Trailers - 13" Hub/Rotor - 8 on 6-1/2 - 7K # HSE7K-T1 uses the Hydrastar Electric Over Hydraulic Actuator # HBA16 and used DOT 3 or DOT 4 brake fluid. I have the full manual process listed below, but be aware, it is a process. Do you have someone that can give you a hand if you go this route? It is pretty needed for this one.
That said, you can use a vacuum bleeder if you have one or have access to one. It will make this a much easier experience.
Bleeding Instructions For Hydrastar # HBA16
1. It typically is much easier to bleed the brakes with two people working together or use of a power bleeding device.
2. Special care must be taken to insure that the Hydrastar unit does not run out of brake fluid. Check the fluid level frequently during the bleeding process.
3. Block the wheels on the trailer and towing vehicle.
4. If the trailer is equipped with drum brakes, check that the brake running clearances are properly adjusted consistent with the trailer manufacturer’s recommendations. Even the slightest amount of brake drag will generate heat and will damage the trailer brake system voiding the manufacturer’s warranty.
! CAUTION – Failure to properly adjust the brakes on trailers equipped with drum brakes can result in sluggish operation of the Hydrastar unit. Eye protection should be worn at all times while bleeding the Hydrastar unit and trailer brake system.
5. Remove the dust cap from the bleed screw on the Hydrastar unit and install plastic tubing onto the bleeder
6. Immerse the free end of the plastic tubing in a clean container partially filled with brake fluid.
7. With eye protection on, open the bleeder screw one half turn on the Hydrastar unit. Take care to protect yourself and the trailer from brake fluid expelled from the bleeder.
8. Activate the Hydrastar unit by turning on the ignition switch and pressing on the brake pedal or the manual control on the in-cab controller.
9. Watch the free end of the bleeder hose for air bubbles escaping into the container.
10. Continue to bleed until the fluid becomes clear and free of bubbles.
11. Tighten the bleeder screw, turn off the Hydrastar unit, and remove the plastic tubing from the bleeder screw. Bleeding of the Hydrastar unit is now complete.
12. Install plastic tubing onto the bleeder screw of the wheel cylinder/caliper.
13. Immerse the free end of the plastic tube in a clean container partially filled with brake fluid.
14. With eye protection on, open the bleeder screw one half turn on the wheel cylinder/caliper farthest from the Hydrastar unit. (If towed vehicle has multiple axles, always start with the rear axle first.)
15. Activate the Hydrastar unit. (Turn the ignition switch on and press on the brake pedal.)
16. Watch the free end of the bleeder hose for air bubbles escaping into the clear container. Continue to bleed the wheel cylinder / caliper until the fluid becomes clear and free of bubbles.
! CAUTION – Do not run the Hydrastar unit without adequate brake fluid in the reservoir as it will damage the unit and void the manufacturer’s warranty. Check all bleeder screws to ensure that they are securely closed and do not leak.
17. Tighten the bleeder screw, turn off the Hydrastar unit, and remove plastic tubing from the bleeder screw. Bleeding of the wheel cylinder/caliper is now complete.
18. Refill the Hydrastar unit with brake fluid.
19. Continue the above process (steps 12 through 18) on the next farthest brake away from the Hydrastar unit. Repeat these steps until all the brakes have been bled.
! WARNING – Failure to properly adjust the trailer brakes and to properly fill and bleed the Hydrastar™ unit and brakes may result in sluggish brake performance. This may result in serious or fatal injuries and / or property damage. As a precautionary measure, it is recommended to bleed the brakes a second time after the trailer has been in service for 7 – 10 days. It also recommended to check the temperature of the hubs on a regular basis to insure that the trailer brakes are not dragging.


Product Page this Question was Asked From
Hydrastar Disc Brake Kit w/ Actuator for Tandem Axle Trailers - 13" Hub/Rotor - 8 on 6-1/2 - 7K

- Trailer Brakes
- Disc Brakes
- Marine Grade
- 8 on 6-1/2 Inch
- Hub and Rotor
- 1/2 Inch Studs
- 7000 lbs Axle
- 16 Inch Wheel
- 16-1/2 Inch Wheel
- Hydrastar
more information >

Continue Researching
- Shop: Brake Controller
- Video: Redarc Tow-Pro Liberty Brake Controller Installation - 2017 Cadillac Escalade
- Video: Redarc Tow-Pro Liberty Brake Controller Review RED24FR
- Shop: Redarc Tow-Pro Liberty Brake Controller w/ Custom Harness - Dash Knob - Up to 2 Axles - Proportional
- Shop: Curt Spectrum Brake Controller w/ Plug-In Harness - Dash Mounted Knob - Up to 4 Axles - Proportional
- Shop: Redarc Tow-Pro Liberty Brake Controller w/ Custom Harness - Dash Knob - Up to 2 Axles - Proportional
- Shop: Optronics Fleet LED Trailer Tail Lights w/ Grommets - Stop,Turn,Tail - Submersible - Oval - Qty 2
- Video: HydraStar Marine Electric Over Hydraulic Actuator Installation
- Q&A: Does Hydrastar Actuator Run All The Time When Breakaway Pin is Pulled
- Search Results: track order
- Q&A: Does Hydrastar Electric Over Hydraulic Actuator Draw Power from Breakaway Battery for Normal Braking
- Q&A: Can 171255TB Grease Seal Be Used In Place of 171255TBG on Keystone Hideout 178RB
- Q&A: How to Bleed Trailer Brakes with Electric-Over-Hydraulic Brake Actuator
- Q&A: Troubleshooting Electric Over Hydraulic Braking System that Uses Hydrastar Actuator
- Q&A: Do Hydrastar Electric Over Hydraulic Actuators Run All the Time When Brakes Are Applied
- Q&A: Comparing Hydrastar Electric Over Hydraulic Versus Hydrastar Marine Electric Over Hydraulic Actuator
- Shop: Hydrastar Marine Electric Over Hydraulic Actuator for Disc Brakes - 1,600 psi
Victor B.
10/1/2025
Thanks! I have a vacuum bleeder and just needed to be sure it would work with the HBA16 unit. (My wife of 40 years is very experienced in the 2 person brake bleeding procedure, if it came to that) "Push!...let off...push...let off" ;-)