


How to Bleed Brakes on Trailer Equipped with Titan Model 10 Hydraulic Brake Actuating Coupler
Updated 09/21/2019 | Published 09/20/2019
Question:
I have a titan model 10 surge brakes can you send me some information on bleeding the brakes can they be vacuums bled
asked by: Greg
Expert Reply:
Begin by removing the master cylinder cap and fill the reservoir to three quarters full with DOT-3 brake fluid. DO NOT allow brake fluid to contact painted surfaces since it will damage the finish. Wipe up any spills immediately and wash the area with water.
If you choose to manually bleed the system, an assistant makes the job easier. Manually pull the actuator out to fully extended position. Loosen the four bolts on the breakaway lever. Remove the back two bolts, rotate the two breakaway locks to the side and tighten the front two bolts. Pull the lever forward until nearly vertical and return normal operating position. Repeat this stroking action until the air stops bubbling inside the master cylinder. This pumps brake fluid into the trailer braking system.
When the air bubbling stops inside the master cylinder, install a bleeder hose on the bleeder screw of the first
wheel cylinder or disc brake caliper to be bled. Be sure to use the bleeder screw on top of the caliper. Start
with the rear axle on tandem axle trailers. Submerge the other end of the hose in a glass container of brake
fluid so that air bubbles can be observed. Open the bleeder screw one turn. Pull the breakaway lever
completely forward or vertical and close the bleeder screw to prevent air from being pulled back into the
system. Air trapped in the brake lines will greatly reduce your braking efficiency. Push the breakaway lever
down to nearly flat position. Repeat this process until no more air bubbles are released with each stroke. Be
sure to close the bleeder screw securely.
Repeat the bleeding operation at each wheel cylinder or caliper. During the bleeding process, replenish the brake fluid so the level does not fall below half full level in the master cylinder reservoir. When bleeding is complete, fill the reservoir to within 3/8” of the top. Install the filler cap securely. To reset the breakaway lever, loosen the front two bolts. Position the breakaway lever and rotate the two breakaway locks to their original operating or ready position. Install the two rear bolts and lock washers and tighten all four bolts to 90-120 inch pounds of torque.
The brake can be vacuum bled, and the exact procedure will depend on which bleeder you use. There are many videos on YouTube that would walk you through the process.


Product Page this Question was Asked From
Dexter Zinc-Plated Brake Actuator w/ Drop - Drum - 2-5/16" Ball - Bolt On - 12,500 lbs
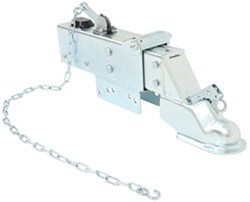

- Brake Actuator
- Surge Brake Actuator
- Boat Trailer
- Construction Trailer
- Farm Trailer
- Travel Trailer
- Utility Trailer
- Bolt-On
- 12500 lbs GTW
- 2-5/16 Inch Ball Coupler
- 3 Inch Channel Tongue
- Drum Brakes
- No Lockout
- Dexter
more information >

Continue Researching
- Search Results: titan model 10 master cylinder
- Search Results: manual reverse lockout ball valve
- Shop: Replacement Solenoid Valve for Dexter Brake Actuators with Reverse Lockouts
- Video: Titan Brake Actuators with Reverse Lockout Replacement Solenoid Valve Installation
- Shop: Replacement Master Cylinder Assembly for Dexter Model 10 and Model 20 Brake Actuators - Disc
- Shop: Kodiak 12" Hub-and-Rotor Assembly - 6 on 5-1/2 - Dacromet - 5,200 lbs to 6,000 lbs
- Shop: Kodiak Disc Brake Caliper - Dacromet - 3,500 lbs to 6,000 lbs
- Video: Review of Dexter Replacement Master Cylinder Assembly Dexter Model 10 20 Disc - T4749501042
- Shop: Kodiak Ceramic Brake Pads - 3,500 lbs to 6,000 lbs
- Shop: Grease Cap Plug for E-Z Lube Grease Caps - Qty 2
- Shop: Replacement Master Cylinder Filler Cap for Dexter Model 60 and Aero 7500 Actuators
- Shop: Trailer Wiring
- Q&A: How to Bend Tab of Brake Pad when Installing New Pads on Trailer
- Q&A: Recommendation for Replacement Master Cylinder With Reverse Lockout
- Video: A Closer Look at the Replacement Master Cylinder Bracket
- Video: Titan Brake Actuator T4748800 Review
- Search Results: 7 round to 5 flat adapter
- Search Results: steel brake line
- Search Results: hydraulic brake lines
- Q&A: Brakes Lock Up After Installing Reverse Lockout Solenoid Valve # T4748800
- Q&A: My Surge Brakes Are Activating When I Back Up My Trailer - What Can I Do?
- Q&A: Why do Tabs on Kodiak Brake Pads # K225CP Need to be Bent
- Video: All You Need to Know About the Kodiak Ceramic Brake Pads
- Video: All About the Kodiak Ceramic Brake Pads
- Search Results: 3/16 brake line
- Search Results: 10" backing plate
- Q&A: How Do I Know If I Have Free-Backing Brakes?
- Video: Review of Dexter Replacement Cylinder Cover Model 10 20 - T1507000
- Q&A: Replacing Hydraulic Drum Brakes on 1991 EZ Loader Boat Trailer