
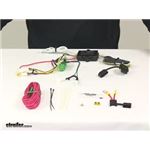
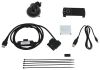
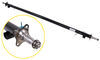
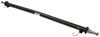
Hopkins Plug-In Simple Vehicle Wiring Harness with 4-Pole Flat Trailer Connector
(12 reviews)
Price: $92.46
Hopkins Plug-In Simple Vehicle Wiring Harness with 4-Pole Flat Trailer Connector
Item # HM11140805
Retail:$124.39
Our Price: $92.46
You Save: 26%
Will this fit?
To see if this custom-fit item will work for you please tell us what vehicle you'll use it with.
Orders above $99 qualify for Free Shipping


- All Info
- Reviews (12)
- Q & A (0)
- Videos (2)
- Photos
Hopkins Custom Fit Vehicle Wiring - HM11140805
- Custom Fit
- Trailer Hitch Wiring
- 4 Flat
- Powered Converter
- Hopkins
Quickly and easily install a 4-way trailer connector on your vehicle with this custom harness. T-connector plugs directly into existing wiring. Powered converter reduces strain on wiring system.
Features:
- Provides a 4-way flat trailer connector at the back of your vehicle to power your trailer's signal lights
- Compatible with 5-pole, 6-pole and 7-pole adapters (sold separately)
- Connects quickly and easily
- Locate connection points in rear cargo area
- Plug in connector
- Run hot lead to car battery
- Includes a tail light converter to ensure that your vehicle's wiring matches that of your trailer
- Powered module connects directly to battery to avoid overloading vehicle's electrical system
- Protective connection terminals resist corrosion
- Comes with dust cap for 4-way flat connector, cable ties, and terminal grease packet for electrical connections
- 90-Day limited warranty
Installation
This custom-fit T-connector plugs into your vehicle's wiring harness, which is located in your rear cargo area on the driver's side and passenger's side. You will have to remove the rear threshold, cargo trays, and some interior paneling to access this harness. Once you've plugged in the connector, run the red hot lead up to your car battery. Connect the included fuse holder, and then connect the fuse holder to the positive terminal on your battery.
Once installation is complete, the 4-way flat connector will be stowed in your rear cargo area.
It is recommended that you use a small amount of grease on all electrical connections - the plugs on your automobile and the 4-pole connector itself - to help prevent corrosion.
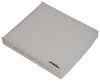
Powered Tail Light Converter
A tail light converter is built into this T-connector. This converter is a battery-powered unit that bypasses the electrical routes that are used by a basic wiring harness. As a result, there is virtually no draw on your tail light circuits.
Because most trailers run on a two-wire system - wherein the brake and turn signals are carried on one wire - the separate brake and turn signals from your vehicle's three-wire system need to be combined so they are compatible with the wiring system of the trailer. This converter combines the brake and turn signal functions of your automobile so that they run on one wire to properly activate your trailer's tail lights. Note: This will not affect how the tail lights on your vehicle operate.
11140805 Plug-in Simple Hopkins T-Connector with 4-Pole Trailer Connector
Installation Details
This Product Fits The Following Vehicles
- 2009 - 2012 Infiniti FX35
- 2013 - 2013 Infiniti FX37
- 2009 - 2013 Infiniti FX50
- 2014 - 2017 Infiniti QX70
- 2014 - 2017 Infiniti QX70
California residents: click here


Video of Hopkins Plug-In Simple Vehicle Wiring Harness with 4-Pole Flat Trailer Connector


Videos are provided as a guide only. Refer to manufacturer installation instructions and specs for complete information.


Video Transcript for Hopkins Plug-In Vehicle Wiring Harness Installation - 2017 Infiniti QX70
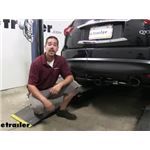
Rob: Rob here at etrailer.com. Today, you're gonna be taking a look at the Hopkins plug-in simple wiring harness with the 4-pole flat trailer connector on our 2017 Infiniti QX 70. Our wiring is designed to stay on the outside of the vehicle whenever we're using it, but it is going to store in the inside. It's going to provide us the 4-pole flat trailer connector, so we can have all the required lights by law to get down the road safely. Like our taillights, our turn signals, and our brake lights.It is going to have a dust cover that's going to be included with the kit, so it's going to keep all that dirt, debris, and moisture out of the connector. However, whenever we're not using it, it's actually going to store inside by the spare tire.We can simply just grab our wire, tuck it underneath the spare tire, and it will be ready for us whenever we do need to use it.
And if we want to drop it down so we can use it, simply just pull it out. Make sure we're on either side of the latch mechanism itself. And the weatherstripping here will provide enough cushion where the wire won't get damaged. And then, we can simply just close the hatch and we can hook up our trailer.As far as the installation goes, we're not going to have to cut or splice any of our factory wires. We're going to have a T-connector that's going to be behind our taillight on each side that's going to give the signals.
And our wiring harness does have a converter box that's going to do two things for us. It's going to take those signals from our taillights, convert it into a working signal for our trailer, but it's also going to prevent any kind of back-feeding or electrical problems on our vehicle. If there was something to happen on the trailer, it's going to prevent it from damaging the electrical system from that back-feeding.We're also going to have a power wire that we're going to run from the converter box all the way to the battery. That's going to make sure that we don't overload the power circuits on our taillights, so we get powered directly from the battery with a fuse holder in place, again, to protect our vehicle.So, whether you're towing a jet ski, a boat trailer, a camper, or even just a utility trailer, our Hopkins wiring is going to be a great way to get those signals to your trailers, so we can be safe and legal. But now that we've seen what our wiring looks like and gone over some of the features, let's get it installed together.To begin our installation, we want to open up our rear hatch.
We're going to open up the cargo door that covers our spare tire and we want to make sure to pull that out. Now, if you have this subwoofer in your car and you want to disconnect it, there's a gray plug you're just going to pull out, and we can pull the whole assembly out. Next, we're going to need to remove the threshold plate. So, if we kind of just grab the edge of it like this, we can pull up slightly. You're just going to want to pull up or releasing the clips.
Kind of work your way across until we can get it to come out and then we'll set it aside.Now, the clips that are being held in the body, these may come out or they might get stuck, and that's all right. Just go ahead and pop them out of the body if they get stuck. You see it's got that little ridge on there You just want to slide it back into position and it'll lock right back into place. If we move to the outside edge right by the door opening of our cargo area, we're going to have a couple of tie-down hooks, one on each side. You want open up the hook. I'm going to grab a flat-blade screwdriver and we're going to pop the cover open and that'll expose the nut that's holding it in place. Then we can grab a 10-millimeter socket and we'll pull it out.We'll pull the entire hook out and we'll set it aside, and we'll remove the one on the other side as well. Now, if we come down by the latch mechanism, underneath where our threshold plate was, we'll have another pushpin holding this tray that our spare tire goes around. Now, the main goal here is so we can get behind this side panel, behind the taillight. So, we're going to loosen this panel up so we have enough room to move this panel to the side. Just want to grab a trim panel tool, you can use a flat-blade screwdriver, whatever you have available. Just come underneath that pushpin so we can lift it up. Come over to this side. Again, just kind of lift it up out of the way and then we're going to start peeling our side panel away from the car, so we can get behind it.There's just some pushpins in there, so you just want to work your way up, so we can loosen them up and eventually get behind there. Now, we really don't have enough room to get our hands in there or so that you can see what we're doing, so we're going to move farther up on our trunk pan where all our floor coverings are, and we're gonna remove these tie-down hooks there towards the front of the vehicle. Now, they're going to work the same way. We'll just flip our tie-down hook up, flip the cover open, and we'll get a 10-millimeter socket and pull it out.And there's going to be one on the other side as well. Now, just to the inside of where those tie-down hooks were, we're going to have a couple of bolts that are holding the straps on for our cover plate. We're going to pull those out, so we can get the cover plate all the way out. So, we'll use a 12-millimeter socket to pull them out.There's going to be one bolt on the left-hand side and one bolt on the right-hand side. And we'll pull out that cover and set it aside. Now, right behind that bolt for our cover, we're gonna have another bolt that's holding this tray in place. We're going to have it, it's just gonna be right here in this little indentation, and it will be on both sides. I'm going to grab a 10-millimeter socket and we'll pull both of those out.Now, we can grab each piece of that cover underneath. Grab the right side and we'll life it up. If you come to the back here, right by the back of the seats, you can actually just grab this cover as well. It's got some pushpins in it. We can pull it out and make it a little bit easier to get that cover out. At the very back of our panel, underneath that cover that was right behind the rear seat, we're going to have one more bolt, and it's gonna be holding down the passenger-side panel. But our driver-side panel is underneath it, so we have to pull it out. So, we'll use that 10-millimeter socket.Now, we should be able to pull the entire panel out. Over on the driver's side, we are going to have to move our wiring for the subwoofer, so you want to be mindful of that when you pull your panel out. So now, at this point, we want to open up that panel that's on the driver's side, and we'll find our taillight wiring, it's going to be really close towards the top right above our taillight in here. We need to disconnect this, so we'll push in on the little tab and pull our connector out. And then grab our new Hopkins harness. We want to grab the end that has the red, yellow, and brown wires on it. Our plugs are going to match up, so we want to take the one we just unplugged, plug it in, make sure it locks in place, and then we'll take the other end and plug it directly into our taillights.With our driver's side plugged in, we're gonna grab the green wire, run it across the back of the threshold here. I always suggest using zip-ties to secure to some factory wiring, and we're going to plug it in the exact same way behind the passenger-side. Now, if we look at our converter box, we're going to have a white wire with a ring terminal. This is going to be our ground wire. If we look down from our taillight, we'll find our factory ground. It's a lot easier to use a factory ground than having to use a self-tightening screw and put extra holes in our car.So, I'm going to use a 10-millimeter socket to pull that bolt out. Slide the bolt around the ring terminal. Now, this one is a little bit tight because it has some teeth on it, but if we can get it started, should be able to throw it in by hand, and get it to go all the way through. If not, you can always use a socket. But if it's still not going through, a quick trick. We'll take our bolt out.And grab a pair of cutters. I'm actually going to cut a notch in there, so it's a C-shape. Now, we can put our bolt back in and we can actually slide our ring terminal around it. That way, it'll still make contact, but we don't have to worry about cramming the bolt through the ring terminal. Whenever you do put your ground back, you want to make sure that you put your factory grounds back in place as well. So, I'm just going to loosely get my bolts started, but make sure I have enough room to slide my ring terminal over it, and then I'll tighten it down using that socket.And we're going to have one more wire coming off our converter box. It will be a red wire with the butt connector pre-installed. You want to grab the length of red wire out of our kit. I'm going to connect it to the other end of our butt connector and crimp it down.Now, this red wire's going to need to run up to the battery, so we need to find a spot either so we can get to the outside of our vehicle and run along the frame, or we can run it along the interior, but then we're going to have to go through the firewall. What I'm going to do is I'm going to route my wires towards the passenger-side, and if we look underneath this module box right here, we're gonna have a grommet that we can easily poke our wire through, then we'll run it along the frame. When you're routing your wire though, you do want to stay away from any heat sources or anything that may potentially damage the wire. So, I'm going to go ahead and run it and then I'll show you how I routed everything. So, my wire dropped out right here from that ground.See it going towards the front of the car, going over all the sub-frames and the rear axle. Came down by my fuel tank, followed it along these factory lines going through the brackets, so it will hold the wire securely. And also using zip-ties where necessary. Follow that around. I'm actually having my wire come following these lines here, but I went ahead and dropped down an air line tube from the top, so I can pull all the slack up into the engine bay by the battery.So, my air line tube I dropped down toward the passenger-side of the motor. Again, you just want to be careful, make sure you don't have it rubbing against anything that'll cause any damage. I'm going to pull all the slack up. We're going to remove the air line tube, and it's not a bad idea to look underneath and make sure you don't have a wad of wire that'll get caught while we're driving.But if we come all the way over to the passenger-side, really close to the firewall, we're gonna have this cover. Lift the two tabs up, pull the cover out of the way, and that will expose our battery. Now, I'm going to look for a way to get this wire inside without having to go over the top to just give it a little bit cleaner appearance and it'll help hide the wire and protect it, rather than trying to go over the top, having the hood and everything else close on it.Went ahead and put a zip-tie right here on this anchor point. That way, I don't have to worry about the wire falling down. And then, I just kind of grabbed here, lifted up on this panel, and it gave me just enough room to sneak the wire in. I want to go ahead and grab our fuse holder. Now, it's already going to have a ring terminal and a butt connector in place. So, I'm going to trim the excess wire off my red wire. It's always a good idea to give yourself a little bit of excess. We'll strip back the end of our wire and we'll crimp on our fuse holder.Grab 10-millimeter socket and I'm going to loosen the nut on top of the positive post to the battery. Now, before we put our ring terminal in place, you want to open up the fuse holder and you want to remove the fuse in there, so we don't have any chances of blowing it. So, remove the fuse, slide our ring terminal over. Then, we can replace the nut.Now, that everything's securely connected, put our fuse holder back in place. Now, we can move back to the back and start reassembling the back hatch. Once you have all your panels back in place, you just want to make sure that you leave your 4-pole wire hanging out by the spare tire. so we have plenty of room to drop it out the back hatch so we can use it. But now, we can take the included dust cover, we'll slide it on to our 4-pole wire on the end of the connector.Now, we need to make sure that all of our circuits are working properly. So, I'm going to go ahead and plug in my 4-pole tester, then I'll run through the lights and verify that they're all working properly. So, if I turn my headlights on, we can see that our taillight function is working, as well as the left turn signal, the right turn signal, and our brakes. All we have left to do now is hook up to our trailer and hit the road.But again, I'm Rob here at etrailer.com and that'll finish up your look at the Hopkins plug-in simple wiring harness with a 4-pole flat trailer connector on our 2017 Infiniti QX 70.
Customer Satisfaction Score:
93% were satisfied with this product
7% of customers were not satisfied
- Package not accepted
- Wrong item was ordered
Customer Reviews
Hopkins Plug-In Simple Vehicle Wiring Harness with 4-Pole Flat Trailer Connector - HM11140805
Average Customer Rating: 4.9 out of 5 stars (12 Customer Reviews)
Quickly and easily install a 4-way trailer connector on your vehicle with this custom harness. T-connector plugs directly into existing wiring. Powered converter reduces strain on wiring system.by: Cornelius01/10/2023
I've installed many many aftermarket accessories over the years. This one was by far the simplest and most clear. I'll be looking for more from etrailer for sure.


by: Jon 09/17/2023
2017 Infiniti QX70
I wish there were more companies run the way yours is. You guys rock.
by: Bruce 03/10/2023
So glad I found this site. Everything including the installation videos and the people that I spoke with are great.
by: Tom G04/14/2019
Everything fit and as described. They could make the power wire longer - I had to take almost all the slack out to reach the battery on my QX-70. They should include double sided sticky pads to attach the power unit as other brands do. I used some I had - it would have been difficult to attach it securely with the Ny-Ties as described in the instructions. Also, be aware the instructions say to leave the flat connector in the trunk and bring it out the hatch and over the bumper when in use. Not very handy if you plan to use a lit hitch cover. There is a grommet on the passenger side of the trunk it will pass through, but you'll need to get an extension to reach back over to the hitch receiver. So, it would be nice if they made the flat connector cord a couple feet longer as well.
by: Robert10/16/2020
2017 Infiniti QX70
Ordered the hitch receiver and the wiring kit. Items were shipped quickly, and between the video online and the directions installation was easy. Great folks, great products and great communication before and after the purchase. Thanks!
by: kevin m03/28/2017
this is the 3rd hitch and wiring package I have purchased from etrailer.
I always call direct and get great service and quick delivery.no need to look anywhere else they have this sh** down....thanks
by: Brian01/17/2018
Product was just what I needed. Installation was easy.
by: William 04/28/2024
by: Reynaldo09/21/2022
by: Changlun08/31/2022
by: Edward 05/08/2021
by: Lisa 04/14/2023
12
12
See what our Experts say about this Hopkins Custom Fit Vehicle Wiring
- Availability of Tester for 4-Pole Trailer ConnectorYou bet we do! You'll need part # F4CT from CR Brophy. If you use the provided link, you can see a demonstration video.
view full answer... - Ground Clearance of Trailer Hitch Receiver for 2017 Infiniti QX70You should not have any issues with the ground clearance with a trailer hitch for your 2017 Infiniti QX70. When we test-fit the Curt Trailer Hitch Receiver # 13554 on this same vehicle, it measured 13 inches from the top of the receiver to the ground, which is about 11 inches from the bottom of the receiver to the ground. That is a fairly standard height so unless you have quite a significant decline, there won't be an issue. Along with the hitch, if you plan on towing with your Infiniti...
view full answer...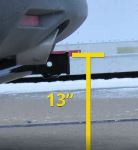
- Parts Needed to Add Brake Controller to 2015 Infiniti QX70It sounds like you're pretty well set up! I'd recommend the Curt Echo wireless brake controller, part # C51180. The Echo communicates wirelessly with your smart phone, allowing you to control and monitor the performance of your trailer brakes from the vehicle cab whiteout needing extensive wiring and drilling any holes in your dashboard. All you'll need to do is install the # HM11140805 and plug the # HM47180 into it. Ground the white tire to the vehicle. The red wire would be extended...
view full answer... - Is Hopkins Trailer Wiring Harness HM11140805 Compatible with Incandescent BulbsHopkins Plug-In Simple Vehicle Wiring Harness with 4-Pole Flat Trailer Connector Item # HM11140805 is indeed compatible with incandescent lights. This harness gets the power for the trailer lights directly from the vehicle battery. I have linked a video review of it for you.
view full answer...
Do you have a question about this Custom Fit Vehicle Wiring?
Info for this part was:

Expert Research:
Mike L

Expert Research:
Michael H

Edited by:
Lindsey S

Video Edited:
Jacob T

Installed by:
Cole B

Written by:
Alexander C

Video by:
Jonathan Y

Test Fit:
Robert C
At etrailer.com we provide the best information available about the products we sell. We take the quality of our information seriously so that you can get the right part the first time. Let us know if anything is missing or if you have any questions.
Product Experts Available Now!
Call 1-800-940-8924
Thank you! Your comment has been submitted successfully. You should be able to view your question/comment here within a few days.
Error submitting comment. Please try again momentarily.