
To see if this custom-fit item will work for you please tell us what vehicle you'll use it with.
Features:
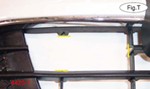
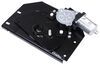
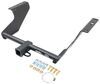
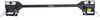
The square drawbars, or front arms, on the crossbar-style base plate kit are simple to mount and remove, easily securing with hitch pins. Once the drawbars have been removed, the remaining brackets are virtually invisible. On most automobiles, the brackets are mounted within the grille, where they remain not only unseen, but protected from scrapes and scuffs as well.

California residents: click here
Videos are provided as a guide only. Refer to manufacturer installation instructions and specs for complete information.
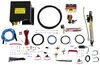
Ryan: Hey everybody. Ryan here at etrailer.com. Today on our 2011 Ford Fusion, we're going to be taking a look at and showing you how to install the Roadmaster crossbar style base plate kit with removable arms. There's going to be six main components needed to flat tow your fusion. You're going to need a base plate diode, wiring, a braking system, a tow bar, safety cables, and a brake light relay. Now, the purpose of our base plate kit is to provide us with a reliable connection point to hook up to our RV, which in turn will allow us to flat tow our Ford down the road.
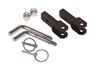
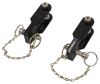
So what I really like about this kit compared to some of the others is that our base plate is not going to come out past our front bumper. That way, it's not going to interfere with our everyday driving. Now as far as our removable arms go, they're going to be very easy to connect and disconnect. Simply slide them in. We're actually going to have a hole here in our base plate.
We'll take our included pin and clip and slide it through and connect our clip on the other side. Our other arm will work the same way. Push it into place and then install your pin and clip.Many of our customers we're really impressed with how well the base plate worked. Now, the installation is a little involved, but it can be done. Speaking of which, let's go ahead and put it on together now.
To begin our installation, we're going to need to pop our hood and remove six plastic fasteners across the front of our fascia. We're going to have two plastic fasteners here right behind our headlight and to get these out, can use a pick or even a small flat head screwdriver. We'll get underneath the head of it and pry that centerpiece upward, and you can work that fastener out.Then we're going to have one here, just past our headlight closer to the center. This is a little bit different. Same idea, though.
I'm using a trim tool. You can use that same flat head though. You get underneath the center, pry up. And if you need to get underneath the base of it, you get it completely out. Now, the other side is set up the same way. So once we get these out, we'll just repeat this process over there.Underneath the front, we're going to have multiple fasteners running along the edge that's attaching our fascia to the plastic splash shield underneath. We're going to need to take those out. I'm going to do that using a seven millimeter socket. We can pull our fender liner down and disconnect our fog light and our side marker light. Now, the fog light on each side, it's going to have a clip just like this. And so what we'll do is kind of pull that towards us and down. And the same thing on the other side, just disconnect it. So those are the clips. And for the side marker light, we're just going to have a tab right here in the center that we'll push down on and at the same time, work it away from the white itself.So now we can go ahead and remove our front fascia. Now, what we're going to do is start on each corner here at the edge of the wheel well and work our way towards the center from each side. What we're going to do is grab the corner of her fascia and just carefully work it away from the car. That's it. Don't want to pop right out. There's going to be some black clips here if you will, so you can kind of get behind with the flathead. Kind of just work them away from our bumper. Just keep working it towards the center. And once you get to about this point, can go ahead on the other side and get it to this point and then we can move to the center to pull it off. We can pull it away from our car and set it off to the side so won't get damaged.Now we're going to remove our shock absorption pad. That's going to be held in with eight clips just like this. There's going to be four on top and four on bottom, directly beneath it. Now, to get it off. We'll start with one corner and you're going to push down on that tab and up on the tab beneath it, and just pull it away from our car. We'll work all the way down using that same technique to take it off.Now, over here on the driver's side by our sub frame, we're going to have some wiring that's attached to it that we need to disconnect from the metal portion, that way we have some room to work. Use a trim panel tool or your flathead and get behind it. Pull it off the sub frame, just kind of scooch it off to the side for him. I went ahead and supported each side of our sub frame right underneath our main bolts here using some pole jacks. Now if you don't happen to have pole jacks, you can just use regular jack stands and a floor jack, but it's very important, you want to make sure to support each side.Now on each side we're going to remove the sub frame hardware. That's going to be a 21 millimeter nut. Now we can put our main receiver brace in place over our sub frame studs that we took the nuts off of each side. But before we do that, and from this point on, any hardware that we're going to be using to secure our base plate to the front of our car, we're going to use some red Loctite on all the threads. We'll put that on each sub frame bolt on each side. Now we can take our base plate and put it on the front of our vehicle and we're going to slide the attachment point on the base plate for our sub frame bolt, and just get our nut hand tight for now, that way we can go over to the other side and do the same thing.Now, with each side started and hand tight, you can go ahead and snug them down. Now, I went ahead and you used a C-clamp here in the middle of our base plate to draw this flat portion of base plate up flat with our bumper beam. That way when we drill, we know everything is lined up correctly. Now I'm going to use a torque wrench to torque down each one of our sub frame nuts and you can find that torque specifications in the instructions.Now with our sub frame bolted in and supported, I went ahead and removed our stands out from underneath it. Now, using our base plate as a template on each side, we're going to drill a hole into our bumper beam to the size specified in our instructions. I found it is a little easier since the bumper beam metal is fairly tough to start with a pilot bit and make a small hole and kind of work our way up in drill bit sizes until we reach our achieved size. Now with the bottom hole completely enlarged, we actually are going to drill a pilot hole up through the top of the bumper beam and then what we're going to do once that small pilot hole's made, we're actually going take our headlight out and drill from the top down. That way, it's a little easier and it'll go a little faster.With our pilot hole made up on the top portion of our bumper beam, we can now take our headlight out. That's going to be held in place by four 10 millimeter bolts and I have one here on the side. Two on the top and one right here closer to the front. We'll just slide our headlight out. There'll be a couple of clips that we need to disconnect. This one here, the brown one. What we're going to do is actually just turn the whole thing a quarter turn like that. And then this one here, we're going to have a clip in the center or a tab rather. Push it down and work it off of the headlight. And we can just set our light off to the side.Now we have room to enlarge our pilot hole, the same size as it is on the bottom. So we're going to use that same method by stepping up our drill bits until we reach that size. With our holes drilled out on each side of our car, we're going to take our hardware and run it up from the bottom to the top. I'll put some Loctite on our bolt, take our bolt, a split lock washer. We'll put that in the bottom up through the bumper beam. Get it to come out the top. Then on this side we're going to attach a threaded plate to the end of our bolt. We'll get both sides started, hands tight like this, and then we can come back and snug them down.With our hardware snug, you can remove the clamp here from the center. And what we're going to do is using this tab in the center as a template just like we did on the sides, we're going to drill a hole through both sides of our bumper beam using the same technique that we used on each side. With all of our hardware in place and snug, we can tighten it down using a torque wrench to the specifications found in the instructions.Now we can trim our plastic shock absorption pad, that way we can put it back over our bumper beam. Now, there is a diagram in the instructions and I went ahead and marked that out, and something I do want to point out is that we're going to need to trim both sides actually. So the top side is very similar to the bottom where we need to trim. I'll start with the top and I'm going to use a Dremel tool to cut this out. However, it is relatively thin plastic, so a pair of tin snips or even a very sharp utility knife could probably get the job done too.Now with our plastic trim, we can go ahead and line it back up and push it back in place. Now, we can reinstall our headlights the opposite way we removed them. Don't forget to put your light back into place. You'll feel it kind of fall down into the housing and you turn it a quarter turn to lock it in. Our connector simply just plugs in. We can slide our light back into place.Now at this point, if you have any other components to install such as wiring or braking system, now would be a perfect time to do those, since our fascia is off the car and we'll have plenty of room to work. If not, you'd simply trim your fascia to the diagram in the instructions and re-install it the opposite order that we removed it. Now we can trim our fascia according to the diagram in our instructions. I went ahead and marked with some white paint, all the areas that we need to cut out. So, more or less, we're going to be cutting out this section here. Now I'm going to use a Dremel tool to do that, however it is plastic so you could use some shears or maybe even a sharp knife.And with our fascia trimmed, we can go ahead and put it back into place in the opposite order that we removed it. Now before you put it all the way on, don't forget to plug back in your electrical connectors. And that'll do it for our look at and our installation of the Roadmaster crossbar style base plate kit on our 2011 Ford Fusion.

deffinetly will use again!
Do you have a question about this Tow Bar Base Plate?
Info for this part was:
At etrailer we provide the best information available about the products we sell. We take the quality of our information seriously so that you can get the right part the first time. Let us know if anything is missing or if you have any questions.


Thank you! Your comment has been submitted successfully. You should be able to view your question/comment here within a few days.
Error submitting comment. Please try again momentarily.