
Part Numbers: TK90160,3050-P
Thank you! Your comment has been submitted successfully. You should be able to view your question/comment here within a few days.
Error submitting comment. Please try again momentarily.

This proportional brake controller has simple controls and a digital display for diagnostic information. Includes 3 boost levels, a slide-bar manual override, built-in battery protection, automatic leveling, and continuous diagnostics.
Features:
Specs:
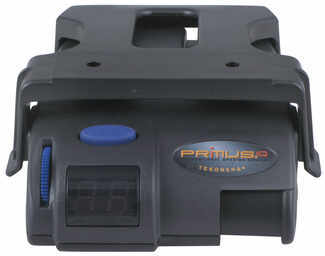
You can adjust the gain (also known as output) with the thumbwheel on the front of the controller. Gain lets you set the maximum amount of power that will be applied to your trailer's brakes. A heavier trailer will need more power to achieve smooth, safe braking, while a lighter trailer will need less. Typically, the gain is only readjusted when you experience changing road conditions or if the weight of your trailer changes.
The boost setting controls the aggressiveness of your trailer's braking, meaning how quickly the brakes reach the maximum braking level. You can adjust this when you're towing heavy loads and you need more umph to bring your trailer to a stop. Your tow vehicle doesn't need that much power to brake in time, but your heavy trailer does.
Depending on the level of boost, your trailer brakes can start at either 13 percent or 25 percent of the set gain. What this means is that, instead of starting at 0, the brakes will start at 25 percent and get to 100 percent sooner. This keeps the trailer from pushing your tow vehicle forward.
If your trailer weighs less than your tow vehicle, no boost is needed. But, if you want your trailer to lead the braking, you can select level B1.
Boost Levels:
| Approximate Gross Trailer Weight | Boost Level | Increase in Initial Power Output |
|---|---|---|
| Less than tow vehicle GVW | B1 | 13% |
| Equal to tow vehicle GVW | B1 or B2 | 13% or 25% |
| Up to 25% more than tow vehicle GVW | B2 or B3* | 25% |
| Up to 40% more than tow vehicle GVW | B3* | 25% |
*Both B2 and B3 offer a 25-percent boost in initial power. But the braking curve for B3 is more aggressive than that of B2. This means that, even though you will start out with the same intensity when using these boost levels, you will get an overall more aggressive braking experience with the higher level. So if you use B3, you will reach maximum braking sooner than if you use B2.
To adjust the boost, use the blue push-button on the top of the Primus IQ.
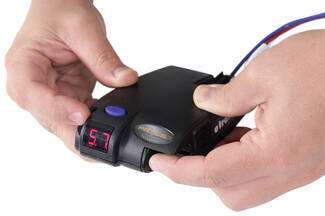
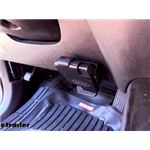
The Tekonsha Primus IQ comes with an easy-to-reach, slide-bar manual override, great for stopping sway or controlling your trailer's momentum in emergencies. To engage the manual override, just push the slide-bar to the left, towards the center of the controller. This will activate the trailer's brakes and brake lights without you having to apply the brakes on your tow vehicle, perfect for limiting trailer movement while you're cruising.
The Primus IQ can mount between -90 degrees and 90 degrees vertically, but the brake controller still needs to be horizontally level and parallel with the direction of travel.
After mounting the Primus IQ unit in your cab using the included bracket, hardwire one end of the included pigtail harness directly into your vehicle. The other end plugs into the brake controller. To remove the IQ for storage when you're not using it, just unplug the unit and slide it out of the bracket. With a replacement wiring harness (sold separately) and replacement bracket (6927 - sold separately), you can even transfer the IQ to another vehicle.
See etrailer.com's exclusive 7- and 4-way brake-control installation kit (ETBC7 - sold separately) if you don't already have a 7-way plug at the back of your vehicle
Note: If a custom brake control wiring adapter is not available for your vehicle, one of the following will be required:

The Tekonsha Primus IQ brake controller comes equipped with proportional braking to give you the best towing experience. Proportional braking means that your trailer brakes mimic your tow vehicle's brakes. If you slam on the brakes in your vehicle, your trailer brakes will activate with the same intensity; if you brake lightly, your trailer brakes lightly too. The trailer's braking is in proportion to your vehicle's braking. This saves wear and tear on the tires and the brakes on both your vehicle and trailer.
The Primus IQ uses an internal inertia sensor to detect how your vehicle is braking so it can send the right amount of braking power to your trailer. It measures the inertia of your tow vehicle and activates the trailer's brakes to slow at the same rate. The result is uniform braking across your towing setup. No push-pull action - just smooth, proportional braking every time.
California residents: click here
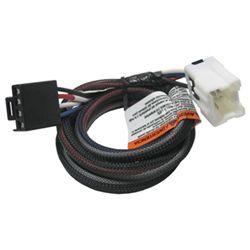
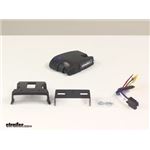
Install your electric brake controller quickly and easily with this custom wiring adapter. Simply plug one end of the adapter into your brake controller and then plug the other end into the junction box beneath your vehicle's dashboard.
Features:
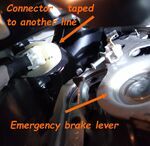
This adapter plugs into the 6-pin connector on your vehicle's built-in brake control wiring harness. Older models will have the harness located underneath the dash, to the left of the steering column, taped to another harness near the emergency brake pedal. Newer models have the harness under the dash, above the gas pedal.
To install your electric brake controller you need to connect the wiring of the controller to your vehicle. Certain manufacturers offer pre-wired options, typically known as tow packages, wherein these wires are run for you from the dash to the trailer connector on the back of your vehicle. Often, a brake controller wiring harness is included with your tow package. This harness plugs into a port beneath your dash and connects to the four wires of the brake controller. If, however, you have a brake controller with a plug in place of the four loose wires, you can use the Tekonsha adapter.
This adapter requires no hardwiring. It is designed to plug directly into your electric brake controller for the simplest installation possible. Because there are no wires to connect, installation is not permanent. You can unplug and remove your brake controller at any time and securely stow it away.
California residents: click here
Average Customer Rating: 4.9 out of 5 stars (3075 Customer Reviews)
This proportional brake controller has simple controls and a digital display for diagnostic information. Includes 3 boost levels, a slide-bar manual override, built-in battery protection, automatic leveling, and continuous diagnostics. Install your electric brake controller quickly and easily with this custom wiring adapter. Simply plug one end of the adapter into your brake controller and then plug the other end into the junction box beneath your vehicle's dashboard.THANKS for the Brake Controller unit from ETrailer. It arrived w/in 5 days from your MO location to my So CAL residence.
Even as an Engineer/Scientist from the Delta IV rocket program and no experience with brake controllers, I was able to install this unit by myself. Your continued (live human) support and online video clips proved to be the key elements to this installation...without my symbolic pocket protector.
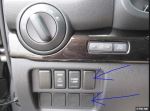
I have attached a few images of the unit, mounted to the fuse-panel cover (3/16 attachments with locking hex nuts) in a 2006 Toyota 4Runner SR5 (with factory tow package). The placement of the unit onto the panel cover allows a new panel cover (no holes drilled) to be used when it is time to sell the vehicle.
Product was delivered on time. Installation vehicle was a 2012 Ford Expedition Limited with factory tow package and was a breeze. I purchased the pre-wired pigtail which fit the Ford connector with no problem. I used the snap-in plastic bracket, mounted on the knee panel as close as possible to the center console. I held the bracket in place using painters tape to check the mounting position before driving in the self tapping screws. Start to finish was less than 10 minutes. I pull a 29' tandem axel travel trailer which comes in around 7,000 lbs and so far, stopping has been smooth and even with no jerking.
I have installed the Tekonsha Primus IQ Brake Controller with the ETBC7 Brake Controller wiring kit on my 1990 Chevy Blazer Scottsdale. Everything that I needed was included and the installation instructions were simple. We will be trying it out for the first time in early November when we are going to rent a small travel trailer. If we like the experience we may buy a travel trailer to go with our brake controller! Before and after pictures attached. Thanks for the quick service and support.
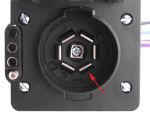
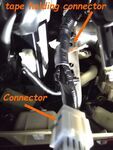
Pictures of the install. Approximately a 20 min job. First picture my finger is pointing to the factory plug with the etrailer supplied harness plugged in. Note the harness did not specify that the white common with the ring terminal should be connected to ground. But then again that SHOULD be obvious. I will be towing this weekend so I will rate the product then. One minor gripe is that there is always power to the unit which is a battery drain (as evidenced with the key out of the ignition and the unit stayed on) Not sure as to the impact but the controller can always be unplugged or removed.
Sorry for the dirty floor mats in the photos.
I purchased the 3050-P quick connect wire harness for the ease of installation.
My 2008 Nissan Titan has the big tow package and I needed an electric brake system.
All I had to do was remove two phillips head screws and the lower dash panel pulls off. Locate the factory brake harness which is taped up at the emergency brake and attach the two together. I routed the harness to the right side of the lower dash because I'm right handed but, there is enough wire to move it to other areas within reason.
I also purchased the pod Pro Series 80500 which serves 1 or 2 axel brake systems. I mounted it to my lower dash on the right side within reach and it plugs right into the wire harness.
I have not had chance to use the new system yet but, am confident that etrailer has sold me a system that will work for me.
installed on a 2009 F-150 everything was as advertised. It was plug and play. My truck had the wire plug behind the dash so was easy to hook up. I installed it in the hole below the coin holder. To reach the pre-wired plug you have to remove the panel anyway. I don't like any wires showing or anything I might hit with my leg. So did not mount it on the lower dash. You have to pull the plastic box out to unplug the connector. So just cut off the back of the box off and run the connector through the hole and connect to the controller. This way you can remove the controller anytime you want. Also you can see the readout much easier then mounting it on the lower dash. See pics
Tekonsha Prodigy P2 Trailer Brake Controller And wiring harness purchased to pull 20’ enclosed trailer on my Infiniti QX 80. Installation was easy and correct the first time. Controller works great. Thank you etrailer
Took me about 10 minutes to install on my 2000 Chevy Silverado. Plug and play.
Excellent quality of materials, fit perfectly fine on our 2018 Infiniti QX-60. Just make sure to take the cap off from the break connector in order to fit the plug and play wire harness. Cap is attached.
Thanks,

Alex S.

8/8/2020
The product has been working flawless.

I've been running the Tekonsha Primus IQ for just over a year now. Very pleased w/ it.
Simple set up & operation. I tow a variety of trailers w/ my '07 2500 HD including dump trailer w/ firewood, car hauler, and enclosed cargo trailer. The weights are anywhere from empty, to 5k. Very easy to adjust as conditions change. I borrowed a trailer from a family member and the controller picked up a short. Come to find out a wire was pinched from ramps being slid in on the underside. The digital screen notified me before loading it up and hitting the road. I would recommend this product.
Installed in my 2014 GMC Acadia in about 30 minutes. Used the GMC plug-in wiring adapter. No problems. Looks like it was made for that location.
Works like a dream on my single axle 3200 lb travel trailer and my 2017 Toyota Tacoma. Like many of the other Tacoma owner reviewers, I mounted my Tekonsha Primus IQ controller in the small cubby to the left of the steering wheel and ran a couple screws up through the lower switch access to mount the bracket hidden inside the dash. Ended up looking like a factory install, exposing just enough of the unit to access the controls and read the display.
Loved this thing on my 4Runner towing our 4,000 pound trailer over 8k miles last summer. Saved us at least twice on the Highway and nice to adjust the sensitivity for city.
This is a great controller, recommended by my trailer manufacturer. I actually don't know too much about it, how it works, etc. But it doesn't require much knowledge to use it. Install it like instructed by etrailer it just works. You can see the number goes up as you apply more pressure on the brake pedal, and the trailer stops with no problem. It's magic.
The only thing I wished they do is to supply a longer length of the thin wire to connect to the break line. For my 2013 CRV, the break line you need to tap into is on the left side of the steering column, if you want to install the break controller on the right side, the wire is a little so short; but you can make it, it's just a little tight. I want to install the break controller to the right side of the steering column because I don't want to accidentally bump into it every time I get in and out of the car. It's a great, the best product though.
It was easy to use this short wiring harness to connect a Tekonsha Prodigy P3 brake controller to the factory installed under-dash connector on our new 2015 Xterra. ALL 2015 Xterras have that under-dash connector, regardless of trim level or model. Previous years may also, just look for the white 6-conductor connector that is taped to a wire bundle under the dash above the right side of the driver footwell (see my photo). The cable was just the right length to make the connection to the brake controller mounted to the plastic panel just up from the hood release tab (see the other photo). Because the brackets supplied with the controller would have placed the controller about an inch from the dash surface, creating a knee-banger situation, I instead use some industrial quality 3M dual-lock fastener (like velcro on steroids) to mount the controller. The controller is securely mounted right up against the dash panel, but is still is removable, if needed.
If you also need a rear 7-way connector harness and the relays that all plug into the factory installed connectors, I highly recommend #118266. It provides everything you will need except for the bracket to mount the 7-way connector to the bottom lip of the rear bumper, see #TM76474.
Installed quickly an easily into my 2009 GMC Sierra 2500HD by wiring up to the factory harness. Be sure to watch the etrailer.com video to see which wires need connected at the fuse box in the engine compartment! (Easy hook-ups, just need to make sure you see which ones get hooked up and where.)
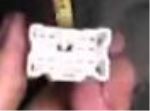
And if you don't use your ash tray, these brake controllers squeeze nicely into the ash tray compartment/recess in the lower part of the dash. Makes a great place to keep most of the controller out of the way and it's easy to install (you will have to create 2x new holes in the plastic detachable controller mounting bracket but its very easy - you can see the mounting screws in the 'new' holes and the old holes go unused as shown in the photo).
Only had a trailer hooked up once, but the controller functioned as designed. I think the 'Boost' function will come in handy if I use a well-loaded trailer and need some additional stopping power from the trailer.
Shipping was great. Stared at it for a couple of days before unpacking. The trailer connector mounting was easy with the holes almost matching the existing holes on my 2013 Toyota Highlander. The first four wires are a snap, they are just plugged into the existing four pin connector. I routed the two wire cable towards the front using ty wraps and improvised L brackets fixed to existing chassis screws.
I mounted the Circuit Breakers on the inside of the left fender making sure there was hood clearance (see photo). Then I hit a snag. There was no easy way to get the brake and 12V power wire to the brake controller inside the car. For grins, I goggled "brake controller video" for my car and came up with a video made by "eTrailer." (Thank you eTrailer) Three things from the video helped me: wire access from inside the car through the firewall, a place to mount the controller and how to locate the brake wire. After the installation I had 18" of two wire cable left over. The install took me about six hours. (I'm 71 and I took my time.)
A couple days later I connected the trailer for a test ride. The brake controller worked like a dream.
Things I liked: Retaining the four wire trailer plug setup next to the seven wire trailer plug. Controller display works but you don't have to look at it. The two wire cable was adequate for the job. Being an Engineer (retired) I worry about things like that.
Thing I didn't like: The mounting plate for the trailer plug is a little weak. A stiffer plate would have been better suited for me. and, oh yeh, somebody else to install it. ;=)
I received the Prodigy 3 brake controller very quick. It was a plug and play. Installation was completed in less than 30 minutes. Etrailer are the best.
Fast delivery and the product was as easy to install as shown in the installation videos on your website.
The controller works good and am quite happy with it.
IT WORKED PERFECTLY. This is my first time to purchase, install, and use a brake controller. Add to top it off, it was my first time to pull a trailer. It was on a Saturday, exactly six days before a scheduled tent-camping trip, when my wife found a good deal on a used pop up camper. The camper was equipped with electric brakes, so it was required to install a brake controller on my SUV. It was Sunday (next day) when I ordered the Tekonsha TK90160, along with the other necessary part numbers #118449, #A0500, #18136, #ETBC7. I was planning to take the parts to a shop to have it installed as soon as I received them. I was hoping I can get them on Tuesday, but UPS dropped it off to the local post office, which caused it to be delivered at 3pm on Wednesday afternoon. The shops that I went to either did not have an installer available, or were all booked for the week. I had to "take courage" and install it myself. I am so thankful that etrailer.com provides extensive videos of reviews, installation, and operation of the products that they sell. I made the connections as shown and hoped for the best. I picked up the camper on Thursday, and was sooo relieved that it worked perfectly. We took off on Friday and the camping trip was a success. We are looking forward to making more good memories with our camper. Thank you etrailer!
Installation was straightforward with help from the online videos. I also installed the ETBC7 universal installation kit. At first I thought etrailer had shorted some parts, but it turns out that the 18140 bracket is sold separately. Had to take back the choice words I uttered under breath. Ended up mounting the provided bracket directly to the hitch with screws which was a little more difficult. As a safety measure--and a little on the overboard side--I also used a dremel to cut a small slit in the center of the provided bracket so I could attach a hose clamp similar to the one in 18140.
Space inside the cab for mounting the brake controller was tight.
Nonetheless, all works fine per my test meter. Don't yet have a trailer to connect, but meter checks out fine.
2011 f150 3.5EB XLT superCrew. Easy plug and play install with the harness I bought also on etrailer, the problem was mounting. I hated the way the supplied mounts looked and didn’t want to bump into it. With some careful measuring and a hacksaw I was able to mount it inside the “plastic cup thingy” that fills the void where the factory controller would be. Attached pictures, the factory plastic cup thingy screws keep it locked in place and the supplies screws let’s you mount the controller into the plastic cup. Looks crooked with the white/silver plastic covering but it is aligned with direction of travel and level, also berey snug and mounted solidly.
Janet was very helpful in answering my questions and helping me select the correct trailer brake controler for my 2007 Nissan Frontier. Didn't need to cut and crimp wires, it was all plug and play. I needed it ASAP and got it in two days. It's good to have customer service in the U.S. and not have to struggle with foreign accents. Thanks etrailer!

Walter
3/6/2023
The controller and cable are still working well, no problems.
Product was correct,fit,on time and simple to install. All the above are very uncommon these days. First time I have used etrailer won't be the last.Thanks.

Don
1/11/2024
Still works great.
Ask the Experts about this Trailer Brake Controller
Do you have a question about this Trailer Brake Controller?


Info for these parts were:
At etrailer.com we provide the best information available about the products we sell. We take the quality of our information seriously so that you can get the right part the first time. Let us know if anything is missing or if you have any questions.


Bill G.
6/4/2018
works perfectly