
# 1
Draw-Tite Max-Frame Trailer Hitch Receiver - Custom Fit - Class III - 2"
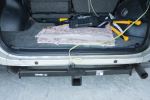
Like many other reviews state, the holes did not all line up with my vehicle. (see photo) I had to attempt to install and remove the hitch three times, using a hydraulic jack and some 2x4’s to spread attachment points apart about half an inch to get all the holes to finally line up. It would seem they just slap these together and throw them out the door with zero quality control.
Bought this to tow a 2990 LB GVWR trailer behind our 2018 Rav4 Adventure. It does it’s job by far with ease. Took 20 minutes to install the hitch on the car, a few hours to run the wiring kit (tricky going through the firewall with the power wire) I would recommend this product!
# 2
Draw-Tite Max-Frame Trailer Hitch Receiver - Custom Fit - Class III - 2"
I just finished installing 76134 Hitch on a 2018 Toyota RAV4 LE Hybrid. I really appreciated the video (red 2017 Toyota RAV4 LE) and other comments. That guy in the video is impressive. I had three differences from the video 1st) The tie down bracket required my torque wrench to loosen. It was on there and my drill would not cut it. 2nd) The keyless entry antenna was in the way. It is right under the bumper on the passenger side middle. The instructions talk about it but the video doesn't. Maybe some cars don't have it. Either way I removed it with a 10mm wrench. I also removed the bracket that attaches to it and when I was done reattached it with tie downs provided and according to the instructions. I did not have to remove the bumper fascia See photos. 3rd) The largest trim panel on the driver side, I had to trim a touch more than in the video to get it to fit. Overall I'm thrilled with this product and the look.
This Draw Tite for the Rav4 (mine is 2018 without auto/foot-operated hatch) is a really nice product. However, the instructions are all wrong. You basically have to remove the entire bumper and the other body parts described in the instructions. You also have to relocate a sensor not described in the instructions. Once you get past that, it's a nice looking installation; very low profile and unobtrusive.
# 3
Draw-Tite Max-Frame Trailer Hitch Receiver - Custom Fit - Class III - 2"
So far, so very good! I bought this for a 2004 Toyota Rav4. My 21 year old F-350 is rusting away and I wanted an alternate means for occasional, light duty hauling. The hitch receiver arrived on time and was carefully packaged for shipment. Metal is hefty. Joints and welds look good. Had I unwrapped it before installation, I would have found the M12-1.25 bolts and studded washers which were stuffed inside the receiver proper. I also bought the wiring harness. I'm a newbie and was rather anxious about prying the plastic body panels open for wire routing. Careful review of the video accompanying the written installation instructions suggested starting at the top and working down. It was straightforward. Only glitch was that the wire bridging the driver and passenger sides was too tight for comfort. I spliced in an additional 8" and the system was working minutes later. About an hour, altogether. If I do it again, it'll be 30 minutes or less If you are considering an installation, please do review the instructions and video linked from the product page.
Good price, fast shipping and fit my 2005 rav4 like original equipment. And only took about 15 easy minutes to install
# 4
Draw-Tite Trailer Hitch Receiver - Custom Fit - Class II - 1-1/4"
My order was received complete and on time. My only problem was with the installation instructions. They were a little deficient. The instructions referred me to a website, but those instructions were basically the same as the printed instructions. Fortunately, there was an install video by etrailer on how to install a Drawtite trailer hitch on a 2018 RAV4 that was excellent.
The hitch was appreciated by my son for his Rav4. I was worried when notified it would be over 5 weeks to receive, but etrailer offered to change the order to receive it earlier. The sales people were kind and sympathetic concerning the order. It did come earlier than expected and everything was as promised.
# 5
Draw-Tite Trailer Hitch Receiver - Custom Fit - Class II - 1-1/4"
Pricing is good, shipping is fast. Manfacturing quality could be better - chain loops welded on crooked - visible to the eye (ongoing issue with Draw-Tite as I've had this on others from them). Packing is poor - ends/attach points poking through the box and scratched up. I've order a few receivers here - always the case. Plan on doing some touch-up painting before installation.
Well built and fits great on my 22' Rav4. Only complaint is the paint quality. Not sure if they used any primer, as some of the paint came off during shipping. Then some more came off where I rested the hitch on a jack to lift it into place when installing. I had to apply primer/paint to the bare metal to prevent rusting in the future.
# 6
Draw-Tite Max-Frame Trailer Hitch Receiver - Custom Fit - Class III - 2"
This review is a little about the hitch, but more about the installation process in hopes of helping others and saving them some additional money. First of all, we bought two hitches: 1) 2004 Toyota Sienna = Draw-Tite Max-Frame Trailer Hitch Receiver - Custom Fit - Class III - 2" - Item # 75237 and 2) 2007 Toyota Rav4 = Draw-Tite Max-Frame Trailer Hitch Receiver - Custom Fit - Class III - 2" Item # 75235. Both frames arrived in excellent condition despite one of the boxes being damaged in shipping. They are obviously well built and meant to fit the specified vehicles. etrailer.com understands how to match vehicles and hitches. Both hitches fit perfectly and no alterations were needed for the hitches. We just finished installing them yesterday and look forward to using them with our new bike rack. Installation hints: 1) Make sure you have everything (tools, lubricant, brush, etc) ready and organized before you try to install your hitch. In my case, I was missing some tools I thought were in the garage and had to make other arrangements. The installation time in the etrailer videos (extremely helpful) is only accurate if you have everything prepped and you don't have any problems with the weldnuts (see #2 below). The actual installation is surprisingly straightforward and could be completed in close to the estimated time. One item you will need, that you might not have, is a torque wrench. Here's the first money saving tip, check with your local auto parts store, to see if they participate in a tool loaner program. Basically, you pick up the tool from their store and pay a deposit (which is the price of the tool), use it, return it, and get your deposit back. While many guys are looking for excuses to buy more tools, I opted to borrow a torque wrench as I don't see myself needing one in the future. If I do, I know where to borrow one :) 2) If your vehicles are a bit older, or if your vehicles operate in wet or snowy areas, there's a very good chance the vehicle weldnuts (threaded inserts - this is where the bolts will thread into) will have dirt, grime, and rust built up in the inserts. I strongly recommend taking the time to make sure your bolts will go into the weldnuts before you mess with the hitch installation. The weldnuts on our 2007 Rav4 were in great shape and only required me to spray in some lubricant (Sea Foam Deep Creep) and clean out with a wire tube brush (Nylon Tube Brush - 1/2" Item # 814092 etrailer.com). If I hadn't done this simple step, I wouldn't have been able to get the bolts to thread. Once I did this, the install was simple. I didn't spent much time doing this. Our 2004 Sienna was a different story. Besides being 3 years older, it also came from an area with more snow and they likely salted/treated the roads which contributed to the problem. Using the lubricant and brushing out several times was not sufficient to get the weldnuts clean enough. The good folks at the local auto parts store listened to the description of the issue I was facing in this installation project. The gentleman helping me said something like, "It sounds like you need to chase the threads to clean them out. We have a thread restorer kit in our tool loaner program." (see two screen shots from their website). I knew what a tap was, but hadn't heard of a thread chaser. I was able to use the thread chaser to clean out all of the junk built up in the weldnuts. In my case, this was a major project as they were in bad shape. I was also being cautious as I didn't want to mess up the threads. Some of the weldnuts required me to go part way in with the thread chaser, bring it out and clean it, relubricate the weldnut and chaser and go again several times. Some of the weldnuts were less problematic. In short, if you run into this issue, see if you can borrow this kit. The thread chaser is designed to be used with a socket and socket wrench. Always start the thread chaser by hand to ensure it isn't cross threaded. Once you're certain it's in the correct way, start slowly with the socket wrench or a drill with socket adapter. The instructions that come with your hitch will provide the specs on the bolts. In our case it the bolts were M12 x 1.25 (I think M12 has to do with the diameter of the bolt and 1.25 refers to the thread pitch (or spacing). 3) Torquing the bolts to spec. The bolts are in an awkward place to work with and torquing them to specification can be a challenge. The Rav4 process went well and I was able to complete this step on my own. Perhaps I was worn out while working on the Sienna or having trouble with the torque wrench, but I finally gave up to seek help. I didn't want to break the bolts! I ended up stopping by the shop which services our vehicles and they torqued to bolts to spec. Because we take our vehicles there on a regular basis, they didn't charge me to take care of the 6 bolts. In conclusion, if you prepare for the install by getting everything ready and your weldnuts are in good shape, this is not a difficult installation project. One of our hitches had 6 bolts and one had 5 bolts. Not rocket science. If your weldnuts are full of junk, try the steps I've mentioned above. Good luck.
I purchased this hitch for my wife's 2016 Toyota Sienna. I chose this particular model because the reviews said that it had the most clearance. Once installed, it is even with most of the mechanicals on the bottom of the vehicle. While it doesn't reduce your ground clearance, it could easily have been designed to sit an inch or so higher. However, because it isn't flush against the vehicle, I was able to get the plastic trim piece back on the van with very little trimming. I suspect that there must be fairly significant differences on the rear pan as some of the reviews indicate they couldn't reuse the trim piece and the instructions show cutting away most of the plastic. Either the rear pan for the cargo area was slightly smaller on previous year's models or the one I received had been dropped and the mounting flanges bent towards each other. Though there was no visible damage. The mounting flanges were about 1/4" to 1/2" to narrow for the 2016. Because of this, what should have been a 1 hour job turned in to a 4 hour job. Having to convince the mounting flanges in to place caused more than significant issues. I marked the product down for this reason. I've never had an issue like this with items from etrailer so I'm guessing the Toyota engineers must have made small, but troublesome size changes on the 2016.
# 7
Draw-Tite Max-Frame Trailer Hitch Receiver - Custom Fit - Class III - 2"
This receiver hitch is heavy duty and very well made. The welds are all smooth and uniform, and the powder coating was great. The bolts and mounting hardware were shipped safely in a sealed plastic bag tucked inside the receiver tube. Install on my Nissan Truck was easy. I would recommend running the threads on the truck frame before attempting to bolt the receiver hitch in place as the factory bolt holes can get filled with dirt and grime.
Excellent fit and finish. Welds are great. Bolted right up - super easy with no problems - I bet it took only 20 minutes to install it to my 22 Frontier, using only a floor jack to support out and a 19mm socket. Shipping was super fast, 2 days. Both the product and etrailer are highly recommended.
# 8
Draw-Tite Sportframe Trailer Hitch Receiver - Custom Fit - Class I - 1-1/4"
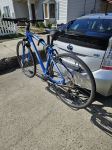
My son-in-law and I installed this hitch on a 2012 Toyota Prius V. The video for the install on a Prius is accurate for a Prius V with the exception that a Prius V does not have cosmetic cowling on the underbody that has to be removed. The install was straightforward and we had the hitch on in about 45 minutes. Other than the receiver on the hitch, you can't see the hitch without bending down and looking under the bumper. I personally like the aesthetics. We're using the hitch with the Swagman XTC-2 bike carrier and the combination is ideal for transporting our two bicycles. The fit between the hitch and bike carrier is tight and the Swagman allows us to drop the middle bar down for access to open the rear hatch of the vehicle when the bikes are not in the carrier but leaving the bike carrier attached. We bought the Prius V so we could carry passengers, gear and two bicycles on trips. The draw-tite hitch and Swagman XTC-2 give us the flexibility to do that. Here's some pictures to demonstrate as I've had a difficult time finding photos on the web showing a Prius V with hitch and bicycle carrier installed. I have a cover on the hitch receiver in some photos, sorry I took the photos at night with a flash, but hey, I did the review! Good luck. Oh, by the way, like others have written, E Trailer was on top of things from the get go and I received numerous e-mails about the status of my order and follow-up after my receipt. Only took three business days between the date of my order and delivery to my home. The hitch and bike carrier were boxed and then inserted into another heavy duty shipping box. There were a few small tears in the outer box (assume from rough handling by the delivery carrier) but the contents were not damaged in any way. I would definitely order again from etrailer.com.
Perfect fit and super simple installation (45 mins from opening box to torquing last bolt). Perfect for my bike rack and other attachments. Incredibly secure!Bought from etrailer 3x never dissapointed ?? Excellent instructions + customer service
# 9
Draw-Tite Max-Frame Trailer Hitch Receiver - Custom Fit - Class III - 2"
 Toyota RAV4
Trailer hitch "after installation" is fine. It was a BEAR to install; though no fault of Draw- Tite or etrailer. The problem was Honda, almost like they didn't want you to install a 3rd party trailer hitch. First there were no captive nuts inside the frame; so it was necessary to fish bolts through with the provided spring wires. And after the bolts were fished through there was nothing to keep the bolts from being pushed back into the frame by the trailer hitch. (I installed trailer hitches on prior models of CRV and RAV4, and both had captive nuts in the frame.) Then after I got the latest trailer hitch bolted into place; I couldn't the exhaust hanger band back on the pegs. Finally had to get help from someone I knew at a body shop. And then it took them 20 minutes.
Just what I needed for a plug-in bike carrier and to tow both small utility and sailboat trailers. It was an easy install with the provided directions being spot on! My second go round with an etrailer hitch - they do not disappoint!!
# 10
Draw-Tite Max-Frame Trailer Hitch Receiver - Custom Fit - Class III - 2"
We are very happy with this hitch! After purchasing a few tools (and borrowing one from our neighbor) we got it put on in about 1 1/2 hours. Works great, fabulous quality, and nice company to work with!
Subaru ForesterEasy installation on Subaru Forester, installed two similar to this on an Outback and Ascent. Instructions were great!
# 11
Draw-Tite Sportframe Trailer Hitch Receiver - Custom Fit - Class I - 1-1/4"
This was easy to install, and unlike others it does not require a strap up to the hatch. It is used for a hitch hauler, so I need to use an adapter from the 1-1/4" to a 2" receiver. I suggest getting an adapter with a slight rise, as my carrier can scrape a curb going up a driveway. Sadly, etrailer only carries one with a 5" rise and I wanted a short 2" rise so my bins would stay below the tailights and window ledge.
Exactly as promised. It went on without a hitch (no pun intended). Ford Focus ‘15 install. I put it on alone so below look at the picture of my hack to hold it in place while I set the first couple bolts. I set the whole thing on concrete block and it wants to tip down toward the front of the car, so I just held it in place with a little extension cord that was in reach pulling down on the back of the hitch. Start to finish it took about an hour maybe an hour and a half but some of that was waiting for the paint to dry on the little bit of the frame that you have to grind down. I thought it would be better to cover the raw metal with some spray paint. I ordered the thing on Monday and it was here on a Wednesday so I’m pretty pleased with the service, the price and the product. Great company, I will order from them again (in fact I just did)
# 12
Draw-Tite Max-Frame Trailer Hitch Receiver - Custom Fit - Class III - 2"
Toyota RAV4I needed a good hitch for my Kuat bike rack and eTrailer made it easy to find and order a compatible one for my new vehicle. (2019 Toyota Rav4) I have installed hitches myself before and this specific installation was the easiest. I was initially worried about needing to drop the muffler per the instructions but following a few other reviews, I saw that wasn't necessary and I ended up being able to install it w/o dropping the muffler. Saved me time and hassle. After a year of use, she is still going strong and getting me out to where I'm going. Thank you etrailer for always supplying top-of-the-line products to us.
this trailer hitch was very easy to install. my husband and i easily installed it together onto our 2008 chevy equinox. the hitch is made very well. i attached my kuat bike rack to it, and it is very solid.


What our customers are saying:
"Great service- ordered hitch, $50.00 cheaper than local store & arrived in a week. Hitch fit perfect & took about 20 minutes to install- saved about $150.00 on parts & labor doing it this way. Great experience- highly recommended."