
# 1
Swagman XC2 Bike Rack for 2 bikes - 1-1/4" and 2" Hitches - Frame Mount
Very easy installation. Used with 1-1/4" hitch. Good quality product. Would recommend to others!
Went together very easy and very stable I hope it last many years
# 2
Swagman XTC2 Bike Rack for 2 Bikes - 1-1/4" and 2" Hitches - Frame Mount
it fits my needs. i would of went with the one that locks and didn't have the pins for holding it in place but i needed it to fold up like this one for storage reasons. used it for the first time and it was fine on the back of my truck no problems at all. i'd like to add nicole on the phone was great she went through all of the racks to get the right one for me thank you.
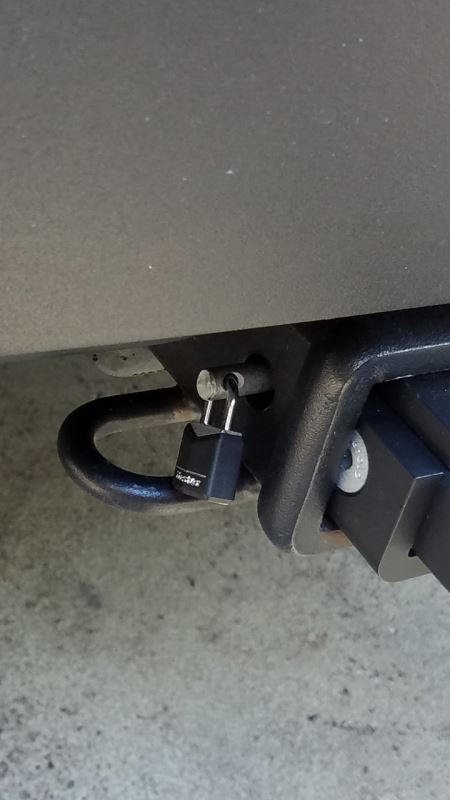
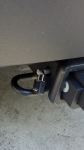
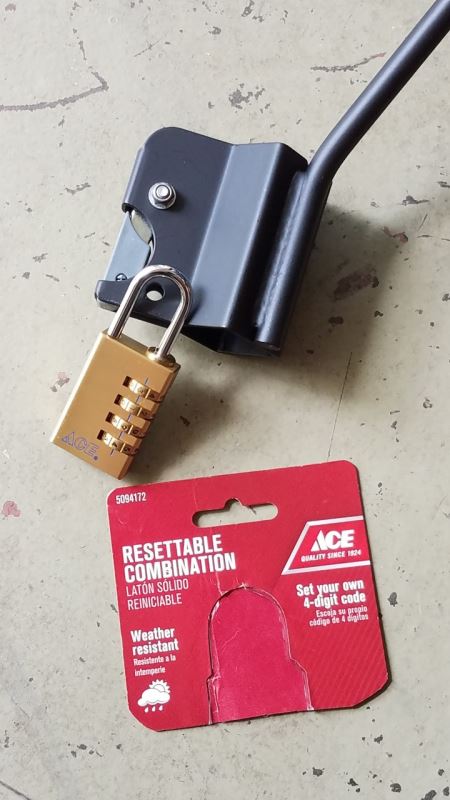
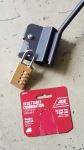
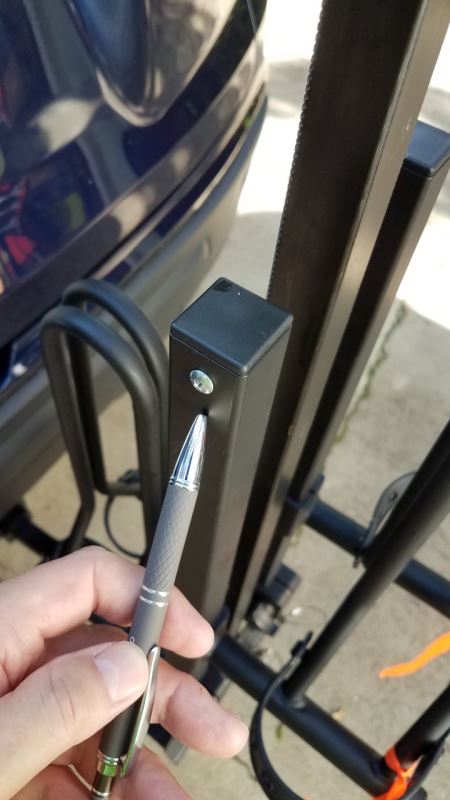
First-time rack buyer / owner / installer. The rack arrived in a timely fashion, maybe a day or 2 ahead of schedule. It was well packaged. I’m LOVING this bike rack. It was easy to put together and to mount on my new Honda Passport. Thus far, no squeaks in my 2” receiver. Hardest part of initial set-up is figuring out the best way to position two bikes. Trial & error and some patience. The directions weren’t clear as to where the 2 left-over screws went. I found the answer in another review and have posted a pic in case others have the same problem (photo with pen pointing at screw). These screws go in the underneath side of both of the folding arms. They appear to keep the wheel wells from sliding off in case in you drive with an empty, un-folded rack, and forgot to tighten down the wheel wells. The folding arm push / pull pins can be difficult at times. I coated the tips with some lube. That and a little jiggling seems to solve that issue. I guess it’s better for the pins to be snug vs popping right out. I added a small Master lock to the hitch pin (in lieu of the provided cotter pin) as a theft deterrent. I read that a 3/16 shackle lock will fit into the bike clamp down arms to also act as a deterrent. I had an old 3/16 lock that did snugly fit and appeared to be locked. HOWEVER, I yanked on the lock and it came open as there isn’t quite enough clearance for the shackle to lock. I discovered that longer 3/16 shackle locks are hard to find. Have attached a photo of the lock that actually fits and works (Ace Hardware). One lock on the upper clamp down arm will secure both arms as the lower arm can’t be removed without removing the upper arm. The clamp down arms appear to be coated to prevent damage to your bike. I’ve tried a simple rag and ultimately settled on pool noodle pieces as a precautionary measure. I CAN NOT open my tailgate (regardless of whether or not the rack is fold up and in the bike carry position). If that’s a concern for you, then spring for the more costly titling version. My back-up camera still functions.
# 3
Thule Hitching Post Pro Bike Rack for 4 Bikes - 1-1/4" and 2" Hitches
The good: I like the way the bikes are held in and the ability to add the upright adapters to the bike frame holders. The straps are quality too. For a jeep with a spare tire, this is the perfect length to clear it. This rack is 5 stars from the bike holders to the base of it. The bad: the 2"receiver adapter and bolt are insufficient. I wish they made this in a solid 2" hitch. The entire setup is held into the receiver by a very short bolt. It only goes about half way into the receiver tube. So your hitch is only "secured" on one side. A hitch pin or bolt should go through the receiver tube completely imo so it can be secured on the other end with a retaining clip or nut. Because this only goes in the one side, the entire weight of the rack plus bikes are held tight to one side of the receiver by the undersized bolt and washer. A few bumps down the road and that bolt loosens. Now instead of distibuting the weight of the rack and bikes on the receiver and post, it's completely up to the bolt to keep you from losing the rack. The bolt threads get damaged too. I took this down a dirt road and nearly lost everything. I had to buy my own bolt with hd fender washers and lock washers to correct this. Thule should've provided this from the start. The current short bolt design where only one side of the receiver secures the rack is unacceptable. This rack is 1 star at best for the connection to the receiver.
Hitch pin broke before I got it. Looks like a poor design for the locking pin, they might want to consider a different design. I got a 3/8 shear pin from Home Depot to replace and it works great. Bike rack is great!
# 4
Thule Passage 3 Bike Carrier - Trunk Mount
 2003 Chevrolet Impala
Does support heavy(electric bikes), but not convienent to use. The major problem is feeding the straps through the tire support and frame, the strap does not stay straight in our Florida weather and you will not be able to get all six without a problem and excess time in the heat. I now tape the end to a coffee stirrer to pull it through the narrow slot, it works but is an extra time consuming step. It is almost impossible for an average person to use alone. Does the job, I've since seen more consumer friendly racks.
2012 Chevrolet ImpalaI have used the product many times. It mounts easily to my vehicle (2012 Chevy Impala). I have put two bicycles on the rack many times. It can be a slight challenge to get a female bicycle on, you have to use different mounting locations. Very easy with male bicycles. Never any issues or concerns, the bicycles stayed well mounted, even when traveling on the highways. I recommend this product.
# 5
Hollywood Racks Express 3 Bike Carrier - Fixed Arms - Trunk Mount
Wow this product is great out of the box. Easy to put on the car. Well worth the price.
Installation was straightforward. The rack sits high up on my 2016 Subaru Forester so lifting bikes onto the rack requires effort. Getting 3 mountain bikes on the rack was a bit tricky. When loaded rack was secure and stable.
# 6
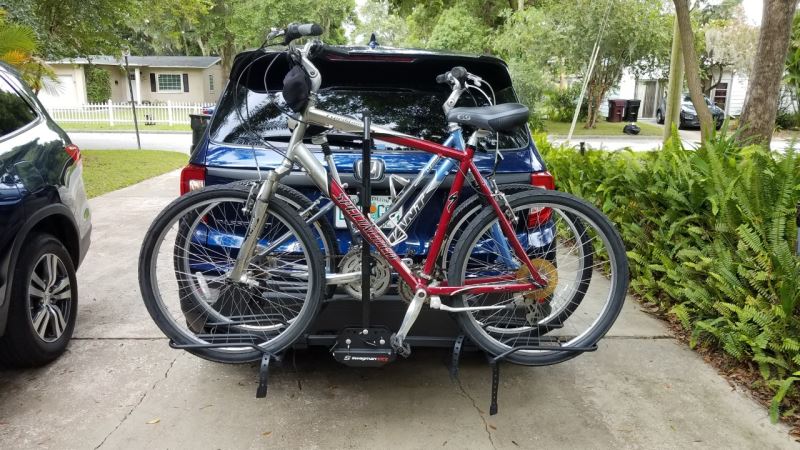
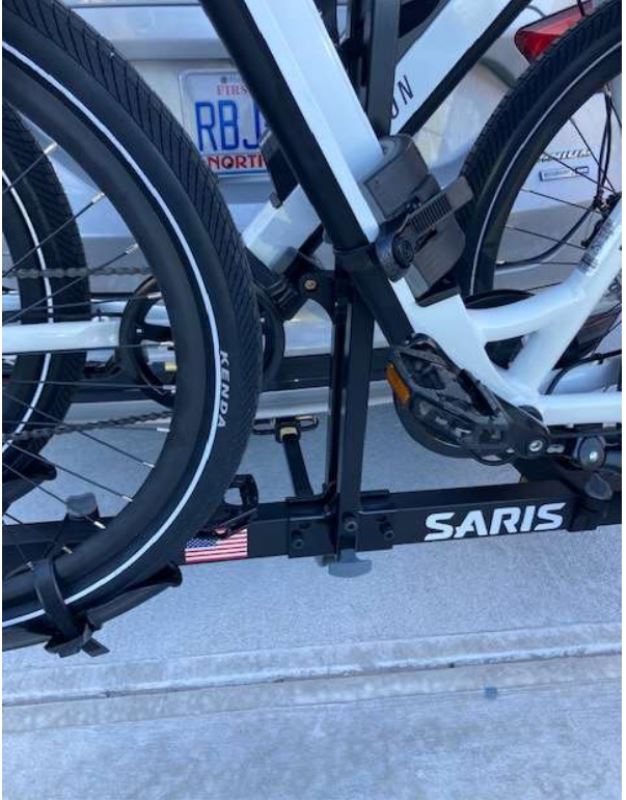
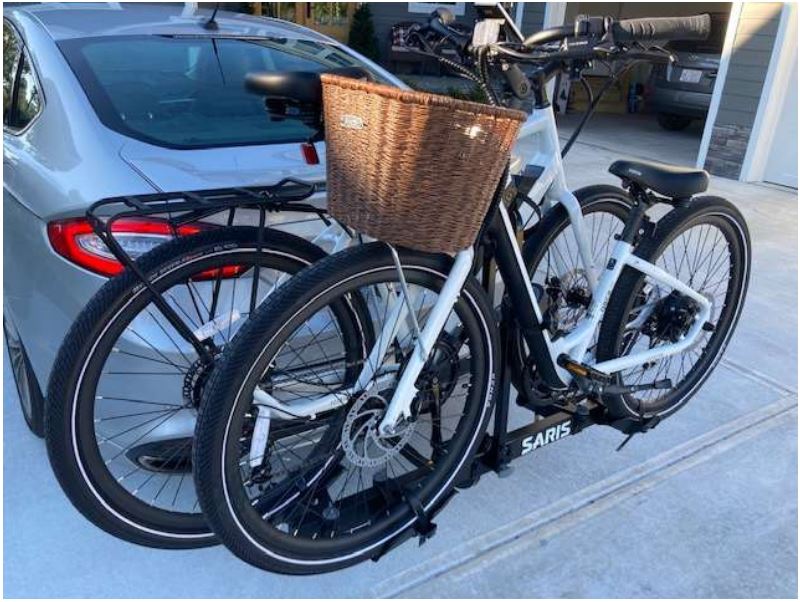
Saris Freedom Bike Rack for 2 Bikes - 1-1/4" and 2" Hitches - Frame Mount
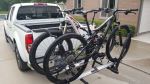
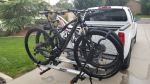
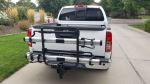
I had to put my electric bikes into this rack, backwards, to make them fit. Not ideal, but it works.The receiving 'trays' that are intended to provide support for holding the bikes, by being placed under the bike tires, are forced to be moved to a location that is not directly under the bottom of the bike tires. While it works in this manner, it is not ideal.For the support that attaches to the diagonal bike frame, we had to remove it from the vertical rail of the rack. We reinstalled it, upside down, because that's the only way we could make it fit, or 'grab', the bike frame. Again, we made it work, but it's not ideal. We chose to keep the rack because it was so much less expensive than the Thule rack we considered buying. The bike shop owner didn't agree with us. He observed that we are putting $3000 worth of bikes on the rack and risking that investment. So far, no problems, other than the ill-fitting installation.
With a few adjustments this rack has delivered. Needed to add additional strapping since the provide straps for securing the bikes to center bar were not long enough due to my ebike design (Velotric). My bikes are step through with a thick frame so provided straps won't fit. Simple adjustment with strapping resolved minor issue. Speed of 73 mph on the highway and some bumpy VT roads and this rack performed.
# 7
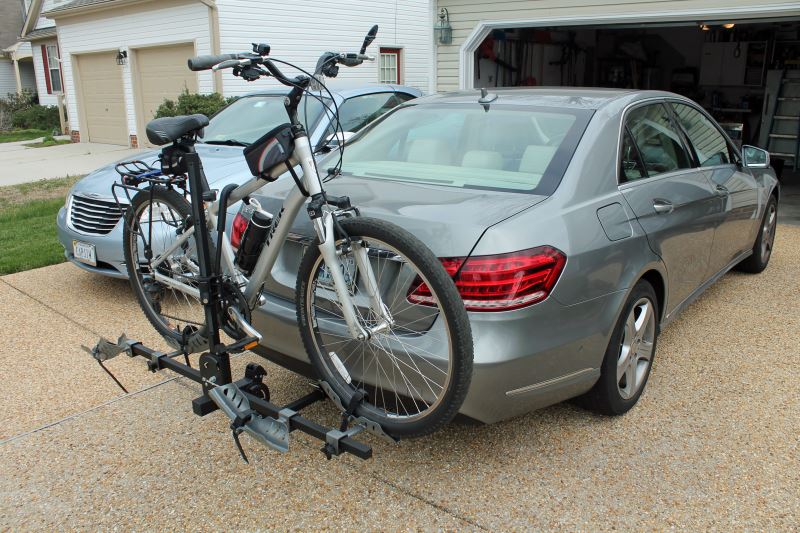
Swagman Chinook Bike Rack for 2 Bikes - 1-1/4" and 2" Hitches - Frame Mount
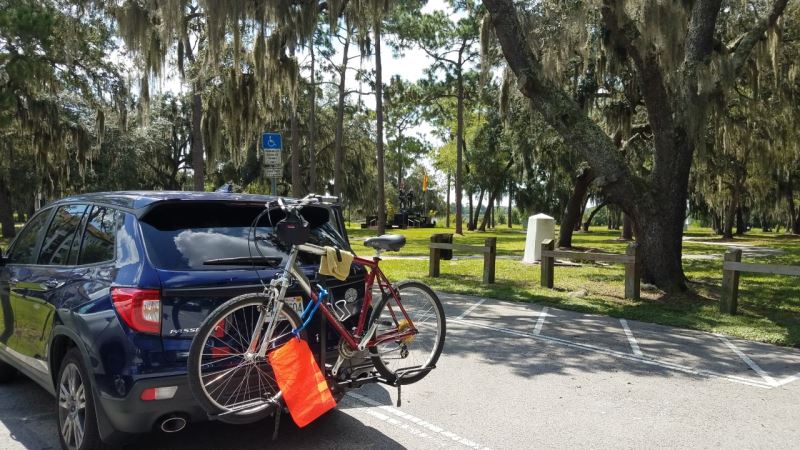
Truly grooving on my wife's new Swagman Chinook bike rack. She wanted to be able to transport her nice road bike easily without throwing it in the back of her car, and since a roof rack is out of the question, this Swagman model fit the bill perfectly. It arrived quickly on the anticipated date. Kudos to etrailer.com for the email updates to keep me informed of my purchase. Within one hour, it was installed on my wife's 2014 Mazda3 hatchback. The Swagman is heavy and solid, which is reassuring as it makes me feel confident that it will keep the bikes secure. It also makes me feel like I got my money's worth. A ratchet wrench and Phillip's head screwdriver were the only tools required for the easy install. I did my research before purchasing the Chinook model as I was also eyeballing a very similar Thule rack that was slightly more expensive. I spoke with an etrailer.com expert who gave me the lowdown on both models. Ultimately, the Swagman won out because it has a smaller 'footprint' while extended or folded up ... and also can tilt away from the car for easy access to the hatchback area. Very convenient! FYI: Mazda doesn't make a trailer hitch for the Mazda3 as it's a small car with a small engine and has no business towing anything. Thankfully, the Curt company makes an aftermarket frame and trailer hitch that fits the Mazda3 hatchback perfectly with no drilling. Stupidly, I purchased it from another online company thinking I was getting a good deal. Turns out etrailer.com had it for less with FREE shipping. Oh well ... live and learn. Now I know that etrailer.com is one-stop shopping for bike racks AND trailer hitches. (Full disclosure: I had the garage down the street install the frame as it's easier with a lift) Only snafu: the shipment contained an extra set of keys that I assumed was for the hitch bolt lock (there was also a set of keys on the bolt itself). I spent 15 minutes using those keys trying to figure out how to remove the lock from the bolt to install it on the hitch. The keys just wouldn't turn in the lock. I called etrailer.com and Kevin told me to try the other set of keys ... and they worked. So an extra set of keys came with it that did absolutely nothing ... weird! Obviously, I can't speak to the longevity and durability of the Swagman Chinook 2 Bike Platform Rack as I just installed it. What I can speak to is the sturdiness of it, the ease of the installation and my complete satisfaction with the good folks at etrailer.com.
I ordered the Swagman Chinook 2 Bike Platform Rack on line from etrailer and so far have been very satisfied. The bike rack was delivered in less than a week. Unpacking the rack and assembly was fairly straightforward. I have read some reviews that complained the assembly instructions were a bit vague. I didn't have a problem but can see where others without a mechanical background get confused. The rack is very sturdy, but there is some side to side play in the tilt mechanism. I'm not sure this can be avoided with a rack that folds down. Installing the Curt trunk stabilizing strap takes most of the sway out of the rack. Installation is fairly easy and quick. It takes me 6 - 7 minutes to install the back on my hitch, and to install the bike and be ready to drive away. That seems reasonable to me. So far I've only loaded 1 bike. I've included pictures of my installation on a 2014 Mercedes Benz E350 sedan. Clearance between the bikes, the rack and the car are good. With the bike loaded in the inside, most forward position, I have 6" clearance between the pedal and the bumper. With the bike removed, the center support folded flat and the rack folded up in the storage position, I have 4" clearance between the closest part of the bike rack (the fold down hinge assembly) and the back bumper of the car. I am able to open the trunk of the car without removing the bikes or using the tilt feature, but I do have to remove the stabilizing strap first. Overall, I'm very pleased with the bike rack and think it will serve me much better than my old strap on rack. Since the weather has been cool since getting the bike carrier, I haven't taken any long trips to give it a real workout.
# 8
Malone Runway Trunk Bike Rack for 3 Bikes - Adjustable Arms
Not bad. My first rack for my first XXL bike (Trek FX3 disc). At first was annoyed at the sparse instructions and the “fact” that the top straps weren’t long enough to reach my trunk’s top hinge. Went to collect my bike anyway and the shop assistant showed me that it was total user error: I had the straps in backwards and doubled. Anyway...she showed me how and we tightened it. Racked the bike and drove the 12 miles home. Wasn’t sure about it (and it’s not the best rack I’ve seen) but it’s simple and does the job for me. Not driving cross country with it but even if I did, I think it’d be secure. Pros: simple, secure, not too big at all/easily stored. Cons: not many bells and whistles, doesn’t keep the bike far enough away from the car (pedal might bump the paint depending on how crazy you drive)
Great product selection. Easy installation. I recommend it to everyone.
# 9
Saris Bones 2 Bike Rack - Trunk Mount - Adjustable Arms
Seemingly well-constructed and supported bike rack. It fits my 2018 Toyota Camry SE just fine and I haven't had any issues with sway or even feeling my bike while driving. I've only carried one bike on it and have used it a limited number of times, so I cannot speak on durability and longevity. Although you shouldn't open your trunk while the rack is attached, I have been able to do so with no issue (without the bike attached).
While getting a bike rack for a sports car isn't ideal, I really wanted to transfer my bike with my own car instead of borrowing my friend's pickup truck. After hours of trying to find a bike rack that would be good for my 07 Mustang, I decided to give this one a try and I gotta say, it has been pretty good so far. It fits very well over the factory spoiler. One of my biggest concerns I was worried about when ordering a rack for my Mustang was ruining the paint, but the feet on the legs haven't left one scratch. I have used this to transfer my bike at freeway speeds (up to 80 mph) on car rides that typically last an hour and my bike was perfectly secure throughout each ride. For extra security, I wrapped both bike wheels with a ratchet strap so the wheels and pedals wouldn't shift in transit. So far, I am very pleased with this bike rack for the price and quality. I would highly recommend this if you want a rack that is affordable and durable.
# 10
Hollywood Racks TRS Bike Rack for 2 Bikes - 1-1/4" and 2" Hitches - Wheel Mount
This rack has been great on my 2016 Nissan Rogue SUV, very sturdy and holds bike(s) securely. I've used it with a fat bike, a regular mountain bike, and a road bike. Amazingly this rack gave me a couple inches MORE clearance in my small garage than my previous hanging-style rack. The aluminum trays themselves are still in great condition, though other parts are showing some rust after 1+ years (and since I use it in the winter as well I leave it on most of the time). The tilt-down feature is great, but pulling the pin and reaching the knob to do this is awkward with bikes in place. When removing the bike, it can be hard to squeeze the lever on the hook that holds the front tire. (Maybe because of pressure when the hook is against the tire?)
I've had this hitch for a day and used it just once on my Miata (class 2). Going on a trip tomorrow and will use it on a Nissan Frontier pickup (class 3). It seems like a quality hitch for a very good price. I feel like buying one of those other brands (named after cities) you are paying a premium for the brand name. Hollywood provides a great value without gouging my wallet. I like the aluminum rails and the entire system is easy to use. Just holding off one star since I've only had it for a day. As a bonus it arrived a day earlier than it was scheduled!
# 11
Rhino-Rack Road Warrior Rooftop Bike Carrier - Fork Mount
This bike carrier has a clean design and it assembled and attached to the roof rack easily. A locking front cover prevents it from being detached from the roof rack and the tray has a cut out in the front for a disc brake if my next bike has one. Once everything is snug, the bike feels solid and there's no slop.
I'm not too sure how to rate this but I'm not happy with it. Everything that happened is no fault of etrailer. I've made many purchases from etrailer, they're a great distributor. The bike rack appears to be great. The problem seems to be that they changed the design. To start, UPS damaged the box in shipping and then tried to tape the package they sent me. After walking through the parts in the box with an etrailer rep on the phone, it seemed that no parts were missing. So I proceeded to connect everything up based on the instructions. As I put it together I noticed the mounting bracket in the rear doesn't have anything to remove the slop. The rear is literally resting on a slider, which means that it would rattle when driving around. Just for kicks I took it for a drive with my bike on top. It rattled like crazy! So I looked at the installation videos on etrailer and then youtube. Every one of them showed an extra rear mounting bracket with knobs to tighten. These were not listed in the install manual so I suspect Rhino thought they could cut cost by eliminating them. I contacted etrailer to see if they had any. They didn't. So I returned it. Sadly, I still had to pay a $25 restocking fee. I'm not sure why etrailer charged me. It's not like I bought the wrong thing and didn't want it. It's actually a really nice bike carrier. Just a flaw in the design that etrailer should catch when they test it out in their videos. If anything, I've helped them out with this. Hopefully etrailer will test out what I sent them, then reach out to Rhino about this new design flaw. Again, I like etrailer as a service but I wish they had caught this before selling to me (and others). I strongly suggest that you don't buy this until the bracket issue gets resolved. Also, take a look at the last pic of the Inno XA391 on the etrailer site. They resolve the rear bracket rattle by putting in a thumb screw.
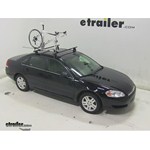
Yakima ForkLift Roof Mounted Bike Rack Review - 2014 Chevrolet Impala
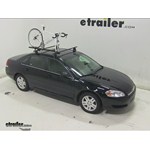
Speaker: Today, on our 2014 Chevy Impala, we'll be test fitting the Yakima Forklift Roof Mounted Bike Rack, part number Y02098. With the Yakima and Q Towers Roof Racks system on our vehicle, well begin our test fit by placing the bike rack up on to the vehicles cross bars. Starting at the front, you will need to remove the skewer first so that you can slide the security cover and access the wing nut. Well need to loosen up the wing nut to position the front bracket around the underside of the front bar. With this done, well need to insert the silver T bolt into this slot on the bottom part of the bracket. Then we can go ahead and tighten it down.
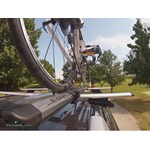
Yakima FrontLoader Roof Bike Rack Review - 2014 Chevrolet Impala
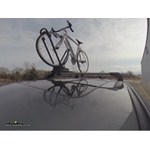
Today on our 2014 Chevy Impala, we'll be test fitting the Yakima FrontLoader Roof Mounted Bike Rack. Part number Y02103. With the Yakima Q Towers Roof Rack System on our vehicle, we'll begin our test fit by placing the bike rack up onto the vehicle's crossbars. We'll need to make sure that the bar goes between the two sets of teeth at the front of the bike rack. Before tightening that down, we'll move to the rear and adjust to make sure the rear bracket is around the rear bar. Once that's done, we'll slide the silver T bolts into the slot of the bracket and turn it so it locks into place. We'll then tighten down the black wing nut to secure the rear part of the bike rack to the rear bar.
Swagman Upright Roof Mounted Bike Rack Review - 2014 Chevrolet Impala
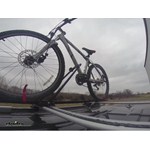
Today on our 2014 Chevrolet Impala, we'll be test fitting the Swagman Upright roof mounted bike rack, part number S64720. With the Yakima Q-towers roof rack system on our vehicle, we'll begin our test fit by placing the bike rack up onto the vehicle cross bars. Starting at the front, we'll need to pull out our hardware and take the silver U-bolts, go around the underside of the front bar and off through the predrilled holes of the head of the carrier. We'll then take our black wing nuts that thread down onto the silver U-bolts. Once both U-bolts are installed in the front, we'll go ahead and move to the rear, where this time where we'll take the silver U-bolt to go down through the predrilled holes of the bike rack. The silver U-bolt will go through the holes in the back plate. We'll then take our black wing nuts to thread down onto the silver U-bolts.
Swagman Fork Down Roof Bike Rack Review - 2014 Chevrolet Impala
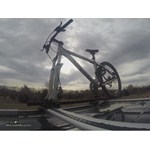
Today on our 2014 Chevy Impala, we'll be test fitting the Swagman Fork Down Roof Mounted Bike Rack, part number S64710. With the Yakima Q Towers Roof Rack System on our vehicle, we'll begin our test fit by placing the bike rack up onto the vehicle's crossbars. Starting in the front we'll take the silver U-bolts to go around the underside of the front bar, and up through the pre-drilled holes of the head of the carrier. We'll then take our black wingnuts to thread down onto the silver U-bolts. Once the front is secured, we'll move to the rear, and this time we'll take the silver U-bolt to go down through the pre-drilled holes of the bike rack. We'll take the black plate, which the silver U-bolt will go through the holes of the black plate, and we'll take the black wingnuts to thread down onto the silver U-bolts. Once everything is all tightened down and secured, we're ready to load up our bike. We'll need to double check to make sure the skewer is loose at the front and that our cam buckle strap is on down at the rear.
RockyMounts TieRod Stretch Roof Bike Rack Review - 2014 Chevrolet Impala
Today on our 2014 Chevrolet Impala, well be test fitting the RockyMounts TieRod Stretch Roof Mounted Bike Rack, part number RKY1011. With the Yakima Q-towers roof rack system on our vehicle, well begin our test fit by placing the bike rack directly onto the vehicles crossbars. Well need to remove the black plastic cover at the front. Well then bring the rubber coated steel straps around the underside of the front bar and hook them into the connection points.Once thats done, youll notice the silver bolt that runs through the head of the carrier. Well use the included allen wrench to tighten down the silver bolt, which will bring the straps tightly around the front bar. Once thats done, we can replace the black plastic cover, and move to the rear.
Kuat TRIO Roof Bike Rack Review - 2014 Chevrolet Impala
Speaker: Today on our 2014 Chevy Impala, well be test fitting the Kuat Trio Roof Mounted Bike Rack, part number RU01.With the Yakima Q Towers Roof Rack System on our vehicle, well begin our test fit by placing the bike rack directly onto the vehicles crossbars. Now move to the rear. Well loosen up the two wing nuts, so that we can position the rear bracket around the underside of the rear crossbar. Once this is done, we can reinstall our black wing nut and tighten it down to secure the rear part of the carrier to the rear crossbar.Moving back up to the front, well take the rubber coated steel U bolts to go around to the underside of the front bar, up through the predrilled holes at the head of the carrier. Well then take the cylindrical nuts, which will thread down onto the U-Bolts. Well then use the included wrench to tighten down the cylindrical nuts directly down onto the U-Bolts, which will secure the front part of the bike rack to the front crossbar.


What our customers are saying:
"Great selection and even better prices. It was easy to find the bike rack that I wanted and would fit my hitch. I would highly recommend this site to anyone looking for anything that has to do with hitches."