
Curt T-Connector Vehicle Wiring Harness with 4-Pole Flat Trailer Connector


To see if this custom-fit item will work for you please tell us what vehicle you'll use it with.
Thank you! Your comment has been submitted successfully. You should be able to view your question/comment here within a few days.
Error submitting comment. Please try again momentarily.


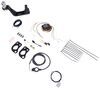
Quickly and easily install a 4-way trailer connector on your vehicle with this custom harness. T-connector plugs directly into existing wiring - no cutting, splicing, or tapping required.
Features:
Installation
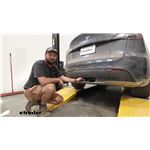
This custom-fit T-connector plugs into your vehicle's wiring harness, which is located behind the driver's-side rear bumper.
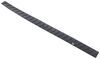
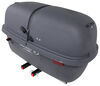
Once installation is complete, the 4-way connector will be stowed beneath your vehicle, near the trailer hitch. A mounting bracket (sold separately) is recommended to keep the connector secure.
It is recommended that you use a small amount of grease on all electrical connections - the plugs on your automobile and the 4-pole connector itself - to help prevent corrosion.

California residents: click here
Videos are provided as a guide only. Refer to manufacturer installation instructions and specs for complete information.
Hey guys, it's Jake here with Etrailer. Today we have a 2022 Tesla Model Y and we're gonna be taking a look at, and I'm gonna show you how to install the CURT 4 Pole Trailer Wiring Harness. Adding a 4 pole wiring harness to the back of your Tesla Model Y is going to allow you to safely get the lighting signals from the back of your vehicle to the back of your trailer. Or if you have an accessory, like a cargo carrier or a bike rack that has lights on it, it's gonna help with that too. This wiring harness is gonna give you your basic 4 pole functions, which is going to be your left turn, right turn, your stop, and your running lights. This particular Model Y is going to be prepped with a factory plug and it's right about in this area behind our bumper.
The installation is really not too terrible. I would say that if you're getting a hitch receiver installed, most of these hitches for the Model Ys are gonna mount behind the bumper and you have to remove the bumper to be able to get to mount the hitch up. Well, if you do it at the same time that you do this wiring, it is so much easier. This particular hitch was installed about two years ago, so we had to pull the fascia back off in order to get the wiring on. So my advice to you is if you're getting a hitch put on your Tesla Model Y, I would go ahead and just throw the wiring on.
It is so easy to do this installation if you're doing it at the same time. To begin our installation, we're gonna need to open up our driver door and open up the front trunk area. This is going to set the doors and windows into a recalibration mode and then we're gonna go inside and change some settings on our dash. Now inside on our main dash, you'll have your little car icon down here in the lower left corner. We're gonna click that and then we're gonna scroll up to Safety, push Safety.
If you scroll all the way to the bottom, you'll see Power Off. This is going to power off the computer so that we can work with the electrical system. Now up in the front area, we'll just need to take this plastic panel, just lift off. It just has some connectors that are holding it in place because we need to get to this wire right over here. Now if you follow this red wire down, we'll have this little plastic connector here that we're gonna have to disconnect.
We'll pull this red locking tab back. Sometimes it helps seize a flathead screwdriver to pop this little red tab back. Sometimes they get gunked up with stuff. Here we go, and we'll take it. You wanna push down on the little black tab in there and should separate. Now we're gonna take a series of screws and push pin fasteners down to lower this bottom panel down, you'll see the 10 millimeter head screws, or the bolts, whichever. And then the pushpin fasteners. (tool buzzes) For the pushpin fasteners, just pop the center of the pushpin out and then pop out the base. In our wheel well, we're gonna have four more push pin fasteners on both sides of our vehicle that we have to remove. Now we can take this lower trim and just pull it down and out of our way. If you see our panel just still hanging here, you can see this one bolt would not come out. It stripped out pretty quick or at least the nuts that's in there twisted loose. That is not uncommon for these Teslas for that to happen. So it's down and out of our way and we can still put it back up later just fine. Just know that that may happen with yours. We're gonna need to remove this plastic trim. Just pull it out a little bit to get to a bolt back there, I'm just gonna wedge our plastic trim panel tool. Typically, we would tape these off, but since the vehicle's so dirty, I feel like we would do more damage by peeling 'em off. But we'll pull this out. There's some plastic fasteners in here that we're gonna have to pop loose. As long as you can get your fingers back in here, usually can pop loose pretty easily like that. The one in the bottom, it's being a little stubborn right now. There we go. Got those pop loose and then we'll just keep pulling up. Just keep popping them out, just like that. You wanna be sure not to kink this plastic 'cause it'll show white marks wherever it's kinked. And then we'll take a eight millimeter socket and remove this bolt. Now we've got this little hand nut in here. We'll just take it, unscrew it by hand. You shouldn't need a tool. If you do, this car's pretty caked up and it's still coming off, but just use a pliers or something like that and it should thread right off. We're gonna take our trunk door here, pop that out, and then we're going to pop these little side panels straight up. We have to pop this trim here out first, and then we can pull these straight up. We're just gonna make loose so that we can get this panel out. Now we're gonna have a little push pin fastener right here. Gonna pop that center out and pop the base up. Next we're gonna have to take out our taillights. I went ahead and did one already so that you can see or understand it a little bit easier. On the passenger side, we're gonna have the same sort of thing on the inside. There's these two eight millimeter nuts you're gonna have to remove and you can see where they're at on this light. They're gonna be right here on this light, so that's why we just removed those pushpin fasteners. We're gonna peel this carpet back a little bit. You can peel it off of this wall too, and back inside here, you can kind of see here along the edge that we'll have to take those out. Now we're gonna grab our trim panel tool again and we need to pop straight up on this little bumper just like that. Now we can grab the taillight. You want to kind of work it out a little bit. There's some tabs over here that need to get popped loose. Use a trim panel tool to help you do that. Here we go, and then sometimes, Tesla doesn't give you a whole lot of extra wiring. Sometimes that wiring will pop right out. If it doesn't, then all you need to do is just pull this little red tab up and then pull the wiring straight back. Then underneath where our taillight just was, we'll have a 10 millimeter bolt that we'll have to take out on each side. (tool buzzes) Work our way from this edge to the middle of our bumper on each side. Peeling back on this, again, if this vehicle, if it we inchesre clean, I would put blue tape on both sides, but again, I feel like I'm gonna do more damage by putting tape on the dirty vehicle than if I just leave it blank and be careful. What we'll do is just take our fingers. We're gonna peel back, work your way along the edge, peeling and popping these clips off. You got a couple here on top that can be stubborn sometimes, but if you work a trim panel tool or a screwdriver under it, or you can, sometimes you can push down on these tabs and they'll pop right out. Now, with an extra set of hands, Bruce is helping us out. We're going to pull this rearward, and we've got a wiring harness right here on our passenger side. You wanna pop the little red tab on it and then push the black button. That'll pop our wiring loose and we can take our fascia and set it aside. Now what we need to do is we'll take our wiring harness and we'll just have to plug it directly into the factory plug right here from Tesla. Now we've got our 4 pole tester connected up to it to make sure our wiring is working properly. We'll start with our brake lights, our left turn, our right turn, and our running lights. Now that we know everything's working properly, we can put our vehicle back together the way that we found it and route this wiring down and secure it safely to the hitch. Once you've got everything put back on your vehicle, that's gonna do it for the installation. Hopefully this video helped you decide whether or not the CURT Wiring Harness is right for you in your 2022 Tesla model Y.

Works great, plugged in behind the left side of the bumper, managed to only need to take off the left side tail light and left side of the bumper, which saved time but it was a tight maneuver to plug it in.
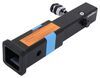
Needs 4" riser for most trailers.
2021 Model Y tows great, but takes up 3-4 super charger spots
Great piece of hardware. Makes it easy as pie to addd trailer wiring to your Tesla. Simple as plugging
in the connector. I wish the wires were 6 inches longer for better wire routing. Wires are just long enough to to the job.
Great harness fits perfectly and works great
It's possible to install this without removing the bumper! Need long skinny arms to do it, but it's possible.
I had UHaul install a trailer hitch (Curt, I think) and asked them to install the wiring harness while they had the bumper off. They obviously forgot, then lied to me and said it didn't fit. With some effort I was able to snake my hand in behind the bumper, locate the harness plug and unclip it from its holder, then install this harness. Haven't tested it with a trailer yet, but used the multimeter to confirm blinkers and brakes give proper signals. Overall way easier than an option that requires splicing, or multiple T connectors and separate power run from the battery. Length is good to reach the hitch and gives a few extra inches to connect to wiring for a trailer.
Easy to install and fit perfectly. Kit included zip ties to secure the cable.
Perfect connection!
Do you have a question about this Custom Fit Vehicle Wiring?
Info for this part was:
At etrailer we provide the best information available about the products we sell. We take the quality of our information seriously so that you can get the right part the first time. Let us know if anything is missing or if you have any questions.


Ev N.
3/9/2026
Not good. Wiring does not work. Telsa locks this feature out for DIY folks. When aked to turn on this feature, they will not turn it on for use with aftermarket hitch. Bummer.