
Thank you! Your comment has been submitted successfully. You should be able to view your question/comment here within a few days.
Error submitting comment. Please try again momentarily.
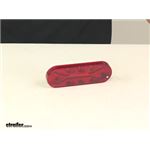
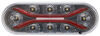
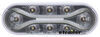
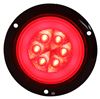
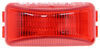
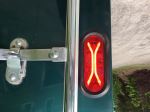
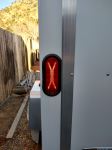
Bright and stylish, this X-shaped LED light will be easy for other drivers to spot as a brake, tail, and turn signal light on your truck or trailer. Mounts in a cutout using a grommet (sold separately) and works with 3-prong plugs.
Features:
Specs:
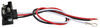
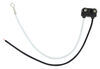
This light has a standard 3-prong plug that connects to your vehicle or trailer with a PL-3 pigtail adapter. Pick up the right-angle pigtail (A47PB - sold separately) or the straight pigtail (A45PB - sold separately) if you don't have one already.
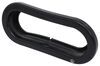
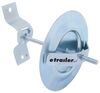
This light installs in a grommet (A70GB - sold separately) and requires cutting a hole into your trailer if it doesn't already have one.
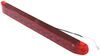
If you'd rather not cut a hole in your trailer, you can use an optional mounting bracket (BK70BB - sold separately) instead. You will still need the A70GB grommet.
California residents: click here
Videos are provided as a guide only. Refer to manufacturer installation instructions and specs for complete information.
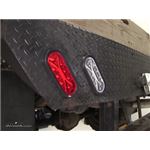
Speaker 1: Today we're gonna take a look at and show you how to install both the Optronics Light Guide LED Backup Light, part number BUL602CB, and the Optronics Light Guide LED Trailer Taillight, this has the red lens, it's part number is STL602RB.Now here's what our lights are gonna look like when we have them on. We kinda turned out the lights here just to give you an idea of how they've gonna look. Now when you use these as a pair, they meet the requirements for the backup lights. So they're gonna be compliant in that aspect, you're not gonna have to worry about having any additional lights anywhere. There's a total of 12 diodes. You can see we've got the eight here on the outside and then they're gonna have four more internally there.
I like that little, kinda that X that you see there. That's unique, you don't see that in a whole lot of lights. So overall it's gonna give us a nice bright light, but it's also gonna be unique in appearance.Now overall, the new LED lights have a lot of advantages to them. They last much, much longer than typical incandescents. We don't have to worry about getting in there, changing the bulbs on them.
Also they give a cleaner and brighter light as compared to what we used to see out of them. And they're not gonna draw as much power. Now these are gonna work out really well whether you're using them on a truck like we are, or on a trailer. They're fully submersible, they're sonically sealed all the way around that back cover so you won't have to worry about any water or moisture getting towards the inside of the light. I think that's really important in trailers, maybe not so much in trucks, hopefully the back end of your truck isn't gonna be submerged in water.
But if it is, I guess we don't have to worry about it.Now the polycarbonate lens is gonna be really good at resisting cracks so it'll kinda absorb that and also resist scratching. So for a long time to come your lights should look really, really nice. Additionally they use surface mount technology inside. It's kind of a newer circuitry. This is gonna run a little bit cooler, it's better at dissipating the heat, but also it's gonna absorb more bumps or kinda the harshness that we'll see going down the road as our truck's bouncing around or our trailer's bouncing around.
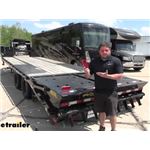
So they should remain very, very dependable.Now overall our light is gonna be six and half inches long. It's gonna be two and three eighths of an inch wide. And then from the surface of the light to the back it's about an inch and three quarter.Now as far as this light goes, it's gonna share all of the same features that our reverse light has. So we've got the surface mount technology, polycarbonate lens, be extremely efficient, bright, and long lasting LEDs. So overall both of them are gonna be almost identical. The difference is of course in the functions that they provide. This one giving us our running lights, taillights, and brakes. This one giving us our reverse lights. They're gonna share the same dimensions as well.Now when in taillight mode, you'll see we're gonna have the illuminated X. That's a really unique design. I like that, very similar to the reverse light has kind of an X shape in it. Now we're gonna hit the brakes, hit our blinker and we'll see how the additional diodes light up to give us that brightness that we need. There you can see those outer diodes lighting up indicating a change in direction. And those will be the same lights that come on when we hit our brakes.Now one thing to keep in mind, the reverse lights are both sold separately. You're gonna need one for each side to be compliant. And the same for our tail, stop, and turn. You're gonna need one for each side. The grommet is also something you'll need to pick up if you don't already have one.Now for our installation we're gonna be putting these on a flatbed. These lights are extremely common, both the reverse and turn and taillights in these applications anymore. I think you're gonna see more and more people doing a replacement like this, but also gonna work out really well for your six inch trailer lights that need replacement kinda on the back. You'll see them used kinda universally in both places. If you take a look here at the passenger side you can see we've already got these installed. Got our rubber grommet here that we're using. Our reverse is here, close to the middle. Stop, turn, and taillight gonna be closer to the outside there, also on a rubber grommet.So we're gonna go through the process and show you how to do it. We're doing these together because we're gonna ground the plugs, in which go in the back of the light, we're gonna ground those together as they go over to the actual frame. So we just have one good big ground point. We're gonna start with our two wire pigtail. This is gonna go to our reverse light segment. You can see as I took the olds out I marked them there. We know this is our reverse so we can pull that off.Now we're gonna use butt connectors to make our connections here. So we're gonna trim that off and strip it back. And we use part number DW05743, it's a heat shrink butt connector. I like using heat shrinks especially when we're on the outside of the vehicle because then we really don't have to worry about any moisture getting in there causing corrosion or holding dirt in there causing corrosion, which is eventually gonna lead to our light shorting out. I'm gonna trim off a little bit of the red wire on our pigtail here, but I do like to leave a little bit of extra. That's just gonna give you a little bit of wiggle room on the wiring if you ever need to make changes down the road or if light fails, maybe you hit it with a board you're loading up. Break the lens, you need to replace it. This'll give us a little bit to work with. That's just gonna go on the other side. Gonna crimp that down.Then we'll use a heat source to shrink it. Now for your heat source you can use a heat gun, you can use a mini torch, or generally what I do if I don't have too many to do is just use a lighter. The key is not to over heat it. You don't wanna melt it or anything, you just want it to shrink. And as you do that if you notice it looks like the wire's magnified now and then there's just a little bit of clear gel that comes out of the end there. Indicates that you got a good connection made. That's what you're looking for.Now to house the light we're gonna use a rubber grommet. So we need to place that in and we just press firmly all the way around the outside until it seats in there. If you look on the back, you got this little lip and we wanna make sure that lip goes behind our mounting surface. Kinda spreads itself out there as we do that. Then we'll take our light. I like to start in one end of it. And the light has this lip right here. As we place that in that's gonna get ahold and that'll keep everything in place securely. Right, just like that. That's gonna give it a little bit of wiggle room so if we do bump it it'll flex a little bit. I kinda like that.And then for our plug here, that's gonna plug into the back of the light. And with the two wire you're just gonna have two prongs. Then we just wanna line it up. Our wire is gonna face the open side. You can see we've got that kinda three walls on each side. Just get that lined up, push down, and you want that to go all the way down to where it's resting on top. Just like that. There's a little bit of grease in there on the back side of the light already, so you really don't have to worry about dielectric grease.Now for our ground, I'm gonna take that, I'm gonna mount it right over here. But I wanna tie my taillight into that same ground. We'll show you how to do that here in just a second. That way we're just drilling one hole, putting in one self tapping screw.We're gonna be using the three wire pigtail for this. White is gonna be our ground, red needs to go to your stop, turn signal. And then the black is gonna go to your running light signal. Now we're gonna use the same butt connectors that we used for our light here for the turn and the brake signal. So we'll just get that placed on our stripped wire. Now for my running light signal, yours is probably gonna be the same way. I've got one single wire that comes out, but it can't just end here at the running light. I'm also doing the side market light here on the back corner and on the front corner, so I wanna be able to extend that. So what we're gonna do, strip this one back a little bit further. I'm gonna twist it up really well and this time I'm gonna use part number DW05744, it's just a slightly larger heat shrink butt connector. With that doubled over we can slide that up and in. Get that crimped down.We're gonna strip back both sides of this and join them together. Let's get that one stripped. I'll strip this one. Let's put them right side by side. We're gonna twist those together. Then we can take the larger heat shrink, slide that down over both of those. Then not only will we get power to our plug, but it'll have a continuation so we can get those other lights hooked up. Now this is basically gonna be in lieu of your quick splice connectors, the ones you'll put on there and kinda clamp down. Generally those are gonna cut and damage the wire. I really dislike using them so I always go with heat shrink so we can shrink that down the same way. Now we're gonna connect our red wire to the turn and brake signal. Doing basically the same thing, just with that slightly smaller butt connector.Now we're just gonna pop that light in the same way we did our reverse light there. We can get that plug plugged in. I like how they're nice and secure. They fit in there really well. Those plugs, I don't think you'll ever have to worry about them coming out unless you actually remove them.Now we've got your ground wires here. Let's kinda get this up and out of the way for now. We'll take care of that in a minute. What I'm gonna do is draw them over. We're gonna go right over here. So right about there, let's splice them together. To do that we're gonna cut. And I'm gonna save this longer ring terminal end. Strip both of these back. Then we'll twist those up and basically we're gonna connect these the same way we did that running light extension. We'll use one butt connector, go in, gonna crimp down. Then the other side will be our pigtail coming out. This one we're stripping back about twice as far. Turn it, flex it, place it in.Now we're gonna decide where we want our ground. I'm gonna loop that up kinda like that. So about right there. I'm just gonna drill it out and then we'll use a self tapping screw. Just like that. And that'll have our ground established. Then with our other wires here, you can tape these up, make them look nice. Basically do whatever you wanna do with them. Just keep them up and secure. You don't want these hanging down. If we left these hanging down here they'd likely get hung on something. So get them taped up and get them secured up.We'll test it out and make sure it's working properly. Of course we need to turn on the running lights, make sure our red light's working. Do our blinker. And do our brakes. Now let's also check out our reverse signal there. Make sure it's coming on as well.And that'll do it for our look at the Optronics Light Guide LED Backup Light and Trailer taillight with red lens.
Ratings & Reviews

These LED brake/tail lights are an easy swap out to replace older incandescent lights. Just remove the old and plug in the new! I really like the "X" pattern that displays as running lights, and the surrounding LEDs light up nice and bright.
I've always liked optronic lights. This is definitely an attention-getter with the X. Very bright easy to install. This is on a Hallmark 5x10 trailer
Just for background on me old retired dude lovin life. Now for my experiences with etrailer: before my purchase of the lights I had made previous purchases and every aspect of dealing with this company has been an excellent experience. Ok old Dudes get sidetracked occasionally. The trailer light have been on my boat for little over a week 2 or 3 trips to launch and all is good lights are totally sealed (and only an idiot would want to try to open it). I think these lights really stand out in the night even before braking. I really like the X worked into the light another way of standing out to all follower excellent product with safety worked into every aspect of it.
Great service. They fallowed up and they kept in touch. Thanks again!

Been a year now and these have been great. Being on a boat trailer in and out of the water several times, they have yet to get water in them.
PRO's: Easy to install; virtually a drop in replacement (Although they were not the exact same as the sealed old-condensent bulb type I had to on my pull-trailer before.) Bright! (Price, on-sale was fair but again, easily off-set by the ease of using the etrailer site!)
Con's: None to state.
Used these to replace older trailer lights. Work great, very good quality.

John T.

6/20/2019
Lights still work just like new. Great product.
Super excellent staff! I preordered this awesome looking light, and they called to make sure I knew it wouldn't be shipped for a month at least. I knew, but was still pleasantly surprised by the call! Awesome. And the lights showed up early!
The lights are good and standard size, but they seem to have a slightly off plug receptical. I ordered 6 of them and all seemed to be the same. I had to bend my connectors with a pliers a little bit to get them plugged in.
It works, but I needed a transformer and a rectifier to use it for the light in my refrigerator.
Product is everything etrailer claimed in specifications and as usual excellent video. Good Value, very happy with the product.
Works as it’s designed. Very low profile and seals well
Easy to install, waterproof, nice & bri ght
This is a stylish & bright trailer ligh t.
Very sharp. The trim lines are beautiful. The lights are fantastic. And like everything else in my life, it tasted awesome with gravy!!
Very happy with the light. And the prompt service! Thanks
Very bright
I like the X pattern
Works great!!
Great lights. Nice and bright!
Just as advertised.
Info for this part was:
At etrailer we provide the best information available about the products we sell. We take the quality of our information seriously so that you can get the right part the first time.


Jeff
4/13/2020
Been Great!! Nice to have a cool looking light that when dunked in the water to launch my boat they dont fill with water. I hope to get a few years out of these.