
To see if this custom-fit item will work for you please tell us what vehicle you'll use it with.


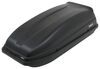
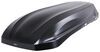
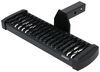
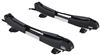
This fully welded trailer hitch receiver bolts onto your vehicle's frame with no welding required. Powder coated steel is sturdy and corrosion resistant.
Features:
Specs:
At etrailer.com we're committed to the products we sell, and to our customers. Our experienced and knowledgeable staff are available via both phone and email to address your questions and concerns for the lifetime of your hitch. The technicians at etrailer perform hitch installations on a daily basis, making them a valuable resource for do-it-yourselfers. The one-on-one, personal service you'll receive comes straight from an expert in the towing and automotive field. We've installed it, we've wired it and we've towed with it, so whatever your question, we can answer it.

Videos are provided as a guide only. Refer to manufacturer installation instructions and specs for complete information.
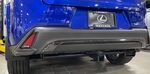
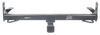
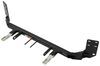
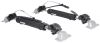
Hello neighbors, it's Brad here at etrailer and today we're taking a look and installing the CURT two inch trailer hitch receiver on a 2023 Lexus UX 250h. Now this is what your hitch is gonna look like when it's installed and it is an exposed cross tube, but it sits pretty nicely. You can see a good portion of the hitch and it does go around the exhaust pipe. But overall, the way that the car sits, unless you're looking directly at it, it's really gonna be hard to see because you have this nice diffuser that keeps it nice and tidy. So really the only thing super visible is gonna be the two inch by two inch receiver tube opening and that's really nice for a hitch normally with this class rating, you're kind of limited with an 1 1/4, but to be able to have a two inch hitch is awesome. That means that you're gonna have a lot of options when it comes to bike racks, cargo carriers, or even a ball mount.
All of your accessories are gonna stay in place with a 5/8 pin and clip. Now this is not included with the hitch. A lot of times your accessories will come with them. If you plan on leaving your accessories on the back of your vehicle long term, you might wanna look at a locking pin and clip. That's a really nice option to lock this in place and know that no one's gonna walk away with your accessories.
You do have safety chain loops here, so if you're pulling a small utility trailer, maybe some kayaks or a jet ski, you can hook up those safety chains. The standard S hook is gonna be no problem. Same with the larger clevis style is gonna be able to hook up with ease. Now speaking of towing, you're gonna wanna adhere to the weight capacities of this hitch. And this one for a gross trailer weight rating is gonna be 2000 pounds and that's gonna be the weight of the trailer plus the accessories on it.
So generally it's gonna be a smaller trailer, but you still have that availability for some of those smaller trailers. Now as far as the pressure that's put on the inside of the receiver or kind of your suspended accessories like cargo carriers, your bike racks, your tongue weight really comes into play and this one's rated at 300 pounds, which is pretty good. You can probably get a four bike bike rack loaded up as long as the bikes aren't super heavy. You could get a cargo carrier on here, you know, take it on vacation, but 300 pounds is what you're gonna wanna stick with. And before hooking up to a trailer and just towing, you do wanna check the vehicle's owner's manual to see what it's capable of towing and then compare that with the hitch, take the lower of those two numbers, that way you're not overloading anything and you stay safe.
Now the side profile of the hitch, it actually sits fairly far recessed, which is nice. You're not gonna hit your shins on it or anything as you're walking by, but you do wanna make sure that if you have suspended accessories that fold up, some of your cargo carriers and bike racks will fold in a vertical position. You wanna make sure that you're able to do that without contacting your fascia. So from the center of the hitch pin hole to the furthest point, we look at about 4 1/2 inches. So you might wanna look at something with a slightly longer shank just to make sure that that's gonna be clear. And keep in mind too, when those are in those stowed positions, you might not be able to open up the rear hatch, but if it's empty you can just drop that down and then you'll have full access. As far as ground clearance goes, this one's actually pretty decent at 12 inches and that's gonna be important if you are picking up a ball mount, you can measure the coupler of your trailer and then compare that with the 12 inches and determine the rise or drop necessary. Something else to keep in mind when you have bike racks and cargo carriers, they're gonna extend the length of the vehicle and as you go up an incline, they tend to tilt towards the ground and you can bottom them out. So if going up a steep incline or hitting rocky or rough terrain or large bumps, just keep that in mind when you have your accessories on your vehicle. Now as far as the installation on this hitch, this isn't terribly hard to do. You're essentially gonna be taking off some panels and then you need to enlarge one of the holes to get the bolts in place to bolt your hitch up. So you will need a die grinding bid or maybe a cutoff wheel, something to enlarge that hole. But once you have those in place, this really isn't too hard to do and I'm gonna walk you through all the steps to make sure you get it installed so let's take a look. To begin our installation, we're gonna be underneath the rear fascia, there's gonna be some plastic push pins, and this kinda brings me up to a good point of making sure that any of the hardware you take off, you're gonna want to keep track of that in a nice organized spot. You may not end up using all the hardware to put it back, but just making sure you have that handy for reinstallation, it's gonna make it a lot easier. The first thing we have is these plastic push pins located on each side. So we'll just go through, you'll see 1, 2, 3, 4, 5, 6 on the passenger side and you get these separated. It's pretty easy here. You just, there'll be a slotted side, you can use a flat head or a trim panel tool like I have here to just pop that out. And from here, a lot of times you can just pull these out. If not, you can pry underneath it. So we'll go ahead, we'll get these taken out. As we get our plastic push pins taken out, you'll see this tab here right by the exhaust, this plastic push pins holding in this underbody panel and we're gonna need to get this removed. So peel that plastic back, get this one removed and then we'll head up towards the rear of the tire, there's gonna be a plastic nut that kind of holds onto a stud. And the best way to get these off is to get a flathead screwdriver and you can wedge it in one of these sections and just loosen that up while pulling this down. That way we can get this underbody panel removed. Now you will have to kind of wedge this out. It's pretty tight here. So once we kind of put this in in a nice angle, we'll make sure that we have all of our hardware. We can go ahead and set this aside. Now we're essentially gonna do the same thing on the other panel. It's gonna have that same plastic nut, so we'll go ahead and get this removed. Now, next we're gonna go to our passenger frame rail and we're gonna find that there's two plastic caps that are covering up some access holes here. So we'll pry these off. If you have a flathead screwdriver, generally that'll work pretty well. It's kind of tucked in there, but we'll get this one pried off and then we'll get this lower one taken off as well. On the driver side, you're gonna have one on the side just like the other. Now we're gonna find that we have this hose on where our other plastic plug was. And so we're gonna get this removed just by prying here on the bracket. And we'll just kind of set this aside for now. Now something I'll point out, I mocked our hitch up just to make sure that we have a clean path to raise this up and something that we're gonna wanna do, the hitch is gonna use this hole and we're gonna be doing some drilling out on this. So we're gonna take our canister, our wire loom that we have here and I'm gonna zip tie this back just using the frame cross member here and just kind of to keep this out of the way while we're working on it. So take the large zip tie included with the hitch and just zip tie this back. Now something else that I'll point out is from the factory, there's caulking that goes on the seams and sometimes it can get in the way if they got a little overzealous with it. If you're gonna be having to cut any out, it's just gonna be a small portion here. And then on the side of the frame up top, sometimes it can just kind of cause issue to where the hitch isn't gonna go into place. So where the hole is on the side of the frame directly above that, if you go about 1 1/2 and just kind of center that up, you can go ahead and cut that out just to be sure, yours may go up and not have issue, but if you're having issues with the holes lining up, you're gonna want to take some of this off. And best way to do that is if you have a utility knife or I have a putty knife here, you can just kind of cut away at this just to peel some of this back. So I'll go ahead get this notched out on both sides here. So we'll just make sure that we have that clearance. Now our hardware that we're gonna be using to bolt up the hitch will have to feed inside the frame rail. And so the issue we have is the access hole that we're gonna be using, which is gonna be where we had our wire loom canister in place and that plastic plug. These are gonna need to be enlarged to fit our carriage bolt and a spacer block. The spacer block is slightly more narrow than the carriage bolt. So if you can get the carriage bolt to fit in, spacer block's gonna work. And there's a few different ways you can do this. If you have a Dremel with a cutoff wheel and you kind of just run it alongside, you can kind of wall that out to get the head of the bolt in. Another option is going to going to use a burr bit or a die grinding bit to just enlarge this out. So keep your carriage bolt handy to test to make sure that you can slide that up as you enlarge it. I've enlarged that access hole. You may need to kind of notch it a little bit for the carriage bolt to be able to slide in like we have here. But now that I know that this will fit up, we're looking good here. We're gonna go ahead and I'm gonna put just a little bit of clear coat or spray paint, whatever you have handy just to cover up this exposed metal. We don't want that turning to rust long term so that paint's gonna help protect it. We'll also go ahead and enlarge the other hole on the other side. Now on the other side you do have your exhaust pipe here. I have a right angle drill, which you may not have at home. So if that's the case and you need a little bit more wiggle room to get your drill in here, you can pop off your exhaust isolators. There's gonna be one here, one on the opposite side, and then there's also one that's a little bit further up if you need to, but I think loosening just these two will be enough to drop it down. If you don't wanna mess with the isolators, you can just simply take off these bolts and that'll drop down that muffler just to kind of give you that little bit more room to work here. Now we need to get our hardware in place for our hitch and we're gonna start with these side holes first. So take your fish wire and this coiled end, we're gonna feed it through and make our way down to the access hole. If you need to, you can put a little bend here to kind of feed this down, but get your finger kind of ready to grab that and pull it down and just pull it out a little bit. And from here we'll take our spacer block, we'll feed this up in the frame rail. We'll then take our carriage bolt and thread this onto that coiled section. And you may need to kind of put the carriage bolt in at a angle of it's backwards, kinda like this to feed this up. But once in the frame rail, we just kind of jostle this around a little bit and you'll see that this is gonna create the mounting stud. Now our hitch is gonna have to slide up. So for this side we're just gonna push this in the frame rail for now. Now for this lower mounting stud, it's pretty easy. It's gonna be a reverse fish wire technique. So we'll take our spacer block, just kind of hold this onto that coil there and then we'll take our carriage bolt, thread this on, feed that up, feed up our spacer block. And this will drop down. Now at this point we'll go ahead and repeat the same steps on the other side. Now you're gonna probably want an extra set of hands here as we raise up our hitch. And what we're gonna do is take those pole wires and feed them through the corresponding holes. And our goal once we raise this up is to pull the side ones in and if we get both of those pulled out, that's gonna support the hitch, making it easier to get our hardware on. So as we slide this up, just kind of pull out the slack from those fish wires and then raise up the hitch to wiggle that holes aligned and then just try to get that to pull through. May have to kind of play around with it for a little bit, but once we get this pulled through again that's gonna hold this up, making it a lot easier. There we go. With the weight of the hitch on there, we wanna make sure, obviously it doesn't go back in the frame rail, but that hitch is gonna kind of hold this in place. So I'll take my pole wire off and then our goal is to just get a few threads started with our serrated flange nuts and that way it'll be attached. We'll do that on both sides and that'll hold up our hitch. Now we'll get our serrated flange nuts on the bottom bolts and we will go through and we're gonna snug these down using a 19 millimeter socket and I recommend starting on the bottom ones to draw it up on the frame first, rather than doing the side, we're gonna come back with a torque wrench shortly. So this is just to make sure that we have it snug. Now we'll grab the torque settings from the instruction manual and you're gonna want a 1/2 inch torque wrench to accomplish that torque setting. If you need one, we have 'em here at etrailer. You can generally go to an auto parts store and rent one for free. This is gonna make sure that long term, our hardware's gonna be tight enough for the lifespan of the hitch, but also not too tight, putting too much stress on the hardware. We'll go through, get these all torqued down. Now these underbody panels, they're gonna cause a little bit of issue trying to get them back up because the hitch is well pretty well in the way of where we're gonna mount this up. You can trim this out and get this panel kind of put back in place on each side, but you're not gonna be able to get all the mounting spots so you don't have to put these back on. There is the one flap that's right here that we are gonna wanna put our plastic push pin in. So we'll get that in place. Now also we need to address where we zip tied up that canister tubing out of the way. There's a spot on the hitch that we can rezip tie that up. Now if you use your zip tie to zip tie this back, you will have to source another one. But you'll see that this slot here is gonna make a nice mounting point. So I'll just get this back in place here. Zip tie this up. I did end up getting our underbody panels on. It did require some trimming, so I just kind of followed it along here and just kind of notch it out for the hitch on this side. I did have to trim up a little bit here, but you know, just test it up as necessary. These are kind of tricky to get back in, so just kind of make sure that these are layered properly. The other side I also trimmed off a little bit here. I notch this for our hitch, but well with a little bit of, you know, mocking it up and then cutting out as necessary. Getting this back on I think just gives it a little bit cleaner look. So if you are willing to do that, I use a oscillating tool or a multi-tool to get a nice clean cut. But you can use probably a pair of tin snips or any really cutting method that you have. And again, you can always cut off more, but just kind test it up as necessary. And once you kind of align that stud up there, you can kind of start to see how it forms and then cut that until you get it to fit properly. And that was a look and installation of the CURT two inch trailer hitch receiver on a 2023 Lexus UX 250h.
Average Customer Rating: 5.0 out of 5 stars (1 Customer Reviews)
This fully welded trailer hitch receiver bolts onto your vehicle's frame with no welding required. Powder coated steel is sturdy and corrosion resistant.
Do you have a question about this Trailer Hitch?
Info for this part was:
At etrailer.com we provide the best information available about the products we sell. We take the quality of our information seriously so that you can get the right part the first time. Let us know if anything is missing or if you have any questions.


Thank you! Your comment has been submitted successfully. You should be able to view your question/comment here within a few days.
Error submitting comment. Please try again momentarily.