


To see if this custom-fit item will work for you please tell us what vehicle you'll use it with.


Thank you! Your comment has been submitted successfully. You should be able to view your question/comment here within a few days.
Error submitting comment. Please try again momentarily.


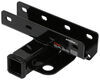
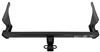
This hitch opens up your vehicle for more adventure. With a 3,500 lbs gross trailer weight capacity and a 525 lbs tongue weight rating, it’s right at home towing small boats, utility trailers, or campers. The 2" x 2" receiver gives you the flexibility to use common towing accessories and gear carriers, so you can haul your bikes, cargo baskets, or other hitch-mounted add-ons without a hassle.
You don’t need special tools or a lift to get this hitch installed. It bolts on using the included hardware—no welding or complicated modifications required. The straightforward setup is ideal for those weekend projects in your own garage or driveway, giving you a solid mount without the guesswork.
You get a clean, factory-style look thanks to the concealed cross tube that tucks neatly behind the bumper. The dual-layer powder coat finish protects against rust, road grime, and weather so it stays looking good over time. The open-back receiver makes cleaning easier too, so dirt and debris don’t collect inside after long drives.
This Curt Class III trailer hitch is built strong for consistent towing and accessory use. The steel design provides dependable strength for daily hauling and adventure trips alike, backed by a limited lifetime warranty for lasting confidence in its performance.

Videos are provided as a guide only. Refer to manufacturer installation instructions and specs for complete information.
Hi, this is Scott with etrailer. Today, we're taking a look at and installing our Curt Class 3 Hitch on our 2026 Genesis GV70. The Genesis GV70 is gonna be a really capable vehicle, and it's nice to add a little more capabilities to this one with the hitch. So our Curt hitch we have on here today is gonna allow you to haul bike racks with the bikes on there, some cargo carriers loaded down with some more gear. Say you do some camping now and then, you need a little more room to haul some stuff, cargo carrier's gonna be a good option. Another thing you can do with this is pull around a small utility trailer.
Say you need to go to the store and get some stuff, maybe some mulch, this is gonna allow you to do that. Our Curt hitch is gonna have a five H pin hole. That's gonna hold in any accessories you put in the back. Now this won't come with the pin and clip, so you may want to pick one of those up. But keep in mind, a lot of your bike racks and cargo carriers will have a pin and clip with it, and a lot of your bike racks will have an anti-rattle pin that comes with that.
This hitch is also gonna have heavy duty, welded-on chain loops. This is gonna accept either your clevis style hooks or your S style hooks, so either one of those are gonna work before you're pulling a small trailer. As far as measurements go for this hitch, from the center of the pin hole out to the edge of our bumper, we're looking at right at around four and a half inches. And with that measurement, you'll be able to decide on if you have any accessories that fold up or stow away. We'll make any contact with the back of your vehicle when you fold those up.
Now from the inside top edge of our receiver down to the ground, for that measurement, we are looking at right at around 11 inches, 11 and a half inches, right in there. With that measurement, you'll be able to decide on what size of a ball mount you may need if you pull a small trailer, but it'll also hook you to decide on if you need a rise of the shank of either your bike racks or your cargo carriers for clearance. As far as weight capacities go for this hitch, this hitch is gonna have a tongue weight rating of 525 pounds. That's gonna be the weight of your bike racks loaded down with your bikes or your cargo carrier loaded down with all of your gear, pushing down on the lower portion of the hitch itself. Now for a gross trailer weight rating, we're looking at a gross trailer weight rating of 3,500 pounds.
That's gonna be the weight of your trailer and everything that you have on that. Now keep in mind, it's always a good idea to take a look in your owner's manual and make sure that you're not exceeding any of the maximum towing capabilities listed in there. Now if you have any questions or comments about this Curt hitch for your GV70, you can always leave a question or comment down below in the comment section, or you can get a hold of one of our experts here at etrailer. They'd be glad to help you out. As far as installation goes, this one can be a little bit tricky to get squeezed up in there into position, but it's definitely something you can handle yourself. If it's something you don't have the time or the tools or the place to do yourself, you can always take a look at our dealer locator and get something done for you locally. If it's something you feel like tackling yourself, stick around, watch our video, and we'll help you get it installed. To start our installation, we're gonna wanna lower our exhaust a little bit to give us a little room to get our hitch in place. So what I'm gonna do is just take a cambuckle strap, I'm gonna support our exhaust and just gonna get that lashed up and just go ahead and pull that tight. Now, the back of our vehicle, we're gonna have two isolators we're gonna need to remove. And one thing I recommend with these, just take a little bit of soapy water and then spray down your isolators where your pins are, and then just wiggle your exhaust to work that soap in. That's gonna help you get these off a lot easier. There's a couple different ways you can get these off. You can either use a pair of isolator pliers, but I'm just going to use a pry bar and just go ahead and get those moved off of the end. Just work those off, pop those back. We have one on our passenger side, and we'll have one over on our driver's side as well. With those removed, we'll just lower down our exhaust a little bit. Now these won't go down super far. It's gonna be down in these exhaust cones here, so just let that sit down on that on both sides. Now on each side of our frame where our hitch is gonna mount up on ours, we're gonna have these three little stickers. And what we need to do with those is behind there is gonna be our weld nuts. So we just need to get these stickers out of the way. What I'm gonna do is just take a screwdriver and just try and get into those and get those to pop out. And we want to be able to get at our weld nuts underneath there, fairly easy. So whatever you need to do to get those out of the way, you don't have to get all of them off because it's just a sticker, but as long as you expose those weld nuts and give yourself plenty of room for your hardware to go in, you'll be in good shape. With our stickers out of the way, I like to come through with a tube brush and just clean out all of our threads, make sure we don't have any debris in there. Now after I've done that, I'll come back through with my hardware that comes in our kit, and I'll just run my bolt in and out of these and make sure they thread in. That way, when we lift our hitch into position, we know that our hardware's gonna go in nice and easy for us because lifting it up in here and then having to fight with the hardware is not something you really want to do. Now after I've done that to all of these weld nut holes, I'll come back through with a little spray and just kind of clean these out, and then we'll get ready to lift our hitch into position. Now for our hardware in our kit, you're gonna have this spacer block, and you're gonna have a tab on one side. When we lift these into position, you wanna make sure that you have your tab towards the front of the vehicle. And for our other hardware, we're gonna have our bolt that comes in our kit, and we're also gonna have our conical tooth washers. When we have these all set up, I get 'em set up on both sides and just have 'em sitting there. We wanna make sure that we have our conical tooth washer where that's gonna be facing our hitch when we get that installed. Now with an extra set of hands, we're gonna get our hitch lifted into place. We want to take these lower ears and go behind our exhaust. We're just gonna push that up as far as we can. Then we're gonna start swinging that over. Now that we get to that point, we want to come back in with our spacer, get that slid in behind our hitch. Now getting our hardware in place and getting everything lined up with this little spacer in here is really tricky, so make sure you have a set of hands or two that can help you move the hitch around while you're trying to get your spacer lined up with your holes. And just be careful when you get this going, and just make sure that you have your bolts going through your spacers, and then just run down to your hardware as much as you can. Once we get it to this point, we have all of our hardware in place. What we're gonna do is end up coming back through and we'll just get everything snug down. Now that we have all of our hardware snug down, we'll come back through and torque everything down to the specifications listed in our instruction manual. Now if you don't have a torque wrench, you can pick one up here at etrailer. We do have some options available, or you can take a look at your local auto parts store. You should be able to rent one there. After we have everything torqued down, we'll come back through and get our exhaust hangers put back in place. Now again, a little bit of soapy water really helps with getting these put back in place and it makes it just pop right on. With our exhaust back in place, now we'll just take our cambuckle strap down, and that'll do it for our look at and our installation of our Curt hitch on our 2026 Genesis GV70. I'm Scott with etrailer, and thanks for watching.
Customer Satisfaction Score:
93% were satisfied with this product
7% of customers were not satisfied
Ratings & Reviews

Do you have a question about this Trailer Hitch?
Info for this part was:
At etrailer we provide the best information available about the products we sell. We take the quality of our information seriously so that you can get the right part the first time. Let us know if anything is missing or if you have any questions.


















Gwendolyn Y.
4/9/2026
Thanks for sharing your experience with us! I'm sorry to hear all that you have gone to to get the hitch install but I'm glad the team got you what you needed. I'll make sure to share this with our customer service team so they can all get a fist bump.