

 Arrives before Christmas
 To see if this custom-fit item will work for you please tell us what vehicle you'll use it with.
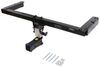
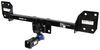
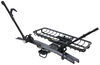
This fully welded trailer hitch receiver bolts onto your Audi Q5's frame with no welding required. Powder coated steel is sturdy and corrosion resistant.
Features:
Specs:
At etrailer.com we're committed to the products we sell, and to our customers. Our experienced and knowledgeable staff are available via both phone and email to address your questions and concerns for the lifetime of your hitch. The technicians at etrailer perform hitch installations on a daily basis, making them a valuable resource for do-it-yourselfers. The one-on-one, personal service you'll receive comes straight from an expert in the towing and automotive field. We've installed it, we've wired it and we've towed with it, so whatever your question, we can answer it.

California residents: click here
Videos are provided as a guide only. Refer to manufacturer installation instructions and specs for complete information.
Hi, this is Scott with etrailer. Today we're gonna be taking a look at and installing our Curt class three hitch for our 2020 Audi Q5. Our Curt class three hitch we have on our Audi today is going to be a hidden cross tube design. So most of it is going to be hidden up in behind your fascia. This section of your hitch right here, your main part that you're actually going to be using is gonna be the only part that you're gonna be seeing. Our Curt hitch is gonna have a two inch opening and that is gonna accommodate most of your popular accessories that are on the market today.
And it is really common for everything pretty much anymore is a two inch receiver. It's going to have a tongue weight rating of 750 pounds. That's gonna be your tongue pushing down on this portion of your hitch itself. And that is the combination of your bike racks with all your bikes on it, your cargo carrier with all your gear on it, and that's the weight for that. It's gonna have a gross trailer weight rating of 5,000 pounds and that will be the weight of the trailer and everything you have on that.
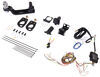
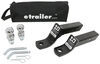
So what you want to do is take the hitch's weight rating, compare it to the manual and go with the lowest of the two. Your hitch is gonna have a welded on chain loops and it's gonna accommodate either your S style or your clevis style hooks. So either one of those are gonna help keep your trailer secure when you are towing. It's going to have a 5/8 pin hole opening and that's gonna secure and keep any of your accessories on. This hitch will not come with a pin.
So a lot of your accessories on the market may have a pin with it or you can pick one up here at etrailer. Another nice option is the lockable pins. Those are really nice, so if you walk away from your vehicle and you have your accessories on, you can lock that in place so nobody can take any of your accessories off while you're not around. As far as measurements go, from the center of our pinhole to the edge of the bumper, we're looking at about 2 1/2 inches there. And with that number, that's the number you want to use to see if any of your accessories that may fold up and stow away will make any contact with the back of your vehicle when you do fold those up.
As far as from the top of the tube to the ground, we are looking at right around 14 1/2 inches. And with that number, that's the number that will help you decide if you need any raise in the shank of any of your accessories, like your bike carriers or your cargo carriers. As far as installation goes for this hitch, it can get a little bit involved. You will need to remove your rear fascia to get it installed. If it's something you don't have time to do and you really don't feel like messing with it yourself, you can take a look at our dealer locator and find something local, have it installed for you or if you feel like installing it yourself, stick around, watch our video and we'll help you get it installed. To start our installation, we're gonna have little Torx bits here on the back. We're gonna have four of 'em across. We're gonna take a T25 Torx bit and just get them screws removed. (tool whirring) On the back of our fender well, here we're gonna have another T25. We're gonna have one of these on each side. We'll go ahead and get those removed. (tool whirring) Now we pull back our inner fender trim and back here on this area here where your trim panel's gonna be, you're gonna have three 25 millimeter star bits back here. We need to get those out and these can be really hard to see and really kind of tricky to get at. So just be patient, maybe put you a little light on it. (tool whirring) Okay. Okay, now we got those three out. We'll do the same thing on the other side. Now we're gonna need to take our wheel trim off and just kind of get it pulled back up to about here. 'Cause behind here we're gonna have a screw we need to get to. So I'm gonna use a plastic trim tool and if we just follow up the edge, we can see where our trim is and just more gently pop that back. As you can see here, we do have some blue painter's tape on. What we're gonna do with that is just gonna keep us from scratching up anything on our body. I'm just gonna move our way up with our trim tool and carefully pop those loose. (trim popping) Now we have it popped back to this point, what I'm gonna do is just take a piece of paper towel and stuff it behind here and that's gonna hold my trim back outta the way. So when we pull off our fascia, it's not making any contact. Now on both sides we have a screw we need to undo, so we're gonna get those done real quick. (tool whirring) Now we'll need to get into our trunk space area and we need to get our floor removed. With that, we'll just pull that out of the way. Now we need to remove this back panel. What I did is just get it popped up and once you have it popped up, get your fingers under it and just apply pressure upward and move along and just move that out of the way for now. Now you're gonna have four rubber plugs along the back, your furthest to the outside of your vehicle is the ones you want. Just want to get a trim tool behind that and pull that rubber plug out. And behind here we have a 10 millimeter nut. We're gonna go ahead and get those popped out. Now when we're doing these 10 millimeter nuts that they have in here, we want to be really careful and not to drop it down in there. So I'm just gonna do this slowly while I have a light in there, making sure I'm kind of keeping an eye on it. (tool whirring) Now you're probably gonna want to have a magnet for this part just to get these out. Otherwise, if you drop it down into the bottom, you can't really get your fingers down in there to get it. So having a magnet handy really helps you out with this part right here. Now we're gonna undo this side panels. We'll take 'em out on both sides, just set them off to the side. Right over here you're gonna have another 10 millimeter nut on each side down here in this pocket, similar to ones we just took out in the back. Now on both sides we'll have this plastic part and it is going to be a T20 star bit, and we'll get both those out the way. Now we want to get behind either side. We pull back and work your way across here, kind of pulling towards the rear. (trim popping) Now we can just lift away and we'll just set it right there for now. Now we'll come through and remove all of our bumper brace bolts. (tool whirring) Now with all of our hardware off, we can set this aside and we will be installing this after we get our hitch in place. Now that we have our hitch in place, we're gonna put our bumper beam back on top and basically just sandwich our hitch in and we'll start putting on our new hardware. Now I'll come back through and make sure I have my hitch centered where I want it to be. Now I'll come back through and just snug down my hardware. (tool whirring) After we have 'em all snug down and our hitch where we like it, we'll come back through and we'll torque down our hardware to the specifications listed in our instruction manual. Now that we have all of our hardware torqued down and everything's in place and we like the way it looks, now we can come back through and we'll get our fascia put back on in the reverse order that we took it off. That was a look at our Curt class three hitch for our 2020 Audi Q5. I'm Scott with etrailer. Thanks for watching.

FIT PERFECT
Worked great and easy install with helpful video

Do you have a question about this Trailer Hitch?
Info for this part was:
At etrailer.com we provide the best information available about the products we sell. We take the quality of our information seriously so that you can get the right part the first time. Let us know if anything is missing or if you have any questions.


Thank you! Your comment has been submitted successfully. You should be able to view your question/comment here within a few days.
Error submitting comment. Please try again momentarily.