
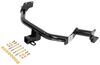
Roadmaster Direct-Connect Base Plate Kit - Removable Arms


To see if this custom-fit item will work for you please tell us what vehicle you'll use it with.


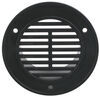
Designed for use with motor-home-mounted tow bars, the direct-connect brackets are virtually invisible, easy to mount and remove, and they eliminate the need for a quick-disconnect crossbar on your tow bar. Installs on your vehicle's frame.
Features:
Note: Roadmaster direct-connect base plates will only work with Roadmaster tow bars that slide into a trailer hitch, such as the Nighthawk, Sterling, Blackhawk, Blackhawk 2, Falcon, or Falcon 2. These base plates will not work with tow bars that require a hitch ball.
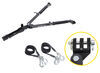
The drawbars, or front arms, on this base plate kit are supremely easy to mount and remove. Just insert them into the brackets and twist to lock them in place. To remove each arm, simply tug the built-in pull pin to disengage the lock, twist the arm back and pull it out of the bracket. Once the drawbars have been removed, the remaining brackets are virtually invisible. On most automobiles, the brackets are mounted within the grille, where they remain not only unseen, but protected from scrapes and scuffs as well.

California residents: click here
Videos are provided as a guide only. Refer to manufacturer installation instructions and specs for complete information.
It's Brad here at etrailer, and today we're taking a look at and installing the Roadmaster Base Plate on a 2021 Cadillac Escalade. Putting a base plate on any vehicle is something that's required for a flat tow. And when you do something on an Escalade, it's a nice vehicle, you want it to look clean. And many people are worried about the finished product, and Roadmaster did a really good job of keeping this nice and tidy in this lower grill. So you get all the function, it's all gonna be up front, and that's gonna be where you hook all your components up. It is rather narrow, but I think that, again, that's to keep that clean look.
So when you don't have any of your flat token components in place, really the only thing you kind of see sticking out are gonna be your safety chain loops, which are just far enough out to hook up so it's clean, it's not sticking out too far. Even the breakaway switch where they allow you to mount it up is nice and clean, as well as the six pole. So they've done a really good job of making it look as clean as possible when not using it. And you still get all the fun usability of being able to hook it up easily because you have your components in place. When you are ready to tow, you'll just simply take your arms, put them in.
And you're gonna get a little spring back from the clip. Just quarter turn that until that snaps into place, and that's gonna lock in, allowing you to put your tow bar. Now that's something I will recommend is getting a tow bar that's gonna be the right weight capacity for this vehicle is key. But with these arms, you wanna make sure that you either get a Roadmaster tow bar that has this style ends, or you can get a a different brand of tow bar and get the adapters. But it is crucial.
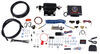
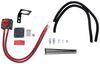
Roadmaster has a specific pin that's a little bit larger diameter to make sure that you can attach to this base plate. To flat tow any vehicle down the road, there's gonna be five main components that are required. And the first one, starting on the vehicle side, is gonna be the base plate. And that's gonna be the structural mount to the frame of the vehicle to allow you to tow it down the road. Your tow bar is gonna be the connecting point between the base plate and the hitch on the RV.
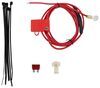
And just like pulling a trailer, you have safety cables that will attach from the hitch on the RV to the attachment point on our base plate. So that way, if there was a disconnect, we have our cables still holding everything in place. We have our diode wiring, and that's gonna transmit the light signals from the coach to the taillights on the RV. So you'll get your running lights, turn signals, and brake lights, and that's all transmitted through our umbilical. Now you also have a supplemental braking system. Ours today has air brakes, but all braking systems will have a breakaway cable. That's in case if everything was to fail, this cable will pull. It's gonna apply the brakes on the vehicle so it's not rolling down the road. And with air brakes, we do have an air cable from our coach. Depending on the coach you have, you may or may not have this. Now with the Escalade, there is something unique as well. The battery needs to be disconnected, and you can do that manually by undoing the battery terminals. Today we use the Roadmaster battery disconnect, which is a solenoid. It's really nice, it's just a push of a button, making it a little bit easier each time you hook up. Something you might wanna look at ahead of time is gonna be a high low adapter if you need one. And what that's gonna do is get your tow bar as level as possible going down the road, and you want it within a three inch variance between the coach and the towed vehicle. So to help you out, a measurement from the ground to the center of our pin is right at 16 inches. So you can measure from the ground to the center of the pin on the hitch on your RV, determine the difference. And if you need a high low adapter, we have plenty of options available to get that nice and level. So hopefully this helps you kind of figure out what you need to flat tow your Escalade. And in terms of installation, this base plate is not necessarily the easiest one to do. The whole fascia will come off, and I recommend doing all of the rest of your flat tow install at the same time to get everything ran nice and clean. With that being said, it is gonna structurally mount to the frame of your vehicle, so give yourself a little bit of extra time to get this installed if you're doing it yourself. But if you go through the video and decide maybe it's not for you, you don't have the time, the place, the want to do it, or the tools, whatever it may be, at the end of the day, if you still wanna flat tow your Escalade, you can reach out to our dealer locator to find someone close to you to get that installed. And once you get it installed, send us a picture of your setup. We love to see neighbors using their vehicles out in the open, gives other neighbors an idea of what they can do with their vehicle. So please share any content you have with us. If you're doing this yourself, follow along, I'll show you step by step how to get your base plate installed. And as we begin our install, there's gonna be a lot of hardware that we're gonna be taking off. So I highly recommend having a nice spot that's organized to keep all that hardware, because the chances of you doing the rest of your components while having the fascia off is is actually a kind of a recommendation. Because with this off, you'll have your base plate, and that's a great time to run the wires, not only for your diodes, but also your braking system and any other component. So you're gonna have the fascia off for a little bit, so having that organized spot is gonna make sure when you do put it back together, it's gonna be a little bit easier. First thing we'll do is pop open our hood, and there's a cover that goes over the radiator support. And this is just gonna be some plastic push pins. So just work your way along here until we get this removed. To remove a plastic push pin, these ones have a slot on one side, and a trim panel tool does a really good job of raising up the center. And then you can get the whole plastic push pin out at once. A flathead screwdriver also can accomplish this job fairly easily. But once we get one off, we'll just repeat for the remaining ones. Those plastic push pins removed, we're gonna set this aside. That's gonna expose the 10 millimeter bolts that we're gonna remove across the top. So there's gonna be six of them. We'll get those taken out. (drill whirls) Now we're gonna head to each of the wheel well liners, and it's gonna be a series of T15 screws that attach it. So you'll see the ones on the outside are fairly easy to get. There's four of them. As we move in a little bit, you're gonna have one that's tucked back here, as well as one that's up here. And that's gonna be holding that fascia on, so we need to separate that on both sides. Now if you need to gain access to these screws, sometimes it can be a little bit tight here. I just have a small quarter inch ratchet with a bit. But what you can do is hop in the vehicle and turn the tire one way or the other. That should expose that a little bit easier, depending on the tool that you have. On our driver's side, I'm gonna just peel back our wheel well liner, and we're gonna start to disconnect some connections that we have. So you'll find a plug that's gonna be located right here. There's a red tab on top. If you just pull that back with your fingernail, that's gonna unlock it. And then if you push on the section where that red tab was, you should be able to get this to separate, leaving our plug like this. Now there is a washer line that they said to unhook. I'm having trouble really getting eyes on it and being able to gain access. So as we move forward, we may need to get that separated, but at this point we can head over the passenger side, where there is gonna be a few more connections that we need to take apart. We have our main harness, and then we have a camera that's located up there. You'll even see the red tab on the camera. So that's gonna be similar, where you just pull that back like we did on the driver's side and we should be able to separate 'em. Now if you need a little bit of extra room, these just have plastic clips that pop them in to the the metal bracing on the vehicle. So if you need a little bit more room to work, you can pry that off with a plastic trim tool, and that'll give you a little bit more room to work. And here at that plastic clip, I just took that out so I can rotate it and get better eyes on this. And then our main harness is gonna be this guy here, and this is a little bit different. You're gonna slide this whole portion up, and that's going to unlock it and push this tab out. So we'll just push up on the clip. And there is a locking tab on this as well. So push back the red. And once I get this popped out, I'll show you a little bit closer what I'm working with. So once you pull back the locking tab, you can press on this, and that's gonna allow you to pull back the locking mechanism. And this will slide the harness in and lock it when you push forward. But in order to unlock it, you're just gonna push this down and then you should be able to get those plugs to separate. Now you may need to work on this in here by pressing that and pulling. It's not exactly easy to separate but we do have it separated now. So that's the main thing, because this is attached to our fascia, and this is attached to the chassis. In order to get the fascia off, we do have to get that separated. Each side we're gonna find where the fascia meets the front fender. There's gonna be this seven millimeter screw and it's facing down. So it can get a little bit tight here, but we'll get this removed and do the same on the other side. (drill whirls) Now there's gonna be additional hardware that we need to take off, and this goes on the fog light housing and it attaches to the fascia. So the 10 millimeter that's located here, as well as the one that's a little bit higher. We're gonna get that removed a little tight here. (drill whirls) Now you're gonna want to head underneath your fascia. And underneath, there's gonna be a ton of different T16s, but we're not gonna be taking all of them out. We're gonna take the two on the outside. There's two that are close together. These are gonna stay. And then we have two in the middle portion. So that's a total of four on each side. So get those removed and keep these in place. They have a block that kind of locks in this under air dam, so we wanna make sure we keep that in place. Once you get those removed, you're gonna come back with a seven millimeter socket, and we're gonna be removing the screws that are located here, as well as underneath to get this all separated. (drill whirls) Now once you have all your hardware removed, this underbody panel we can set aside for now. Now we're gonna take our 10 millimeter socket and get the screw removed, attaching it to the frame. We're getting ready to take our fascia off. And something you might wanna do is put some painter's tape along the fascia and the front fender. It's gonna keep any rubbing of the clear coat, you know, to a minimum of potential scratching. And to get this off, you're gonna want an extra set of hands and have a spot set aside to keep your fascia while you get all your components installed. So up top where we remove hardware, there are some tabs. You just kinda lift this up and pull back, so those kind of unhinged from there. And then you're gonna start on each corner, just peeling back. It's just a series of clips along here. And once you kind of get a few popped off, you just work your way through and it's gonna continue on on the front. So start on the outside, work your way towards the middle, where there is gonna be a series of clips along the grill. And you may want to grab underneath to loosen some of those clips up. That'll help work it through if you're getting any resistance. And those clips, they attach to this metal bracket, so there is a little bit stress there. So if you kind of grab on this center brace to pop those out, that'll help it along. But with everything separated, we'll put our fascia aside. Now we need to attach the bracket for our adaptive cruise control. And I've marked it out in yellow. And whatever cutting method you have, I'm gonna be using an angle grinder. And you could remove this entire thing by pulling our bracket off with the 10 millimeters or the seven millimeters, which we will eventually take off. But having it structurally mounted to the vehicle does make it a little bit easier to cut. So I'll go through here and get this yellow portion cut out. That's gonna give us space to get our base plate mounted up. (drill whirls) Once you get this cut out, I do recommend taking a file to any of those edges. And then also a little bit of spray paint, whether it be black or clear coat, just to coat up any of those raw edges that we inchesre made so it doesn't turn to rust and corrosion long term. With that cut out, we're gonna take off our seven millimeter screws, and we can just let this hang and that's gonna give us more space to work. (drill whirls) Now we're gonna start getting parts of the base plate up, and there's gonna be side specific brackets. So on the driver's side, what you're gonna be looking for is this notch is gonna sit back, and this tab is going to sit underneath. So the notch is gonna go right over that plastic part. So as I slide this in, we should have a hole that's aligned here. And it should kind of almost rest in place. So what we're gonna do is get our nut plate. That's gonna just slide in. We're eventually gonna be bolting up a bolt through where we drill, but this will keep it in place, because we're gonna be putting this frame spacer. And this is pretty simple but you need to make sure that you have the right bolt. From the longer bolts in the kit, there is one that is slightly shorter. You're gonna want the long bolt. And we're going to slide this into place. And it's gonna line through two holes and through our bracket. Make sure you put a flat washer on the head of the bolt. And then we'll pass this through. And once we slide it through that bracket, it should be that first mounting hole. We're gonna finish that up with a flat washer, a split washer and a nut. But we're gonna leave it hand tight for now. We'll come back later to tighten it all down. Now something you're gonna want to do on all of this hardware is put some red Locktite on the threads, because as we go back later and tighten it, torque it down, that's gonna make sure that those bolts don't become loose over time. So as you're putting the rest of the hardware on, just make sure you're putting a little bit of that red Loctite on. Take that shorter bolt, and that's gonna pass through this lower hole. And you may need to move your bracket a little bit to get it to pass through the hole on the bracket. But same thing, once it's passed through, we're gonna finish it up with that flat washer, split washer, and nut combo. Now we're gonna be drilling out two spots on each side, and the first one is gonna be the template that's made with our bracket underneath. So I would recommend starting with a small drill bit to kind of drill out and then work it up to 17-30 seconds. A little bit over half inch is gonna allow us to pass our bolt up and eventually get that hand tightened onto our nut plate. The other drilling spot is going to be, you'll find the hole here, the secondary hole, and on our bracket there's two, but on the inside of the frame rail that hole does not continue. So we need to drill through this hole and through the frame rail, and that way we can bolt up on the side of our bracket on the inside. (drill whirls) And once that's drilled out, just test to make sure that your bolt passes in. We have a split washer attached. So as I feed this in, we're gonna move that nut plate until we can thread this on. So just get a few threads started. Now I'm not gonna thread this all the way on, because I don't want the threads of the bolt to be in the way as we drill straight through here. Once it's drilled out, we're only gonna be bolting up on this side so it's not gonna be in the way. But in order to get a straight shot across to get the hole drilled out, you can do it from this side and use the bracket. Or you can just take a drill bit, run it all the way across, whatever works best for you. But the same thing, have your bolt ready to test and make sure it feeds in. And we'll be using the other nut plate to get that in place. (drill whirls) And if you're drilling from the outside, what I'd recommend doing is going on the inside with a smaller pilot bit, and that way you can get the start of the drill bit through the other side. (drill whirls) And once drilled out, just make sure that your bolt passes in. And then from here, you can grab your nut plate, the smaller one, and you can put bends on this. It's not gonna matter as long as that weld stays on place. And that way we can get this over that frame spacer and get a few threads started on here. Once you get the passenger side done, the driver's side's really gonna just be the reverse of it. The good part is is the hole is already here on the inside, so you don't have to worry about drilling that out. You'll just run that through and you'll be good to go. So get all your hardware hand tightened in place. Getting our cross member section in place, it's gonna be a little bit tight here, so we'll have to raise this up and kind of wedge in between and try to align these holes. I would have your fine thread bolts ready to go. And we'll be passing 'em with a flat washer on the outside. Our cross member will be on the inside. And once that's passed through, we'll finish it up with a flat washer and the nylon lock nut. There's three on each side. So the main thing I'd recommend is raise it in place, get two of them up and started. That way it'll hold it in, and then we can get the rest of the hardware started. So I loosened my brackets up. It is pretty tight here, but I think if I kind of wedge in kind of at an angle, I can push this in. We might have to give it a little love with the dead blow. So if you wedge in the bottom and get this bottom bolt just started on each side, now we can kind of just raise this up with the dead blow, and it's gonna take having to fight this a little bit. A little easier 'cause you can kind of work both sides, until you get those holes aligned, and that way we can get our hardware in. Now if you need to, obviously you can see this kind of starting to not taper as we wanted it to get it all aligned. And what you can do is just either put the arms in place and use that as leverage to kind of just start to raise that up. But we'll get these aligned as possible. And what we're looking for when it's all in place is this portion to be flush. So once you get all the hardware in, kind of massage it with the hammer until we get this portion flush with the bottom part of the bracket. Get this as level as possible. Our brackets are bowing out. And one of the last steps is gonna be test fitting the fascia, and you want the variance to be able to move this up and down to get it perfectly aligned. But our back brackets are pretty well in place because they're using factory holes. So I'm gonna go through and get these snug down first, and then we're gonna come back with a torque wrench and we're just gonna be focusing on our brackets. We're not gonna be touching any of our cross member bolts. So you may need a three quarter inch wrench to put on the head as you snug these down, and you don't need to get too crazy because the torque wrench will take care of the rest of it. And we need to do this in a specific order. It's gonna draw the bracket in how we want it. The first one we're gonna tackle is this lower bolt. Now because these weld nuts on the nut plate, it's not super strong. It's enough to hold this in place as we tighten it. I recommend not using an impact, that can snap that off and then it makes it really difficult to get these snug down. So start with this bottom one. We'll then go to our back bolt that we have, and then we're gonna move forward to these forward bolts. So just follow that pattern on both sides as you snug this down. And the same goes for when you torque it down. Something I noticed when tightening our bolt where the frame spacer is, this tab, I haven't quite found out exactly what it does or if it does anything, but I will say, at some point we're gonna have to come back to these bolts. So to make it a little bit easier, I would tighten it to where it's up out of the way, and that way it's gonna be a lot easier to gain access to these later on. So once you get it all snug down, we'll come back with that torque wrench. And this is really just gonna make sure that the hardware's gonna be tight enough for the lifespan. But also, especially when it comes to those nut plates, it's not gonna be too tight, putting stress on any of the hardware. All of these bolts are the same half inch. So just follow the chart that's in the instruction manual for the torque setting, and we'll go through and get these all torque down. So with that hardware torqued down, we can get the handle nut handles taken off. And you just kind of move them around quite a bit. Eventually that weld will break off. And if you have to, you can bend these in, it's not really gonna cause any issue. But while we're here we'll just remove them. And our next step is gonna be, we're gonna be heading over to the fascia. We're gonna do some modifications to really test fit to make sure that it fits properly. Now normally, I don't put the fascia back on until we have all of our components, but that's gonna allow us to really align this perfectly and get this torque down. And that way we'll know it'll fit for sure. On the backside of the fascia, it may depend on the trim that you have, but this lower filler panel we should be able to pop out, and that should give us access to be able to drop our base plate through this. So we'll pop out these white clips. And those just lock in place. So if you just push down on the tab, we should be able to get these to separate. If you need a flat head you can push down right there. And now there's just a series of clips along here, but this should all kind of start to remove fairly easily. So as I take this out, I actually realize these outside clips aren't necessary. This is the main panel that we're gonna be looking for. And it looks like we're gonna be needing to drill out this, but I'm gonna get this whole thing removed and see if that opens it up for us. I was able to get this popped out, it's mostly just a series of clips that you're gonna unhinge. They kind of get a little bit tight in the corners, but having this popped out means that we're gonna be able to get this bolted up, or loosely bolted up to really see how everything's going to interact. And then if we wanted to, we could trim this out. We may be able to really get this as clean as possible without having to trim. Sometimes I think the trimming doesn't look as nice as omitting, so it's very possible we may salvage some of this. So definitely keep this handy. With this mocked up, I was able to put my tabs in and just kind of snap a few of the clips in place. With this out, it sure does make it a lot easier obviously to feed this in and not have to guess on this. And so what I can do later is I might just keep this portion and snap that in. But otherwise, you are gonna be needing to use probably a whole saw to get these circular cut. But you can see pretty quickly where our six pull mount will feed through here. We have a breakaway switch that's back here, and then our safety chains go right through. So really the only drilling that I foresee having to really modify is gonna be this portion here. So I'm gonna wait to put this in. I think I can get it looking a little bit cleaner. And as I mentioned before, it does make it a lot easier to get all of your components in place with the fascia off. So I am gonna take this off. I know that it's aligned pretty well, perfect to where I need everything, and we're not getting any clearance issues on our fascia so we can torque down those bolts. And also, we're gonna attach that ACC again, and I'll show you a little tip on that. So we'll get these all tightened and torqued, three quarter inch socket. Again, you're probably gonna wanna wrench here. So as far as getting level, again, making sure that the bottom's gonna be level. We know that it fits. I do see that my safety chain loops do bend down. Don't use that as a reference. The main thing is is it's sitting pretty well level with the bumper beam, which we have going. So we'll get this all snug down. (drill whirls) So with those snug down, we'll get these torqued down. And that ACC, I am running into an issue with that bracket here, so I think I'm gonna bend that down. But we'll get that mounted up. Once the hardware's torque down, it's not gonna be an issue of it being in the way. So once you get that in place, really all that's left to do is get your components up. Now that you know that it's gonna fit, you'll get your fascia put back in reverse order once you have everything mounted. And I'll do some trimming on this and see what we come up with, and I'll show you how it turned out. Now when we left off, I had our panel, and I really mocked it up quite a few times to get it perfect. And the instructions do a pretty good job of laying out a measurement that you can use a two inch hole saw. Feel free to go a little bit larger. You can always cut more, but you'll see I left myself a little bit of gap there. And the main reason is, right where the pin latches in, you wanna make sure that that's not gonna cause any issues. So you can see where I trimmed on that just a little bit further in to allow for that pin to lock in. So I do recommend doing that. Something else that I noticed on the six pole, where this attaches, the boot was rubbing pretty hard against the grill. So in order to make it not flex, you could just cut that, but I just trimmed off a bottom portion. If you don't wanna do that, you could bend these arms down a little bit. The plug angle may go down, but that's one way to omit having a trim. Otherwise just kind of go at a light angle, and just knock out the bottom and it should fit just fine. And that was a look and installation of the Roadmaster Base Plate on a 2021 Cadillac Escalade.

Info for this part was:
At etrailer we provide the best information available about the products we sell. We take the quality of our information seriously so that you can get the right part the first time. Let us know if anything is missing or if you have any questions.


Thank you! Your comment has been submitted successfully. You should be able to view your question/comment here within a few days.
Error submitting comment. Please try again momentarily.