
To see if this custom-fit item will work for you please tell us what vehicle you'll use it with.
The Vanish tonneau delivers a sleek, ultra-low profile and great features at an economical price. It sits only 1/2" above the bed, inside your vehicle's rails. XT-Dial offers quick tension adjustment, and a trigger latch secures the cover.
Features:
Featuring an ultra-low-profile design, the Vanish tonneau from Access rolls up so that you can haul bulky items and rolls down to shield and secure your vehicle's bed and cargo. The custom-fit cover sits only a 1/2" above your truck bed and keeps air from getting caught by the tailgate, thus reducing drag. That can improve your gas mileage by up to 10 percent. Velcro closures on the sides help seal the cover to your truck box and allow you to peel it back quickly for easy access.
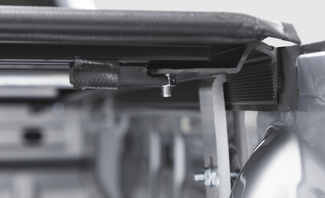
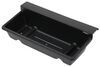
The tonneau stores neatly behind your cab, secured by two elastic straps with large hooks.
The cover is constructed of double coated, reinforced UV-blocking vinyl, so it won't fade in the hot sun. The material stays flexible down to -40 F and won't shrink, regardless of the temperature. Aluminum bows line the underside of the tonneau and act as ribbing that supports the cover and makes it easy to roll up.
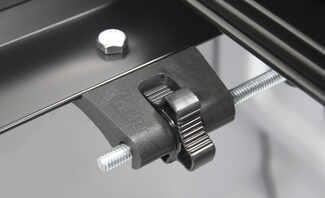
Customize the cover tension by turning the XT-Dial easy-grip tension adjuster at the front of the cover, near your cab. A reinforced vinyl weather flap runs along the tailgate to help keep out dirt, rain, snow, and ice.
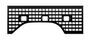
The contoured, black powder coated aluminum tonneau rails resist rust. They sit inside your truck bed side rails so that you can still use stake-pocket-mounted accessories, such as a ladder rack or tie-down anchors. Easily install the rails on a truck with an under-the-rail, drop-in bed liner. Over-the-rail liners can be cut to make room for the installation clamps.
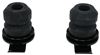
The tonneau's rails attach easily to your truck bed side rails using Tight Bite clamps. The specially designed teeth on these clamps seize the integrated ridges in the rails, ensuring a firm grip.
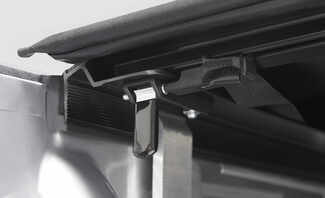
Once the cover is unrolled and in place, the trigger latch engages automatically to hold the tonneau closed. To release the cover, simply pull the latch for easy, one-hand operation. For added security, lock the cover on both sides using the 2 slide locks. And locking the tonneau won't interfere with your tailgate - open and close it as usual or add a tailgate lock (sold separately) to get secure storage for your cargo. Cover your assets with this tonneau from Access.
California residents: click here
Videos are provided as a guide only. Refer to manufacturer installation instructions and specs for complete information.
Hi, I'm Matt etrailer. Today we'll gonna be talking about the Access Vanish soft roll-up tonneau cover on the back of our 2025 GMC Canyon. And if you do decide to go with this cover after watching this video, let us know how it's fitting on there in either a comment or view. So the vehicle we have today is actually one of our neighbors, and they wanted us to install a tonneau cover for 'em. Now the original one they had picked out wasn't gonna work with this truck, and that's because the package they have comes with this rack. So if you have a similar rack, you're probably gonna be in a similar situation.
So this to cover actually allows this to work because with this type of rack being on your bed rails, it's gonna take up a majority of that space. As you can see here, there's clearly enough room for that tonneau cover to work around it. So if you're in another similar situation, let's say you don't have this rack, but instead a ladder rack back here that mounts to the top of those bed rails, this is probably gonna be the tonneau cover from you. It'll still allow you to have that tonneau cover look, something that's a little bit more aesthetically pleasing, but it's not gonna get in the way of anything back here that mounts to your rails. But if you have a Canyon that does have some free space on this bed rails, like you don't have this rack back here, then I would recommend checking out the etrailer soft roll-up tonneau cover 'cause that one's just gonna be a little bit more affordable and it's gonna do basically the same thing.
Now, another low-profile option I do like is gonna be a canister style. And that does have a leg up on this because as you can see I have, to manually get in here since I do have this rack that gets in my way, I gotta unroll it. Canister style, you can just press a button and it comes out directly. Now the issue with that, if you've got a rack back here, that's not gonna work 'cause canisters weigh quite a bit, so you're gonna need more bed rail space on here, which you just can't get with the Canyon. Another thing I don't like with a canister style specifically on the Canyon is at the very back of that bed, you're gonna have to put that canister there.
That's gonna take up a little bit over a foot of space, and the Canyon already doesn't have that big of a bed so you're really gonna limit yourself on what you can haul. Now I talked about this is gonna save you a lot of space, so let me get a few measurements that really show that off. So I'm gonna get the height of it. So that's gonna be a little bit under an inch, which is gonna be great because if you don't have anything back here. This is gonna be the way you're probably driving around with it most of the time.
So you want something that's gonna look good. The next thing I wanna point out is just how much space that is taken up on your bed rail. That little lip there, and you get a measurement of that. That's gonna be about close to 1/8 inch just on your bed rail. So that's really no space at all, and you can really only accomplish that with a soft roll-up because any other type of tonneau covers, there's gonna weigh too much and it won't be able to support this. Now we are trying to haul a few things. You might need to know these measurements to see how much space you actually have. So for the height, it actually sits up above your bed rails, that's gonna be four inches. So that's gonna sit right underneath your headrest so it won't impede your vision any. And for the distance, it actually sits in your bed. That's gonna be just about four inches. So it's only taking up four inches of space in the bed. So that's really nothing. And it is kind of flexible. So you do have it, if something pushed up against it, it will move some. Now for this space underneath that, 'cause we are gonna have this rail back here, we're gonna have just about 20 1/2 inches of space that'll be underneath the tonneau cover. So if you're hauling with things and that covers fully rolled out, anything below 20 1/2 inches is gonna fit under there just fine. So no matter if you're loaded up or not, your rails are always gonna be taken up by at least a little bit of space. So if we get that measurement real quick, that's gonna be just a little bit under three inches of space on either side. So for a total of a little bit under six inches. So keep that in mind if you have anything that is extra wide. But most things should fit in here just fine. And we are gonna have this hook and loop here on the side. That's important because you wanna make sure you're pulling your tonic over overhead so it keeps it nice and tight when you're driving down the road. Speaking of keeping things nice and tight, we are gonna have this adjustment point that you can tighten at will. So things will continue to work fine for you. Something else that's gonna help with this is gonna be these beams. So if I unroll this a little bit, you get a better of look at what I'm talking about. Right here, what this is doing is making sure if there's any water buildup on the cover itself, it is gonna help disperse that and prevent it from piling up. So a good point to start off with is just gonna be laying everything out. So right next to me, we're gonna have all the hardware. We'll go over that a little bit more in detail once we're actually using those. We're gonna have some weather stripping, and we're gonna have the tonneau cover, and you're gonna have two rails. And speaking of which, we can start installing these now. So I already put the rails on here, but I didn't put 'em on all the way 'cause it's kind of tricky to do this if you're all by yourself because you're gonna want to want one person holding that rail on and the other person tightening it down. But what you're looking for when you put it in place is the one on your driver's side. You wanna make sure we have this lever here at the tailgate side. We also wanna make sure that this lip here, where there's just a little bit at the very top, is over your bed rail, and we're gonna have that foam side pressing on the inner side of the bed rail, just like that. Now I'm gonna show you how to put those clamps on that come with your kit because they're all gonna install the same way. When you're putting your clamps on, you wanna make sure this rail is pushed up as far against the back as possible closest to your cab. Now, for that first clamp you install, we wanna make sure this is as far back as possible. So since we do have this indent in your bed, this is gonna be the furthest point we can go. Once you've done that, you're probably gonna wanna have a friend that help you out with that process 'cause you don't have much to really lean it on. We can move to the next one. Again, they're gonna be the same process. What we wanna do is notice how we have these indents. We're gonna have a larger one here and the smaller one. For our case today, I'm gonna have both the larger ones on the bottom. This is really just to fit different styles of trucks that have different thicknesses of the bed rails underneath here. And I found that this one works the best. You just wanna make sure it's like this for all the clamps on here. Then, we're gonna come to a spot right over here. So when you're on your second one, you wanna come to about the center of the rails between the two clamps you're gonna install, you're gonna find these grooves. My case today, I'm gonna put that as high as possible and I'm gonna make sure that nut is facing the outside. Push that as high as possible, make sure it's biting on to those grooves there by squeezing it. You just kinda hand tighten it a little bit. Once that hand tight, and I'll come back through with a 1/2 inch socket and wrench, tighten it down just a little bit more. (ratchet cranking) Might even push up on it now, and it's gonna stay in place. And we're not gonna go super hard with this, just a little bit tighter 'cause later on we're gonna come back by and torque all these down. Once that one's done, we're gonna repeat this process on the very front nearest to your tailgate. And then you're gonna do the same thing with all three of these clamps on your passenger side. With those types of those clamps tightened down a decent amount, then I come back through and just double-check our rails. What we're looking for is to make sure those rails are level with your bed rails, kind of sitting the way it is right now. Now, if yours is sitting more at a downward angle like this or an upward angle, then you're gonna have to come back through and loosen up those clamps and retighten them to see if that changes anything. If it doesn't, you might just need to change the placement of where that clamp is sitting or biting on. What I'd recommend you doing is either lowering it down or pushing it up, seeing if that changes anything. And most times, it should. Now with that done and it when it looks good, then you can just grab a torque device. If you don't own one, you can find one on our website, or you can rent one by one of your local auto body shops. And we're just gonna come back through. You'll have a search and spec in your instruction that you can tighten this down to. (torque wrench beeping) And something else I recommend is when you're torque these down, kind of hold the clamp when you do that 'cause you are putting a lot of pressure on this one point. So if you give it a little bit more support, that should help you out. So before we move over to the tonneau cover itself, I'm gonna grab this weather seal. This is gonna come with your kit. It's gonna have this red strip that goes underneath. So this red strip is gonna be protecting the adhesive layer here. So leave that on for right now. And what I'm gonna do is just gonna make sure I know where I'm gonna place this. So I'm gonna put it in this corner right here, right above that rail. I'm gonna fit something like this. I'm gonna run this down and it's gonna gimme an idea of how much I'm gonna have and how it's gonna go on here. You gotta notice we're gonna have a lot of excess, so I'm not gonna worry about that excess right now. When I'm gonna do instead is as you start putting this on. So now I can ask you to start removing that red adhesive and I'm just gonna start by just a little bit, get that started. You wanna have it facing this direction where that seal is gonna be right on that corner and this end facing the tailgate side. Something like that. There we go. Big thing is just take your time with it. So we we inchesre able to push this all the way to the other side. And we cut off some excess, so it's a little bit easy to see what's happening here. Now what you're probably gonna have to do is if you want this to be a nice or a finish, you wanna one whatnot, just cut off the very end here and make sure it's lined up with your bed rails. So you can just kind of grab a utility knife and cut that down. Something we did that help us stick a little bit better is use that wipe that does come with your kit, wipe this down some too. Also, for spray-in liners specifically, what you can do is kind of sand this down a little bit, make it more of a smooth surface. In our case, we didn't do that and we're still gonna be a really good fit. And this next step is gonna involve the tonneau cover, and I recommend getting underneath it. It's gonna be a little bit easier. So we have this resting on our rails and we're gonna have this bar that goes across. We wanna make sure the underside is showing up. You can tell because we have this channel here with that little square nut inside here. With this all right here, I'm just gonna grab this adjuster. This is gonna be the adjust the tightness of that cover, and this with the tube, there's gonna be one that's labeled, L, and one, R. The one that's labeled, L, is gonna go on your driver's side, and it's gonna go in kind of an orientation like this. And to secure the down, you're gonna grab your hardware. Now you're gonna have two different bolts and they're gonna have washers that come with them. You wanna make sure that you're using the longer of the two. This one right here. So just push that right through there, like that. And I'm gonna come over here and line that up. The reason why I think it's easily to do this underneath is 'cause that square washer is kind of, or nut, it's kind of far back in there. It's kind of hard to reach. So what I do is flip that over. And since that's facing downwards now, it's gonna be more weight here, making it a little bit easier to access. And when you tighten 'em down those adjusters, you don't wanna do it all the way. You still want them to be loose so you can move them around. And just repeat that on the other side. Once that's done, and we can grab this tonneau cover and bring it towards the front. Now, with this being on here, I might have to put this on at an angle to begin with, and then we'll just set it down. And we're kind of put this close to the bulkhead side of your cab. And what we're gonna do here is unroll this. Now when you unroll this, you're gonna have these straps. You wanna make sure these stay in your bed. You might need to arrange this just a little bit to get things tempted up. There we go. And we're gonna wanna push that in just a little bit, kind of push down on it. It kind of should just fall into place. So when you have this down, the way you're gonna be able to figure out if this is in the right spot is with this little tab here. There's gonna be an alignment tab that lets you know if everything is looking good. And we want this to be perpendicular with the tonneau cover itself. So right now we got this bend in here, so we wanna push that forward some more and looking for something that sits a little bit more like this. There we have it. There's gonna be one on each side. So you're gonna make sure you do the same process on your passenger side too. That's a good way to see if everything is aligned is to come over here to the edge of that bracket here. And if this is making contact on either side, you're probably in a good spot. Now what we're gonna do is align this adjuster. You're gonna have a hole here in the bottom. That hole is gonna line up with the one right on your rail. You also have a groove to help you get things lined up, make sure it is parallel. And the way you're gonna be able to adjust this is with this knob here. So you can turn that either way to either tighten or loosen it up, make everything lined up. Now sometimes if things won't move close enough inwards, you probably getting caught up right over here. You're just gonna need to either loosen or tighten that bolt up here so you can bring it to the very edge. Once that's done, then we can tighten this down. We'll start with that bolt first. You can see I'm a little bit off, so I'm just gonna adjust it to have everything in place. I'm just gonna loosen the side here on this little knob because we're a little bit cockeyed at the moment. Then we're gonna move over once that is through to putting a washer on here and then topping it up for the nut. Gonna start off by hand tightening it. (metal clacking) And then we'll grab our 1/2 inch socket and wrench. You'll need one on either side (metal clacking) until this is nice and tight. (ratchet cranking) When both sides are tightened down, then if we can make sure that this tonneau cover is gonna be centered on here. So what I'm gonna be doing is finding this metal bar on the tonneau cover itself. I have it rolled up some more so we can see it better. I'm gonna grab my tape measure and I'm gonna go from the edge of that bar right there. And you can use any point on your bed as long as it's the same on either side and measure outwards to see if it is centered. What I'm gonna do is use the inside of that rail. I'm gonna get the distance in between these two, right there, and I'm gonna compare that to the other side. I'm gonna make sure that's even. And if it's not even, all I'm gonna do is just push this over some till we do have it even. So something I wanted to point out before we tighten this down is where we are right now. So we're gonna be right behind the bulkhead or the back of your cab and the front of your bed. So this is where the tonneau cover ends. You're gonna have this flap here, and you wanna make sure you get this tucked under before we tighten everything down. Just gonna give it a better look and I'd give it a better seal. So I'm just gonna push all that in. So we left this point loose earlier, we can actually tighten it down now. And you're gonna do that same thing on both sides. (ratchet cranking) So now we can finally test to see how this is gonna fit if we need to make any adjustments. So I'm just gonna roll this out, make sure this stays pretty tight. There we go. (tonneau cover clacking) I'll get you the very back of it, (tonneau cover clacking) see if this grabs on. Here we go. And push down on this. This should take about 20 to 30 pounds of pressure to maybe lock into place. So it should feel like there's a tad bit of resistance, but mine right now feel is really tight. So what I'm probably gonna have to do is go back through there and just loosen up those adjusters we tighten it down earlier. Now we made some adjustments, this is a lot looser now, and I can attempt again to see if this is gonna work. So we're gonna make sure this grabs into that latch area there. Already, this is feeling way better, not fighting this much. It's gonna take a little bit of force to kind of put it down, but that's gonna be around 20, 30 pounds of pressure, at least. Come back over here, make sure this latch feels good too. You don't have to put too much force behind it. And of course, the first time you operate this, it's gonna feel a little bit stiff. Again, one more time. And this time, I'm gonna check the tailgate, make sure it's gonna close. And we're getting a good seal right on the back of here. Now if you're getting a little bit of a gap, you might need to make some more adjustments, or if it feels too tight, again, same, either pushing that back or forward some. And in some cases, you might even need to adjust the clamps. So what I mean by that is lift up on that, roll it in some. With this rear one, you can typically loosen that up a little bit, and it's gonna change the fitment of this or tighten it down some more, and it should change how the back of this feels. Last thing to check is just to make sure that these locks are actually gonna latch, you go into place. This is feeling pretty good. And once that's done, you can close it up and then take it out for a ride. (tailgate thudding) Well, if you guys have any other questions, please let us know here at etrailer. And again, I'm Matt, and thanks to watching.
Ratings & Reviews

The install was easy looks great thanks!
good product looks great and goes on really easy

Great product
Great product fast service haven’t installed it yet is my third access top
Product arrived 3 days after order placed. I did the install myself. Easy to understand directions, nice morning project.
As advertised and perfect fit.
Nice cover, fits well even after one year of use.
It was awesome and easy to install but I sold the truck
install was great, everything fit grate didn't take long.
Very happy with the finished product
Very good just what i was looking for. Thanks,
2018 F-350
Cover has been great. Good value. Would buy again.
I love the tonneau. It installed easily and has worked well fdor a year. Very satisfied.
Info for this part was:
At etrailer we provide the best information available about the products we sell. We take the quality of our information seriously so that you can get the right part the first time.


Thank you! Your comment has been submitted successfully. You should be able to view your question/comment here within a few days.
Error submitting comment. Please try again momentarily.