
To see if this custom-fit item will work for you please tell us what vehicle you'll use it with.
This soft topper changes how you use your truck bed. It lets you stack tall gear and keep it covered without committing to a permanent shell. You can fold it down when the bed is empty, or take it off when you need the full bed for hauling.
A truck topper changes how you can use your truck bed. Once a permanent one is bolted on, you lose full bed access unless you take it off, which usually requires tools, time, and another person. The Fas-Top Solo soft truck bed topper solves that problem without giving up coverage. It keeps bins, tools, and camp gear dry when it rains, and it creates sheltered space in your bed for camping. When coverage isn't needed, the frame folds down inside the bed so it stays usable. And when you need every square inch of bed space, the topper comes off without tools or extra help.
Once the truck bed is enclosed, airflow can become a problem. Heat, fumes, pet smells, or stale air can build up inside the bed, especially when camping or driving long distances. A mesh rear window (FT39CV - sold separately) lets air move through the bed instead of getting trapped inside.
Visibility can also be a problem. With gear stored in the bed, you may not want people being able to see what you're carrying when your truck's parked. A blackout rear window (FT33UV - sold separately) blocks the view into the bed so gear stays out of sight.
The Fas-Top system uses built-in rails with mounting channels. Those rails stay on your truck, so you can switch between the soft topper and other compatible Fas-Top components as your setup changes.
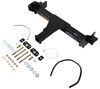
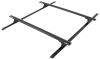
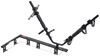
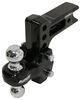
If you need to haul longer items like lumber or ladders, the Jay Bar ladder rack (FT57MJ - sold separately) adds crossbars above the bed so you can carry cargo that won't fit inside the soft topper.
If you only need to cover smaller items and want full use of your rearview mirror back, you can remove the soft topper and install a soft, roll-up tonneau cover (FT68NV - sold separately).
G-Hook Straps (FT65YJ - sold separately) hook directly into the rack and accessories, letting you roll up the sides of the Fas-Top truck topper and secure them out of the way. This gives you quick access to the bed and lets the topper function as a sunshade when you are parked.
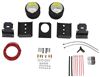
Fas-Top tie-downs (FT25YJ - sold separately) add fixed anchor points on the rack, giving your straps a consistent place to pull from instead of wrapping around bars wherever they happen to fit.
The Gripstix cargo grabber (FT52YJ - sold separately) gives you a way to load, lift, and move items in your truck bed without climbing in or overreaching.
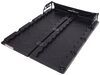
Large and small cargo bags (FT72AB and FT75YJ - sold separately) keep items contained so they're not rolling around in your truck bed or getting lost under larger gear.

California residents: click here
Videos are provided as a guide only. Refer to manufacturer installation instructions and specs for complete information.
Hello, neighbor. This is Curt with etrailer. And today we're gonna take a look at the Fas-Top soft collapsible truck topper on our 2025 Chevy Silverado 2500. Now, a truck topper is gonna be a great way to keep those things in your truck bed dry as you're traveling, and just, you know, keep it more secure. And it's gonna be giving you a bit better coverage than a tonneau cover would, mainly because you're gonna get about another almost 19 inches of height out of it, where a tonneau cover would be flush really with the rails. So if you've got some taller items in your truck bed that you'd like to keep dry, a truck topper would be the the best way probably to do that.
Now the cool thing about this one on here too is, on our 2500, this topper actually doesn't really come any higher than the cab, and I think that that's gonna be a big help when it comes to wind resistance, and because of that also maybe help out a little bit with any kind of road noise. And a soft topper is really great because this one is collapsible, so if you do have something that you need to get in or out of the bed that, you know, is taller than the topper, we can fold this down, still have access to almost our complete bed, and it's really easy to get up and down. Now, the Fas-Top Solo has an aluminum frame, and the cover itself is covered in a vinyl-coated canvas, and that's gonna be weather resistant and UV resistant, so it's not gonna fade on you, and it's gonna last you a really long time. Now, the edges are attached to these rails with a hook-and-loop system, and that's gonna be a big help, because it does make it a lot quicker to collapse and deploy this topper. As we come to the tailgate here, we can actually lift up this transparent plastic window space.
We have these trigger latches on the inside that if we push forward on 'em is going to release at the tailgate. And from here, we can get it rolled up and out of our way if we need to. And it's actually protected by more hook-and-loop and zippers on the side as well. So as we get that off of here, this is gonna be able to be rolled up. And we can secure it with these G hooks into these loops up here at the top.
Now, not only is this cover collapsible, but it's also very easily removable. In each corner of the truck bed, we have this strap with a hook at the end, and it's a ratcheting strap that can be loosened up for us. And once we remove all four of these, along with this pin on our hinges on each side, we can actually pull the topper off completely and set it aside and store it if we desire to. So we we inchesre talking about how it collapses, so let's show you how that works. So we've already got our tailgate window rolled up.
The side seams here, again, in the front are gonna work with the hook-and-loop, and then we'll have a zipper that we can lift up as well. And then what we're gonna do is just go down the rail and detach our hook-and-loop. And we're gonna basically just kinda throw this up over the top and out of our way. We're gonna do the same thing over there on the driver's side as well. Now, on each corner of our truck bed we have this strap and hook that I had mentioned earlier. So we're gonna go ahead and loosen those up a bit for us and remove our hooks. Yeah, perfect. So with all four corners detached, we're just gonna go ahead and start to collapse this up. And as you can see, the whole thing is gonna fold toward the cab, which means it's gonna leave us a lot of bed space to have the option of loading up those taller items. Next thing I'm gonna do is take this front crossbar, and on each end I'm gonna go ahead and detach that as well, and then I'll bring it down, just like this. So the idea of this is that when you have it down in this position, you're gonna wrap it up in this. And it's just the hook-and-loop placement. It makes it really difficult. It's meant to taco like this, which doesn't give it a very strong hold. It comes apart very easily, and it only has attachments on the corners. If it was me, I probably wouldn't even use this at all. What I would probably end up doing is just getting, you know, a few vinyl straps or ratcheting straps or something like that with plastic fittings so I don't do any punctures or anything, and I could strap it a bit altogether. If I had something in my truck bed that I was worried might puncture or cut into my cover, I might take something like a tarp or a furniture blanket or something like that and cover this with it so that wouldn't happen. That's how you essentially collapse it. Now, one thing before we do go to install is that, you know, this is actually really easy to completely remove. It's attached right here on this pin. It actually has plenty of room to move back and forth, so if I wanna remove it, I can just pull this pin and washer on each side of the truck, and I could take it off completely, and just not have the cover on it while I'm using that taller cargo. But with all that being said, let's go ahead and take a look at how to install it. So the first step to our installation is going to be to install our rails. Now, the rails are identical. And I'm gonna put this on just like so. You're gonna have your hook-and-loop attachment toward the outside, and on the inside you're gonna find this T slot here, And we're gonna find these nuts that can slide back and forth to different positions. So first thing I'll do is get this on, make sure it's flat and pressed up against the side of it, moved all the way up to the front of the box. And next thing I'm gonna do is go ahead and grab my clamp. And I'm gonna start in the middle. Now, there are five total of these sliding bolts going back and forth here, and the clamp placement where we're gonna want them is, we want one as far to the back toward the tailgate as we can get it, we want one as far to the front as we could possibly get it, and then we want one placed as close to the middle as we can. Now, for that placement, we're gonna need the one bolt. It's gonna be three clamps on the driver's side, three clamps on the passenger side. The extra two nuts are gonna be for our pin-and-clip attachment that's gonna end up being moved a little bit back from the center. So I'm gonna separate these. I'm gonna have my center nut right there. And I'm gonna go ahead and grab my universal clamp. So the clamp is shaped like this. You're gonna find a bolt hole on the outside. So I'm gonna take one of my bolts and washers, and I'm just going to line it up back here in a good position. Now, the thing about the Silverado, underneath the rail here, the attachments, there's all these different nibs and things that we gotta dodge. So I'm gonna place this in a way that I can get the best, most flat grip, without interfering with one of those. So once I get that on there, I'm gonna go ahead and pre-thread my bolt a little bit, and then I'm gonna slide it back and forth until I get a good placement. Now, once I find that good placement there, I'm gonna go ahead and take my 9/16 socket, and I'm going to get that tightened down. The whole time I'm doing it, I'm kinda adding pressure. I wanna make sure this stays flush against my rail, and I also wanna make sure that it's staying as far up to the front as I can get it. Now, this is gonna be the same process for my rear clamp and my forward clamp. Now, one thing I do wanna point out with the way that this bolt and washer goes on is you'll notice there's a little bit of a gap at the top. It is at a slight slant. And I found that when it comes to these Fas-Top rails, that's actually really common. I got a really good solid hold on it, so I'm not really worried about that, but don't expect this to be perfectly flat and flush. So the next thing we're gonna do is put on this attachment, that pin and clip that's gonna hold on our cover frame. Now, I have seen rails like this where it comes on it, but in case you need to install it, this is how you would do it. These extra bolts that we had here between our second and our rear clamps, we're gonna go ahead and position those in a way that this is gonna bolt on just like so. We wanna do it to where the stem of this is facing upward, and we're gonna put it on with these slots so that it is low as we can get it. And that puts this about flush with the inside of our rail right here. Now, if it hasn't been installed, one of the things that I have noticed with Fas-Top is they do put a mark there for you where it needs to go. So we just wanna line up this bolt stem here with that when we put it on. So I'm gonna go ahead and kinda loosely put it on so I can make sure I maneuver it and get it into a good spot before I tighten it down completely. So I'm just gonna hand thread it for now so I can move it easily. So with it in the right position, I'm gonna go ahead and use my same 9/16 socket and get that tightened down as well. Now, this is going to be a simple bulb seal with an adhesive backing, and it's gonna be placed along our bulkhead here on the flat portion of the bulkhead. We don't really want any of it on this more curved area. So as soon as that curved area stops, the flat portion coming across, we want it as close to that curved edge as we can get it without actually putting it on there. Now, we're not doing a permanent install today, so we're not gonna be putting this on, but it's essentially gonna go on really just like this with that peel-back adhesive backing, and any excess that we have when we get to the end we can go ahead and trim with a scissor or knife. So what we'll have as far as our frame and cover is, the cover is going to have these U-bar attachments going through the front and the back of it. As far as our side frame goes, what we're gonna find on our passenger side are these color codes, and they're gonna match up with the passenger side of our cover, so it's gonna be really easy to align it. So we just match up white to white, yellow to yellow, blue to blue, and green to green. Now, with this lined up to our passenger side, we've got our header here, and our latches at the end of our rails. We're gonna fit that right into the wedge and just get it kinda lined up there. I'm gonna do that on both sides. And the reason I'm doing it is just to keep some, you know, kinda clearance, and if I've got this up on the rail like this, that's just gonna be able to suspend this a little bit for me and make it easier to make my attachments over here on our pin and clip. So I'm gonna pull the clip and the washer. We're gonna go ahead and make our attachment. Replace our washer and our pin. We're gonna repeat that process over on the passenger side. We're gonna go ahead and get it raised up. And what I wanna do is go ahead and engage my front header up here and get it latched in. That's gonna give me a good, solid anchor point as I get everything else done. So I'm gonna fit it right here into the wedge of my latch, and get it locked into place. I'm gonna do the same thing over here on my driver's side. These straps and hooks are located on all four corners of our cover, and on our latches at each end of our rails, we've got a hole here for it to go through. So I'm gonna go ahead and latch all four of my straps in. And I'm not gonna pull 'em too tight. I'm just gonna get 'em so that they're just a little bit taut. And I'm gonna repeat that process over here on the front again. And we'll do the same back here. So once my straps are in place, I'm gonna go ahead and take the rear header here, and I'm gonna drop it down, and I'm gonna go ahead and deploy my sides over. Now, just behind the cab, on both the driver and the passenger side front, I'm gonna go ahead and zip down, and attach the hook-and-loop attachment around the front there. And with both sides done, I'm just gonna give this a little bit of a tug to see what kind of room I have. Check the other side as well just to see what kind of gap I've got over there. If it's looking like it's not gonna reach too well here, I'm gonna go ahead and go inside and adjust my straps down a little bit more. That's just gonna pull the frame a little tighter, and it actually lowers it just a little bit so we can get a good grip on our hook-and-loop around our cover. So once we've got the frame tightened down and lowered for us a little bit, we're gonna have room to get this done. So I would recommend when attaching the side that you start from the middle and just get a good stretch on it and a good grip. Now, this isn't gonna grip all the way down, but it's matching about what we've got on the other side. It's still plenty to have some grip on here, especially once we go all the way down the line. But once I get it in the middle, I'm gonna go ahead and work my way toward the front, just kind of stretching this as tight as I can as I go. And then I'll start working my way to the back, again, just keeping it tight as I go along, making sure I get good pressure and a good, tight fit around the sides. Now, at this point, I'm gonna come around the back and detach the G hooks on my tailgate window. And we're gonna let that just kinda roll down here. I'll go ahead and drop the tailgate. Might be necessary, depending on your height, for you to lift the tailgate up a little bit to reach that. In my case it was. And then, as we come around to the back here, we're gonna find that same type of latch attachment that we did on the front, where we're gonna kinda wanna, first off, make sure that our latches are out of the way, and then it's gonna fit right into that wedge, just like so, and then I'll be able to push down on it and have it latch into place. And now, on the driver and the passenger side, we've got, just like in the front, another zipper, and then hook-and-loop attachment coming over, just like that. And we are ready to close up our tailgate. And our installation's complete. So that's a look at the Fas-Top Solo truck topper on our 2025 Chevy Silverado 2500. And if you have any questions about it, or if you've got this and you've been able to use it, and you've got some experiences to share, go ahead and leave those in the comments below. Sharing those questions and experiences with other neighbors just like you can help them make the best decision for themselves. Once again, this is Kirk with etrailer. Thanks for stopping by.

I picked up the Fas-top Solo soft topper and honestly, it’s been a solid buy. It’s super easy to use, and the parts that tend to wear out are simple to replace, which I really like. For the price, it’s a great deal, and I like how it changes up the look of the truck without being a hassle to take on or off.
The only thing that gave me a little trouble was getting the latches set just right. I had to loosen and adjust them a few times before they lined up perfectly. And I’m still not sure why you’d need both a tonneau cover and a full topper setup, since I don’t really see myself switching back and forth. But as someone who likes to tinker with my truck’s look, I’ve got to admit, the versatility is pretty nice
Works great and a nice fit!
Info for this part was:
At etrailer we provide the best information available about the products we sell. We take the quality of our information seriously so that you can get the right part the first time. Let us know if anything is missing or if you have any questions.


Thank you! Your comment has been submitted successfully. You should be able to view your question/comment here within a few days.
Error submitting comment. Please try again momentarily.