
To see if this custom-fit item will work for you please tell us what vehicle you'll use it with.


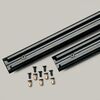
This aerodynamic roof rack gives you the freedom to haul gear and cargo on your vehicle. Full-length aluminum crossbars offer plenty of space for channel mount and clamp-on accessories. Installs to raised rails on your vehicle's roof.
Features:
Specs:
 Alternate Instructions
California residents: click here
Videos are provided as a guide only. Refer to manufacturer installation instructions and specs for complete information.
Hello neighbor, this is Curt with etrailer, and today we're gonna be taking a look at the Rhino-Rack Sportz Roof Rack and we're gonna see how it fits and how it installs on our 2025 Ford Bronco Sport. So when you're planning your next trip or adventure in your Bronco Sport, it's likely that you're gonna come across a situation where you're gonna have, you know, too much gear, too many items to fit in the vehicle with you and the rest of your passengers, or you're gonna have some items that you just don't want riding in the vehicle with you and your passengers. And in that case, a roof rack is an excellent way to transport all those extra items, all that extra gear to and from your destination. I think it makes a better alternative in a lot of cases than using the hitch, whether it be for a cargo basket or a cargo box out of the hitch or even a trailer. All of those things increase the footprint of the vehicle can make it a little bit more difficult to maneuver and park. When you're using the roof rack, you don't really have that problem.
The only thing you wanna be conscious of is roof clearance, like a low garage or low hanging trees or whatever that you know situation might be. So a roof rack like this for one, you're gonna get a 165 pound weight capacity. Now you do want to double check your owner's manual for the rooftop weight capacity on the vehicle. Whatever number is lower is gonna be your maximum capacity. This is gonna give us 50 inches of bar space to work with.
We're gonna be able to use our clamp mounted accessories with this, or we've also got the T track up top. And what makes the sports bar pretty unique is that this channel up top is open rather than closed. They have a lot of accessories using what's called Zwifloc that you could actually drop down directly into the channel and lock into place, rather than removing the end cap and having to feed them in that way, which you could also still do. And having that open channel might give you some concerns that these would be rather noisy, but the way that they groove these weather strips on either side of the channel, it's gonna force air up and over that ball, that open channel rather than directly across it, which makes all that loud whistling when you're driving down the highway. The other great thing about these is that they are an arrow bar.
This isn't your typical round or square bar, so they're already gonna be more aerodynamic than those other styles also helping to reduce the wind noise. This is an overhanging roof rack, meaning that the crossbar actually goes out beyond the towers as opposed to a flush roof rack that's going to dead end into the towers. And that's gonna leave us some overhang here on the outside that we can use some clamp mounted accessories with. And it allows us to use the full 50 inches of bar space with our T channel up top. And if you've got concerns with an overhanging roof rack, this 50 inch bar doesn't even come outside of the door threshold.
So you don't really have to worry about head clearance getting in and out of the vehicle. So let's take a look at how it fits on the roof of our Bronco Sport. And the first thing that I'm gonna take a measurement of is our crossbar spread, which is gonna be the distance between our crossbars. Now the reason that this is such an important measurement is that every rooftop accessory has a minimum and a maximum crossbar spread that it can work with. So if we take this measurement, I'm gonna go from the inside back of the channel, all the way across, and we end up with a crossbar spread of about 29 and three quarter inches, almost 30 inches. And for me that's perfect. Most crossbar spreads have that minimum maximum in between the 25 to 35 inch mark. So at almost 30 inches, I'm really not worried about coming across accessories that won't fit this crossbar spread. The other thing that I'm gonna take a look at is our distance underneath the bar. And for our back bar we've got about one and three quarter inches between the roof and the bottom of the bar. We're gonna have even more over here on our front bar, which is gonna be at about two and a half inches. And that's because of this rise that comes up in the middle of the roof on our Bronco Sport. Now either way, plenty of room, like I said, to get those clamps around here. So again, not too limited on accessories from that regard. If we take a look at how much height it adds to the vehicle, we're looking at about three and a quarter inches of height. If I'm going from the middle of the roof here, now that could end up interfering a bit with this antenna that we've got toward the back because the antenna itself does come up higher than the bars. And if we have something like a big roof box up here, that's definitely gonna be getting in the way. But this antenna can be unscrewed and removed, and if you do that, the top of our bar is actually higher up than the shark fin portion of it. So any accessories you put up here should be able to clear that without any problem. But one of the great things about the Rhino-Rack roof racks, the sports bar roof rack, is that it's really pretty easy to install and uninstall. And why would uninstall be important Well, if you like to run your vehicle through an automatic car wash, it is not recommended that you leave your crossbars on the vehicle while you do that. If you're hand washing fine, but running it through one of those automatic washes, you're gonna want to take these off and put 'em back on again. Luckily that's a really easy process. Stick around and I'll show you exactly how we got these on the roof of our Bronco Sport today. Now we've already put the rear bar up. The front bar is gonna go up exactly the same as that rear bar did, and we're gonna start installation by attaching our towers to our crossbar. So what we'll do to start is turn the crossbar over just like that. And I'm gonna move that tab, move our scale outta the way a little bit, and we're gonna go ahead and remove our end cap. We're gonna remove our scale and then we're gonna take one of our towers. And what I would recommend doing first, 'cause it's just easier while it's off of the crossbar, is go ahead and loosen up this bolt. This bolt controls how wide open the clamp on our tower ends up going. So I just want to give it as much room as possible. It's just easier to do this here than it is with the bar attached as you'll see in a moment. But once we've got a good amount of space there that'll go over our rails, I'm gonna go ahead and with the open end of the bolt, the outside of the tower facing the outside of the bar, we're gonna slip this right in through this track underneath and slide it over. We're gonna repeat that process on the other side of the bar. So at this point with both of our towers attached, we can get it up on the rails on the Bronco Sport. So I'm just gonna feed this across just like so, and let it cup over there. We're gonna do the same up here in the front. And we had widened out these clamps before getting it up here. Again, that's just gonna make it a whole lot easier to maneuver. And at this point, I'm gonna decide where I want my crossbars to sit. So what I did on this back bar was I set it up so that it is in this second section, there's a little bit of a cutoff with the support right here. So I put it in the second section, I'm moving it all the way to the front of where that support is right there. I'm gonna do the same thing with this tower. Now we do have freedom as far as where we can place these, we can move 'em closer together or further apart. Whatever you end up doing, make sure that your towers are directly across from one another. That's gonna guarantee that our bars end up parallel. So if I wanted to say place it here, what I would do is I would pick some kind of an anchor point like maybe the seam here, and I would measure that distance and make sure that it is the same distance on the other side of the vehicle, that will guarantee that our towers are directly across from each other. But what I'm gonna do, just to make it a little bit easier on everybody, is I'm just gonna move this up just like I did with this section as far up as I can. And I'm gonna do the same thing on the other side, therefore guaranteeing that they're directly across from each other. But not only that, I like this placement because it's gonna give me a really good crossbar spread and it's gonna allow me, if I get up into the second row door threshold, I'm gonna be right in between both of the bars and that's just gonna make cargo management and accessory management that much easier. Now, the next thing that you're gonna want to do is double check your overhang. We want that to be even on both sides. So if you grab your measuring tape, you want to get the same amount of overhang here on the driver's side as we've got over on the passenger side. So we've got this measured out to about three quarters of an inch here. We had it at three quarters of an inch on the other side. So before we replace our caps, we're gonna take the tool that we get with it from Rhino Rack, and we're gonna use it through this bolt right here. That bolt is not only gonna tighten the clamps down onto our rail, it's also gonna tighten our crossbar down onto the tower, so that everything becomes immobile and secure. Now, a piece of advice I would give is I would not tighten down one side completely and then move on to the other. What I'm gonna do over here is give it five or six turns over here and then I'm gonna go do the same on the other side, and I'm gonna work my way back and forth until it's all tightened down. If you try to tighten down one side completely before the other, there's a really good chance of that other side getting kind of knocked out of place and then you're undoing everything and starting over anyway. So if you incrementally go from driver to passenger side, that tends to get the best result. Now, as you feel it's starting to tighten up, this is a torquing tool. So once you get a loud pop like that, you know that you've got it down to the torque specs that Rhino Rack provides, and we can give it a good shake. Nothing's moving, it's not going back and forth on the rail, the bar isn't going back and forth on the tower. So we've got this right where we want it. Before we get finished up a couple of things. One, we've got this weather stripping at the top we talked about earlier. That's gonna keep everything real quiet as far as putting air over this gap, and not allowing for any extra noise to come out of it. However, underneath the bar we've got this section at the end underneath that's gonna be open, and we've got a section inside the towers that's gonna be open as well. So what we'll do inside the tower is slide this piece over until it meets the tower, closing off that gap. And on the outside of the tower we've got this scale that we removed earlier, if you'll recall. And what we'll end up doing is reinserting that scale until it dead ends. We will trim this piece off before replacing our end cap. However, we are doing a demo today. This isn't a permanent install, so we won't be trimming this down, we'll just pretend we did. And we're gonna go ahead and replace our end cap. And the end cap is gonna go with this kind of protruding portion toward the top and it'll just snap right back into place. So that's a look at the fit and the installation of the Rhino-Rack Sportz Roof Rack on our 2025 Ford Bronco Sport. Now if after watching this video you've still got some questions about it, or if you've purchased the roof rack and you've got some experiences to share, go ahead and leave those in the comments below. We would love to share your stories and your questions with other neighbors just like you so that they can make the best decision for themselves. Once again, this is Curt with etrailer. Thanks for stopping by.

Lightweight and easy to install. Appears to be well made.
Wuick order delivety and GOOD follow up !
Fast shipping and exactly what I needed. Spent a lot of time figuring out what I needed for our truck's tonneau cover wrt rack systems and this looks perfect!
It is crazy that larger bars like the 59" won't fit my car. When buying racks, the issue has always been that you can't go too small. But these have a 36" long metal obstruction in the bottom T bracket and so it limits how much the towers can come together. Get Malone, they are less expensive, have broader fit range, can handle longer bars and have an integrate lock.
Nice strong crossbar. Does not make any noise in the wind on my camper shell. using it for surfboards and kayak's etc. Very versatile and strong.
Perfect fit for Nissan Pathfinder and Pioneer platform rack.
Do you have a question about this Roof Rack?
Info for this part was:
At etrailer we provide the best information available about the products we sell. We take the quality of our information seriously so that you can get the right part the first time. Let us know if anything is missing or if you have any questions.


Thank you! Your comment has been submitted successfully. You should be able to view your question/comment here within a few days.
Error submitting comment. Please try again momentarily.