
Inno Aero Flush Roof Rack for Fixed Mounting Points - Aluminum - Black - Qty 2


To see if this custom-fit item will work for you please tell us what vehicle you'll use it with.
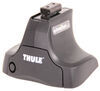
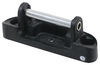
This aerodynamic roof rack mounts flush on your roof for a factory look. Crossbars with push-down rubber strips in top channels work with channel-mount and clamp-on accessories. Installs to fixed mounting points on your vehicle's roof.
Features:
Specs:
 Alternate Instructions
Videos are provided as a guide only. Refer to manufacturer installation instructions and specs for complete information.
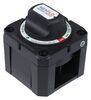
How's it going, neighbors Today we're gonna take a look at the Inno Flush Mount Roof Rack and see how well it fits on our 2025 Chevrolet Trailblazer. Now, being a Trailblazer owner, you already know you have a limited cargo area, so this is gonna allow you to get more of those bigger, bulkier and sometimes dirtier items out on the road with you for your adventure. So, let's take a closer look and see how well it fits and how to install it. What stands out most is gonna be the flush mount, so you're not gonna have additional bar hanging in over the side. It gives it a real clean OEM look. Another thing that's really cool about the Inno is the fact that it does come with your key and lock course, so you can have that additional level of security.
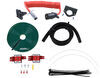
Other than the included allen key, you're not gonna need additional tools to get it set up. You don't have to worry about having a tape measure because you have fixed mounting points. Now, as far as the height, you're gonna have plenty of clearance for just about any rooftop accessory. If you go with the Yakima SkinnyWarrior or the cool Wide Deck system, you're gonna be able to get anything up here. Now one thing to keep in mind, they are rated for 165 pounds, but you want to make sure that you follow Chevy's guidelines as far as how much weight can be on top of your vehicle.
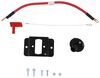
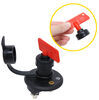
I already installed the rear, just to get a feel for how it goes on and it goes pretty straightforward. Now another thing that's really cool is when you're not using your roof bars, you can actually just leave the fixed mounting points on here and use the included cover. So now, I'm gonna go to the other side and I'm gonna bolt this guy on. You're gonna want to use your panel removal tool to get the plugs out of the holes. Now, you see a flat head on the end of it, but it's not really threaded.
It's just enough for you to kind of get a grip on it. And once I get positioned in here, underneath I'll just wedge it out. As you see right there, that's why you want to go with the panel removal tool so you don't damage the paint, or any of your plastics with scratches. There we go. Let me just repeat that over here.
There we go. We got up under here, so we can pop this guy right out. Now we're gonna use our bracket and just align it right here to the bolt holes and then we'll include our cover. So I'm just gonna use the cardboard that the bolts come in and just make sure I don't have it on the paint 'cause I'm really big on making sure you don't damage anything. One of these real easy assemblies can become super frustrating if you pick up a brand new scratch. So, it's threaded in with my fingers here and you don't have to worry about measuring 'cause everything's fixed. So, it's just gonna go where it goes. Now before you actually get everything installed, you want to take a little bit of time to make sure you're getting everything in the right orientation. So as far as your towers, they're gonna actually have a R or a L here to let you know what side it should be on. Right-hand side is gonna be your passenger side and it also shows you the orientation of the bar, how it should be on the end of the the crossbar. So, we're just gonna take this cleat and we're gonna drop it right into our track here. All right, and we're gonna do the same thing on the other side. All right, now we're just gonna go across to our other contact point and we're just gonna carefully place it. Now you may encounter your clamp being a little bit closed, so you can just make adjustments for it to wrap around and I'm just gonna give it a little bit of tension on this side just so we can hold it in place. And I'm gonna go to the other side and do the same. All right, and now we're just gonna tighten these guys down to make sure we're secure. I like to go back and forth just because it has a tendency to pull, and that way I know it has even pressure across the top. So, now we're just gonna make sure everything's aligned and it gives you a nice seamless finished look. And we're nice and secure. Ready for adventure. Now this has been a look at the Inno Flush Rails for our 2025 Chevy Trailblazer. I'm Ed, this is etrailer, you have a great day!.
Ratings & Reviews

Info for this part was:
At etrailer we provide the best information available about the products we sell. We take the quality of our information seriously so that you can get the right part the first time.


Thank you! Your comment has been submitted successfully. You should be able to view your question/comment here within a few days.
Error submitting comment. Please try again momentarily.