
Thank you! Your comment has been submitted successfully. You should be able to view your question/comment here within a few days.
Error submitting comment. Please try again momentarily.
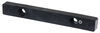
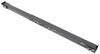
Replaces the gear pack of your Lippert through-frame slide-out with a 2-1/2" x 2-1/2" arm.
Features:
Fits:

California residents: click here
Videos are provided as a guide only. Refer to manufacturer installation instructions and specs for complete information.
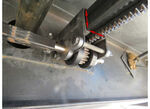
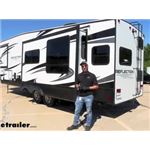
Kevin Hey guys, Kevin here with etrailer. And today I'm gonna be showing you how to replace your worn out gear pack for your slide out on your 2019 Grand Design Reflection Fifth Wheel Trailer. If you're having issues with your slide out not really wanting to come all the way out or come back in. Maybe one side's kind of starting to come out more than the other, might be a good time to get down there and look at your gear packs. Your gear pack has a crown gear in the center of it which has teeth in it and that's what actually kind of helps move your slide out in and out. Those gears get chewed up too much then you're not gonna be able to have your slide out actually move forward or back.
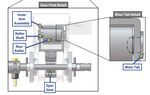
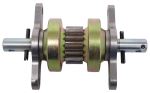
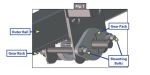
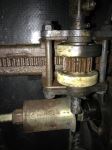
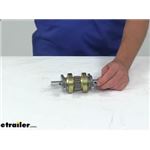
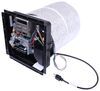
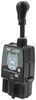
Here's what our gear pack is gonna look like once it's installed. We have our two rollers which are gonna ride along our arm here, and our crown gear which is actually gonna bite into the teeth on our arm and force our slide out to move in and out. As far as installation goes swapping at your gear pack can be super simple. The only thing you may run into some issues with is just a seized up bracket, just because sometimes over all the years, all that usage, that bracket can kind of get gunked up and really wanna stick to the mounting brackets on our frame. So you may have a little bit of issue trying to break that off, but shouldn't be too bad.
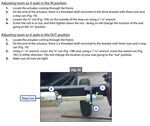
One of the things with this is in the instruction manual they tell you to place your slide out about halfway out. I feel like that's a little bit too much. I'd say anywhere from like a third to a half would probably be better, just so you don't have as much tension coming out because as this bar comes out, it's leaning all that weight more towards the outside which is pushing down on our gear pack here. If we have a little bit more in I wouldn't have had as much tension on here it would've been easier to swap out. Now that we've gone over some of the features of our gear pack, let me show you how I installed it.
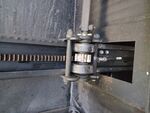
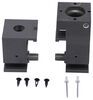
The first thing you're gonna need to do before picking out your gear pack is to actually measure the arm. Once we measure our arm we'll have three choices of gear packs to choose from. We're gonna have a two by two, a two and a half by two and a half, or our two by three and three by three gear pack. To measure that, we're just going to take our tape measure up and looks like our arm is two inches by two inches so we know that we need the two by two gear pack. Just to give you a little bit of a reference I have our two by two and then our two and a half by two and a half.
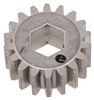
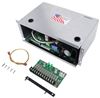
Now on our two by two, there are spaces for our roll pens but they do not come included. On our two and a half by two and a half and two by three and three by three gear pack we do come with these roll pens and these are important because that's how you can attach to your room bar, which will go between your gear pack on both sides of your slide out. I'm gonna start by disconnecting my room bar. I'm gonna set that aside because we're gonna put that back in once we replace our gear pack. Typically, your room bar can kind of collapse into itself. I just noticed cause I was having some issues getting it off. It's actually been welded. So our inner piece of our room bar and our outer piece are welded together. So this isn't gonna collapse at all. Which, not a problem. We can still get our gear pack out without having to collapse us in but it does help a little bit getting it off if that's not in your way. Now we can go ahead and we're just gonna break these bolts off here. Just get off my hand. All right, now we can start to pop our bolts out. We may need to use just a rubber mallet to get this out just cause this got a little bit of tension on it just from use over time and it's kind of gunked up a little bit so we'll grab our rubber mallet and get these out. Rubber mallet's not gonna fit back here I don't even have to use a steel hammer just wanna make sure that we're being careful we don't wanna damage anything. In our case, I am gonna need to also use a punch and just kind of hit the center of that bolt just to get it the rest of the way out cause it's just really sticking. Pull our bolts out. If you're having a lot of issues with the tension it is the room bar. Like I said, with ours being kinda welded in place really just have to sit there and fight the bolts out. You can take that room bar off and just easily slide it back go ahead and do that and make your life a whole lot easier. Get that bolt out the rest of the way. And then we can slide our gear pack out. If you look at your gear pack you can actually slide these brackets off and our rollers and then get to that crown gear. Our particular one here is a 15 tooth one but there are 18 teeth models. This is a replaceable part so if just your teeth are messed up and the rollers are fine, they're looking good no dents, no cuts in them you can go ahead and just replace that gear. Just match it up with what you already have or on some models you do need to kinda look because there are tech notes saying if it's within a certain year that you'll have to use the 18 tooth instead. All right, so now I'm gonna kinda line up my holes for my room bar. Get that slid in. When we look at our brackets here, it has a little bump out and that bump out's gonna sit inside of this well right here. I wanna make sure that we're sitting up against that and that this portion of our bracket is flat up against our mounting bracket up here. We're gonna do that for both sides. I'm just gonna try and slip the back bolt in first. Slips right in, and we can throw our front one in as well. Kinda lift up our whole assembly here. You need a little bit of persuasion to get this in. There we go. Just cause adding that room bar on there puts a little bit tension. Here we go. And now all we need to do is replace our nuts back on here and we'll just tighten those down. Okay, just double check they're even. Yep, all right. There isn't a torque setting for this so it's just getting it as tight as you can just with the wrench. And now we can go ahead. We actually slide my bar down just a little bit so I can get it matched up with our room bar here. All right. Now we can try getting our pull back through. It'll go up, and then you'll go just a tiny bit more. Like I said, typically you'll have one of those sheer pins in there on these and you won't have to really worry about it. Those sheer pins are designed to obviously just sheer away. That way if there is ever an issue you're not gonna destroy your whole assembly it'll just snap off of that room bar and not allow it to travel anymore. We can go ahead and take our wrench and tighten that down as well. Once you have all your bolts all nice and tight you can go ahead and run your slide out in and out just make sure it's working properly before you take off and go on that camping trip. Well, I think that about does it for today's replacement of our slide out gear pack here on our 2019 Grand Design Reflection Fifth Wheel Trailer. My name's Kevin, thanks for watching..
Customer Satisfaction Score:
87% were satisfied with this product
13% of customers were not satisfied
Ratings & Reviews


These gear packs are very well made out of materials that can stand up to the the torque used when driving these heavy slides in and out. If you have slides and the factory gear packs it's just a matter of time untill the pot metal gears break and not to mention the plastic rollers. These replacement gear packs are made of steel rollers and high quality steel gears. I highly recommend them. Change them before you stranded in a campground and can't close or open your slideout rooms.
Works as advertised. Much higher quality than the original.
Fits great, built better than what came from the factory
Easy installation and strong.
After one year I'm still pleased with the way that slideout works, so pleased that I ordered the same replacement part to go on the kitchen slideout this summer.
!!!!!!!!!!!
slide-out gear pack looks well made,I changed out the 15tooth gear for my 18tooth gear. No problem, fit on the new shaft. Installed on my 06 Cougar with the new slide motor assembly (from etrailer) and slide works like new.
The part worked as expected. Slide-out now works as it should. New end caps with new bushings raised the rail up and not binding any more.
The Part installs and works as it should
Did the job. Exactly what we needed
Your packaging was less than what was needed. A 10x5x3 box with two metal gears packs with extruding shafts and no other packing punched holes in the box. As far as I can tell, not damage to the gear packs, but you packing is not adequate. Since you didn't manufacture the gear packs, I don't have an opinion.
I needed this part quick. etrailer came through like always and overnighted it to me. It worked perfect to get my RV working so our planned trip is still a go. I have used etrailer for years and always a great experience.
Our fifth wheel is 12 years old, I have replaced the gear rollers twice, these are by far the best ones I have had.
Excellent item. The USPS shipping however leaves a lot to be desired.
Perfect fit. The slides work better than new. The video on etrailer.com gave the measurements so I was confident that they would fit.
Much better than the original gear pack which had plastic rollers.
The video describing the product stated that they were Zink coated. They did not appear that they are, and they are covered with a fair amount of rust.
Trailer video was a huge help.
Bought 2 of the same part (one for each side) and they were both great. The buying experience was simple and fast. Would highly recommend ordering from here! Great easy worry free experience.
Worked very well.
Shipped very fast and is very well made. Can't wait to install when the weather breaks.


Do you have a question about this RV Slide Out Part?
Info for this part was:
At etrailer we provide the best information available about the products we sell. We take the quality of our information seriously so that you can get the right part the first time. Let us know if anything is missing or if you have any questions.


Paul
8/9/2025
1 year later and gears packs still working great. These are the last gear packs you will need to buy. Made from good material and wont break under a load. If you need gear packs to replace the cheap factory ones buy these you wont be disapointed.