


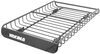
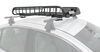
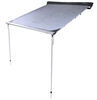
This fit kit lets you mount Thule Rapid Podium-style feet to your vehicle with factory roof-rack tracks. The fit kit includes pads, hardware, and tools necessary for installation.
Features:
Specs:

California residents: click here
Videos are provided as a guide only. Refer to manufacturer installation instructions and specs for complete information.
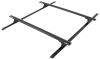
Hey everyone, it's Evangeline here at etrailer and today we're going to take a look at and show you how to install this Thule roof rack system on our 2023 Kia Seltos. So this is actually my car and I wanna carry around some fun accessories like kayaks, maybe put a roof box for extra cargo space or if needed, put a roof-mounted bike rack. My first need though is a roof rack system. So this is the Thule roof rack designed specifically for the Seltos. You then now have two crossbars that go across your flush rails on your Seltos creating that platform for those accessories. This has a 47 inch long WingBar Evo crossbars.
You have the aerodynamic shape for the crossbar and you have a little bit of length or overhang to the side. Measuring from the tower to before the end cap, I have about two and a quarter inches of overhang. The crossbar spread is fixed to your fixed mounting points. So if you measure center to center of the crossbars we have about 26 and a half inches of spread. You can move this further out to get over 36 inches of crossbar spread.
So that's pretty much as far out as you can make your adjustments depending on your roof boxes, roof baskets, kayak carriers. You may want more, you may want less. Roof clearances have two measurements you wanna think about. One is how much space do you have from underneath your crossbars to your roof So measuring from underneath the crossbar to the moon roof I have it at three and a quarter inches of space. Plenty of space for things like clamps, U-bolts, wing nuts that other accessories have to clamp around the crossbar.
But the next measurement is gonna be how much height does this add So from the roof to top of crossbar I have it at five and a quarter inches. That's gonna be where your cargo sits. Plenty of space there. There's also the option to not use clamps that go around the crossbar, but to use T-track mounted accessories. So if you flip this over, you'll see the channel where those accessories can fit into.
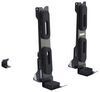
You do have this wind strip. The downside to Thule bars is that that wind strip does deteriorate over time and you may need to purchase extras ahead of time if you plan to use a T-track channel a lot. So these crossbars are made of aluminum but they also have this black powder coat finish. You can get them in black which is what I have here, but also silver which might be preferred if you have these accents like our Seltos. Everything is included with this kit, from the tools to the parts to install this roof rack just make sure you get the right kit. That's why it's important to use our fit guide where you put your year, make and model here at etrailer.com and then select the correct fit for you. Now let's take a look at that install process where I explain how to put everything together and how to put them onto the vehicle. To install your roof rack, it might look a little confusing at first because the instructions only have pictures. There's pads of different shapes and sizes. You have hooks, you have towers. Well I'm gonna guide you through that process. The very first thing we're going to do is we're going to set up the crossbar. First, install your weather strip. The arrow's gonna be facing the front of your crossbar. This is also when you get familiar with what the front of the crossbar is. That's gonna be the thickest one. The tapered end is the back of the crossbar. Next, install your tower. So you may have to take off your end caps, so you press down on the end cap and then you pull that cap out. Look here at the tower, see how you have these tabs. Well, when you fit the tabs into the crossbar track from underneath, you're able to slide it in and then that end cap you just took out we'll pop that right back in to secure the tower. And now that your crossbars are set up, notice how I have all four towers attached. It's now time to set up your vehicle. So what you're gonna first need is the little tools included with your kit, this little pin and this little wrench. Here we have the flush rails of our Seltos and there are different spots you can put your crossbars. For this specific set though, they are designed for the ones right above your sunroof. So we'll start there. Use your pin to remove the cover. There's a little lever in there that you need to access. So use a pin on both sides. If you don't have a pin, you can also use a really small screwdriver or a bobby pin. See here, this is a close up of what that lever looks like. Once all those covers are removed, you can then get your long nut and bolt. So this fits over the bolt that's in your flush rails. Tighten that down. You can get it, I want 90% tightened down by hand actually and you only need a small turn with your wrench to fully secure it. Back to the crossbars. We're going to attach these hooks and these pads together. You just need to make sure you get the right one. So for the front left, it's going to be 2, 4, 6. Look in the square you'll see hidden inside is a little print with a number. Fortunately all the hooks are the same so you don't have to figure out which one's which, the hooks fit into the pad like this. They kinda like slide and click into the pad. Gonna need to put a little bit pressure. Now notice the orientation of the hook. See how there's two holes on the top That's how you know it's facing the right way. Remember how I showed you, which is the front and the back of the crossbar Well, take your front crossbar. This is gonna be the right, it's gonna be left. 2, 4, 6 goes to the left. In order to secure, you do need this barrel nut though. So with that in place, you can then use these bolts to secure the pad and the hook to the barrel nut will come in from the front. Once they're through, just finger tighten them for now. As you're securing all four pads and hooks just do a couple turns of those bolts. You don't have to fully tighten it down. Final step before putting the crossbar on the roof is grab your split washers and your nuts. And now we're back to the vehicle with our front crossbar. Make sure you have the front and not the rear crossbar. We're going to gently set this onto the bolts and line that up before we tighten it down. The split washer and the nut go over the bolts for your flush rail. So get those lined up and tightened down. So your crossbar can slide back and forth. You need to make sure that it's centered before you tighten everything down. I have it just a little past three inches of overhang on each side. Once it's the same, you then know that you can use your included Allen key to tighten down those two bolts. Now your crossbars will still be loose and you can slide them back and forth. So make sure it's the same length of overhang on each side. I have it at about three, little past three inches of overhang. And now we're going to secure it with your included Allen key to tighten down those two bolts, holding the towers and the pads and the crossbars together. Your Rapid Podium feet have these doors and you also get these plastic lock barrels. So notice on your lock barrel how you have that lever. While that lever is going to sit to the right of the door as you push this in. And then that way you can lock it. So we're gonna fit this door over at the tower and then turn to lock. This can get tricky with just your hands so you may also want to use a flathead screwdriver for more leverage. Underneath your crossbars you have a slide out wind deflector so make sure that's pushed up against your tower. Once all the end caps are installed just double check them and try to shake them for you to make sure that they're all locked. If you want to, you can purchase metal lock cores separately. I prefer them because then you get to have a key to lock it and not just anyone can turn this and get access to your roof rack. So switch 'em all out now if you do have them. And then afterwards, keep your keys on your key chain, your tools in your car, and that's it for the install. And that right there was a look at our Thule roof rack system with the 47 inch long WingBar Evo crossbars, the Rapid Podium feet and the fit kit for the 2023 Kia Seltos.

Do you have a question about this Accessories and Part?
Info for this part was:
At etrailer we provide the best information available about the products we sell. We take the quality of our information seriously so that you can get the right part the first time. Let us know if anything is missing or if you have any questions.


Thank you! Your comment has been submitted successfully. You should be able to view your question/comment here within a few days.
Error submitting comment. Please try again momentarily.