
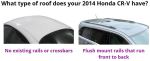
To see if this custom-fit item will work for you please tell us what vehicle you'll use it with.


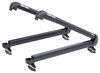
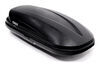
This quiet, aerodynamic roof rack with a from-the-factory look lets you carry gear on your vehicle's naked roof. Sturdy, lightweight aluminum crossbars include top channels with noise-reducing Vortex strips. Integrated locks deter theft.
Features:
Specs:
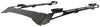
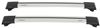
The low-profile, aerodynamic Rhino-Rack ROC25 roof rack lets you carry gear and accessories on your vehicle's roof quietly and with little wind drag. It's designed for installation on a naked roof (a roof without factory raised side rails, flush rails, fixed mounting points, tracks, or rain gutters). The rack's Vortex Aero crossbar has built-in rubber strips that disrupt airflow for a quiet ride, and the bar is constructed of aluminum so it won't rust. This bar blends seamlessly with the support legs to provide a from-the-factory look, and it is custom cut to your specific vehicle so it requires no adjustment during installation. The legs also include built-in locks that protect your gear and the rack from theft.
The rubberized Vortex strips in the top channel of the crossbar disrupt airflow with evenly spaced, wave-shaped grooves. This carefully controlled turbulence minimizes wind noise and whistling, so you won't need to add a fairing to your roof rack. And the slim, elliptical Vortex Aero crossbar cuts through the air with minimal drag - even at highway speeds.
The ROC25 roof rack has a flush-mount design so the crossbar terminates at the legs with no overhang. This provides the rack with a seamless, from-the-factory look, and it also helps to improve aerodynamics by reducing drag and wind noise.
The Vortex Aero crossbar is made of structural-grade anodized aluminum with an H-shaped internal extrusion. This extrusion strengthens the bar without adding a significant amount of weight. And the aluminum bar won't rust so you can leave it on your roof year-round.
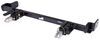
The rack's durable, glass-reinforced nylon legs are designed to stand up to cargo loads and weather extremes. They're also UV treated to withstand long-term exposure to sunlight.
The roof rack arrives at your doorstep almost completely assembled. The crossbar is already mounted into the nylon legs. And the bar is pre-cut to match the width of your vehicle's roof, so you won't need to waste any time centering it. The few remaining assembly steps are straightforward and require only the vehicle-specific fit kit.
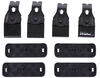
The vehicle-specific fit kit includes pads and clamps specifically designed to fit the contours of your roof. To install, simply attach the pivoting plates and rubberized pads to the bottom of each leg. Then secure the legs to your vehicle with the metal clamps. Decals inside the legs and a diagram in the instructions help you to orient the crossbar on your roof.
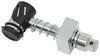
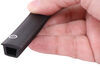
Once the crossbar is properly positioned, use the included Allen key to tighten it in place. The Allen key is designed to serve as a simple torque wrench. The curve in the blue plastic handle straightens when you've applied enough torque to each bolt.
The crossbar has a built-in C-channel so you can carry channel-mounted accessories such as bike racks, watersport carriers, and ski racks. The Vortex strips in the top channel come in 3 pieces, so they're easier to adjust than a single long, continuous strip. You can remove, trim, and re-insert the Vortex strips around the mounting hardware of your accessories to keep the crossbar channel capped and quiet. Replacement strips (sold separately) are also available if you remove your accessories or switch to clamp-on accessories.
You can also attach most clamp-on accessories to the bar, and the Vortex strips provide a shock-absorbing, no-slip cushion for any accessories that rest on it.
Locking covers on each support leg let you secure accessories mounted in the crossbar top channel. These sturdy nylon covers give the rack a finished look and also help secure the rack to your roof. The cover locks are keyed alike, so a single key opens all locks.
 Alternate Instructions
California residents: click here
Videos are provided as a guide only. Refer to manufacturer installation instructions and specs for complete information.
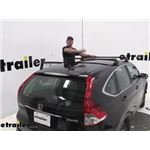
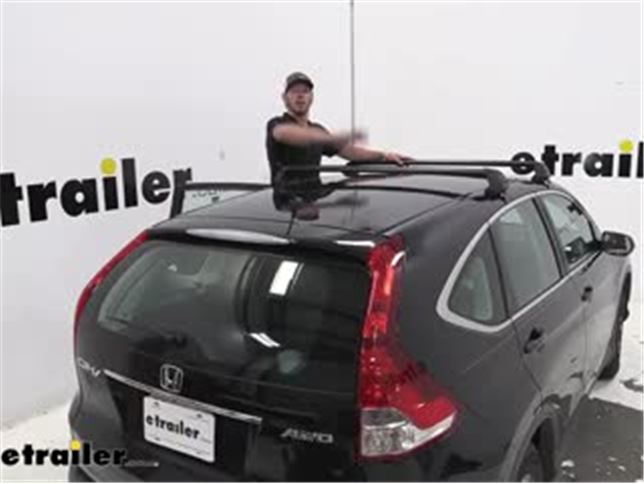
Hi everybody, Adam here with etrailer. Today we're gonna be taking a look at the Rhino-Rack Vortex Aero Roof Rack system, for your naked roof, on your 2014 Honda CRV. If you're looking for a fairly cost-effective roof rack, that has all the features that I really look for, in a roof rack system, I definitely think that the Vortex Aero Rhino-Rack Roof Rack system, is gonna be good for you. We're going to be able to put about 165 pounds worth of stuff on top, we have T-Tracks, it's made of aluminum, it's not gonna rust away, and it's just gonna allow your CRV, and the people you're driving around, to do more. Some things that you don't see with some roof racks is locks, these come with it. Even some of the higher end racks, you really have to purchase the lock separately, which is kind of silly in my opinion, but this one comes all with it, you don't have to buy anything separate.
I just don't like the idea of buying a premium roof rack and then having to buy more stuff for it. This one doesn't break the bank and it gets the job done. And we don't have to worry about anything scratching, we have some rubber pads on the bottom of our little feet here, but then also on the clamps, that clamp into our little door jambs, that is gonna be coated as well, so you don't have to worry about this thing scratching up your vehicle. It does have a pretty sleek design, so we don't have any overhang right here. So this is good if you're really just needing some bar space, but you really don't want a bulky roof rack sticking out past the foot.
I really like that, especially if you're looking for something that's going to look a little bit more OEM and low profile. From the top of our roof in the center, to the bottom of our bar, we're gonna have a little less than an inch and a half of space, and then going all the way up, it's only going to add about, two and three quarters of an inch, to the top of your roof in the middle. So if you do have a sunroof or something like that, I think we're gonna be able to clear, and then most of it's gonna be back here, so I think it'd be fine there. Hopefully that kind of gives you an idea of what you're really gonna get, when you go with the Rhino-Rack Vortex Aero Roof Rack system but, if you want to see how it installs, if you stick around, we're gonna show ya. First thing we want to do is familiarize ourself with the hardware.
We're gonna have our foot kit here, and we will get keys with the kit, so what you want to do, is just take this cap off, just like that, and then we can go ahead and take this, and insert it in. You know if you're putting it in right, you'll see a little hole here, it's gonna line up with the hole on the foot, and work it in like that. We're gonna have a screw, it's gonna go right there to secure it down, and then you can take a Phillips screwdriver and screw that all the way down. And we'll do that same exact thing on the other side. Now's a good time to put in our weatherstrip.
I've found it easiest to start on one side, make it to where it's flush right up against the edge of the bar, get that one channel fitted in on one side, and then kinda fold it in, kinda like that, you hear it kinda of snap in there. That's the easiest way I've found it to be, and you just kinda have to mess with it a little bit. We can take our excess, once everything's in, and trim it up. You can just use a little bit of scissors right here, to make a clean flush cut, and then put the rest in there. Now what we want to do, is we can take our little plastic foot, and notice the arrow, so what this is gonna do, they're going to be pointing towards each other whenever they're installed, so gonna be facing towards the inside of the bar, and then all we need to do, is take this, put it right on top like that, turn over, you can kind of start to push it into place, like that, and then with the arrow facing in, just go right here, and snap it into place. We're gonna do that same exact thing on both sides, and while we're here, you might as well remove this, because we will need that to be removed, to install the next bracket. Now you want to grab the 145. So this is going to be the front bar, so grab those, make sure they match, and what we're going to do, is take that bolt we just took out, it goes through that, and we're going to have to kind of hold this with our finger on the back end, so it doesn't pivot, and get that threaded in. We don't have to thread it all the way down, but just get it started, so it'll just sit there and hang for now. And we're going to use another 145 bracket, on the other side. Now we can go ahead and put it up on our roof. Just go on one side, make sure it grabs, then we can go on this side, and kind of get it into place, figure out exactly where we want it. In your instructions there's going to be measurements, and what we're gonna do, is from the middle of the bar, so right down this line here, to the door jamb right around here, you've got to match that up to the measurement in the instructions, so we just need to shift a little bit, and once we get that measurement, make sure it is the same on both sides, and then we can proceed. So now with the tool included with the kit, we can go ahead and start to tighten this down, I always like to hold the bracket in place while I'm doing this, just to make sure it seats there well. And I'm not gonna fully tighten this one, I'm just gonna get it nice and snug, to where there's no movement or anything, and then I'm going to do the same to the thing on the other side, and then come back and torque it down to specs. So the neat thing about the tool is, this little section here, once it starts to straighten out, that is going to be when it is torqued down to specs, so that's really cool. So just go like this, and as we tighten this down, we've still got a little bit of a bend, but now, right around there it's pretty much straight, and that feels plenty tight, so we are good to go. Now with our second bar, we can go ahead and put it up on our roof, and just match that up with the measurement in the instructions. It's going to be from center to center, so once we get it kind of up here, grab a measuring tape and make sure that's all lined up. Last thing to do is put our cap on. So, it's gonna slide in, just like this, and we can lock it, and we are ready to rip. And that's pretty much it for the installation. Now we're ready to load up, whatever kind of rooftop accessories you may have. Again, this was the, Rhino-Rack Vortex Aero Bar Roof Rack system, for your naked roof, on your 2014 Honda CRV..

Do you have a question about this Roof Rack?
Info for this part was:
At etrailer we provide the best information available about the products we sell. We take the quality of our information seriously so that you can get the right part the first time. Let us know if anything is missing or if you have any questions.


Thank you! Your comment has been submitted successfully. You should be able to view your question/comment here within a few days.
Error submitting comment. Please try again momentarily.