
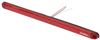
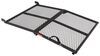
Westin Sure-Grip Running Boards w/ Custom Installation Kit - 6" Wide - Brite Anodized Aluminum


To see if this custom-fit item will work for you please tell us what vehicle you'll use it with.
These 6" wide, brite anodized aluminum running boards sit close to your vehicle's frame for a streamlined look. The 1-piece, non-slip step pad on each board is made of soft, durable rubber, providing better grip than a molded step surface.
Features:
Specs:

California residents: click here
Videos are provided as a guide only. Refer to manufacturer installation instructions and specs for complete information.
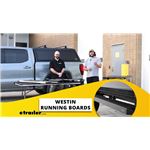
Hello, neighbor, this is Curt at etrailer, and today we're taking a look at the Westin Sure-Grip Running Boards in anodized aluminum. Now if you have any experience with this particular set of running boards, please leave a comment below. We'd love to share your experience with other neighbors in order to help them make the best decision for themselves. Now this running board is gonna come in at six inches wide, four-and-a-half inches on the rubberized textured grip that it has. This is a really, really nice design in that you really do get a good sure footing when you're getting in and outta your vehicle. Even in those wet and icy conditions, it still does a great job.
It's got these channels running through the grip that is really gonna help with distributing any of that moisture or water coming off of your boots or shoes and just ensuring that you got a good dry place to step every time getting in the vehicle and being six inches wide and four-and-a-half on the grip, again, is enough really, just about any shoe or boot size is gonna do a good job on here as far as getting that grip in and out of the vehicle. This is the anodized aluminum version. Gives it a really nice chrome finish that really kind of gives it a good sleek and updated type of look. Now before we get too in depth, I wanna let you know that there are two different aesthetics that you can get in this running board. We have the black aluminum, we also have the anodized aluminum with a little bit more of a chrome finish to it.
So as previously mentioned, the step on this is definitely wide enough for pretty much any shoe size to get in and out and still be able to take advantage of that rubberized grip right there. It also doesn't really protrude too far from the vehicle itself, so it does keep that kinda sleek factory looking finish with it, rather than being kind of one of those running boards that really has more of a rugged look. It doesn't always fit well with the vehicle. This could go on just about any truck or SUV and look really good. There's also an LED light kit that you could add onto the purchase of this running board that's gonna provide two small lights, one under each door, really help you at nighttime getting in and out of the vehicle and making sure that you use the step completely.
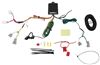
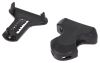
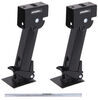
Now that we've taken a look at all the features on this running board, let's take a look at how we got it installed. So the first thing we're going to do is take our passenger front bracket, which is easily identifiable because it's at this angle, plus it has the stamping on it we've discussed before. And each bracket is gonna require two of those hex bolt assemblies that we showed you. And I've got my 13-millimeter socket wrench. Now the first thing I'm gonna need to do is remove the existing bolts that are under here, which are located at an angle here and here.
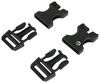
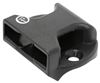
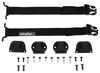
(metal clanking) On our passenger side is gonna go with this next set of bolts here. There's no angle to this as far as the bracket goes, so they're just gonna go on pretty directly. Now what you're also gonna find is that the next set and the next set after is really gonna be dependent on the type of vehicle and the type of running boards you get as far as which of these sets to use for your third passenger side bracket. If you have a shorter cab, this is likely the set you're gonna need to use. If you have the double cab, this side is the set that you're gonna likely use. It could also be dependent on the type of running boards you get, but these are gonna go on the same way regardless of which one of these you end up going with. And we're simply gonna need to repeat this same process over on the driver's side. Now we've got our first rear mount installed on the passenger side, but something that we noticed as we we inchesre taking the Toyota bolts out is that the Westin Install Guide is gonna let you know that you need a 13-millimeter wrench for the bolt heads, which is true of the bolts that come with the bracket kit. However, the Toyota bolts that we're removing, we found out are actually 12-millimeter. So 12-millimeter, like, well, this is the 13-millimeter. You could see how loose that is. That really gave us a fight as far as getting these out. So get yourself a 12-millimeter wrench as well for the removal of the Toyota bolts. You will need the 13-millimeter, however, when we install the bolts from the install kit. Now that we've got our bracket installed, we're gonna show you how the running boards install onto the bracket. Being so low to the ground, it's a little difficult to show this on camera, so we're gonna show you how this works here. Now what we've done is gone ahead and turned our running board over and we're gonna see these three rows of T slots here. Now, for this particular bracket, what we're going to be using is these outside ones here. We're gonna take our square head bolts and we're gonna slide three of them into the T slot there and we're gonna take another three of them and put them in the T-slot on the bottom. So you'll have three sets of these, top and bottom, that'll go onto our three brackets. And the way that they're going to attach to the bracket is simply by going through these ovular holes that are sticking out from under the vehicle. The bracket will go on as such. And as you can see, these ovular holes here are gonna allow you to slide the bracket in and out away from the vehicle. Depending on the vehicle that you have, you may want it all the way in or possibly all the way out. The important thing is, is we want it to look flush on the vehicle. So once that goes on there, you'll be putting on your washer and your bolt, you're gonna hand tighten these down because again, we're gonna save the torquing of all the bolts for last. Now before we put the bracket on there, there's one more thing we need to do to prep our board. Now the running board kit is also going to contain this flange here and this flange is gonna be installed on the running board. And what it's going to do is really help cover any gap between the bottom of the car door and the top of the running board. To do that, you'll see it's got this L shape at the end here and this slot right here, we're just gonna feed that through. You'll have to bend it slightly and we're gonna feed it through to the end of our running board. It's a little bit stiff, so you do have to fight with it some at first, but once you get it running in there pretty good, it'll slide down pretty easily the rest of the way. (material sliding) Okay, now that we've got our running board placed on the brackets, we've hand tightened the bolts down just to keep it from shifting around before we do our torquing, which is the last thing that we're going to do with this. We've got our torque wrench set right now at 15 pounds, 15 to 18 is what the instructions require on this. So now we're gonna go in, there are 12 bolts per side of the vehicle and it's time to torque down each one of those bolts. (tool beeps) (metal clanks) So there's a look at the Westin Sure-Grip Running Boards in the anodized aluminum. This is Curt etrailer. Thanks for stopping by.

Info for this part was:
At etrailer.com we provide the best information available about the products we sell. We take the quality of our information seriously so that you can get the right part the first time. Let us know if anything is missing or if you have any questions.


Thank you! Your comment has been submitted successfully. You should be able to view your question/comment here within a few days.
Error submitting comment. Please try again momentarily.