
To see if this custom-fit item will work for you please tell us what vehicle you'll use it with.
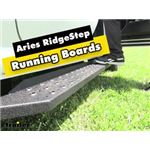
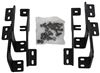
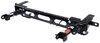
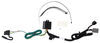
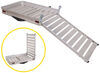
These rugged, all-steel running boards provide a 6-1/2" wide step for entering and exiting your Dodge Durango. Raised steel treads offer superior traction in all weather conditions. Textured black powder coat. Custom installation kit included.
Features:
Specs:

California residents: click here
Videos are provided as a guide only. Refer to manufacturer installation instructions and specs for complete information.
Hi, Matt with etrailer. If you're looking for a set of running boards that are gonna be pretty rugged, pretty rough, gonna be more so for those really wet, slippery situations to give you more traction, then the Aries RidgeStep running boards are gonna be a great option for you, so let's check it out. And today we're gonna be showcasing that on our 2024 Dodge Durango. And honestly, I think it's a great option for that. Really any type of running board's gonna help you some 'cause when you're stepping up here, this might not be a huge step for me. I could probably manage, but if it's been a long day, you're pretty tired or if maybe your knees are just a little bit rough and they can't reach up that high, this is gonna help you out a little bit with that.
Another reason I like this is it just kinda helps you access other parts of your vehicle. So if we look up at our roof, you notice we have some roof rack up here. If I'm trying to reach up here without standing on this, I'm gonna find this is a lot more difficult to do and the fact that we can really travel a little bit more on here gives us a, or makes this a little bit more manageable compared to if I was down here. And the last thing I really like about the ones that we have today is just this aesthetic that we get. This is gonna give us more of this rough design, more rugged look.
So if you are doing any type of off-roading or over landing, it's gonna help you look the part too. Well let's kind of take a closer look at the design of these running boards. So looking right at them, these are gonna be made of steel and there's one gonna have this type of finish on them. It's gonna be this kind of textured powder coat. So that powder coat is gonna help it from rusting over time since it is made from this sturdy steel.
But with this finish, there's a rough texture to it. So that's in turn gonna give you more traction on here, but what's gonna give you the most amount of traction is gonna be this extruded metal right here. That is great especially if you have any type of boots with a lot of tread on them. When I put my foot on here, I find that this does really good. I'm grabbing onto my shoe, I'm pulling on this pretty good and it's gonna take a lot for you to slip on this.
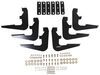
And if you look here, we're also gonna have this little wall. This goes from your running boards to your vehicle and I think it kind of gives you more of an OEM finish altogether. But this is especially great if you're someone who is going through a lot of snow, ice, mud, dirt, whatever it be. It's just gonna help you just be a little bit more safe when you get in your vehicle. And you probably notice how long this is. It's gonna be perfect if you have any passengers getting into the back of your vehicle. So if you have any kids, it's gonna help 'em just get up here and prevent them from really stepping on the side of your vehicle and scratching things up. And speaking of length and sizes, let's kind of talk about some measurements. So the first one I wanna talk about is gonna be the width of the step. That's how much of your foot can actually get on here. That's gonna be a little bit under six and a half inches, so that's gonna be good for most people. If I put my foot on here again, you notice this is gonna allow me to put the ball of my foot on here, which is perfect 'cause that's gonna give you a lot of stability out of this. If it was maybe a little bit wider, I think it'd be fine with that too. You just run the risk of this shooting out a little bit. And I think I like this a little bit more than something a little bit wider. But let's also talk about the height and how much a of a step this is saving you. So we compare it to what's just more standard on your vehicle. This step is gonna be around 22 inches from the ground to your vehicle here. But the step from the ground to this step here is gonna be a little bit under 10 inches. So that's about saving you half that amount of travel. So in turn that's just gonna make this a little bit more manageable and more easy. All in all, I think this is a pretty solid choice. I think of all the Aries options, I think this is gonna be the one that gives you the most amount of traction. Now if you want something maybe a little bit less aggressive than this because if you have kids, if they trip, they might scrape their knees on this a little bit, then I'd recommend the AdvantEdge. Still gonna have a rough design to it, but it's also gonna give you a lot of traction 'cause it's gonna have the same type of finish as this. That textured powder coat is not gonna have any of that extruded steel. That's really could be the potential cutting point for someone. But any choice you really go with, they're all gonna install the same way. And that's the neat thing about these. These are actually interchangeable with other types of Aries running boards. You can just simply take off this board, leave the brackets on and put a new one on if you ever do want to change it up in the future. But if you're curious to see how this is gonna install, just stay tuned. We'll walk you through the process. To start off the installation, I like to lay everything out. So right in front of it we are gonna have all the hardware that's necessary for this. I'd just like to lay this out just to make sure we have everything, nothing's missing or damaged. And then we're gonna have our brackets too. You're gonna have two sets of these. This is only one set we have right here, but they're all gonna have specific points that will go in your vehicle right here. We're gonna have our rear one. Next to that, we're gonna have our center one. And in front of that we're gonna have the front one. The way you can tell which one's which, this is gonna be a indicator on them. It's gonna be a little letter just like that, gonna be labeled F, C, and R for which location to go. Then we're gonna come over here to our vehicle now and we're just gonna start prepping. And what we need to do is remove some adhesive tabs underneath our vehicle because they're gonna be covering up some holes we're gonna be using. Now there will be a few under here. You will have some spots marked in your instructions. It's kind of vague, it's roughly gonna be placed like this. Now yours might be a little bit different. The best way I find to really figure out how I'm gonna do this is I'm gonna go to the front most hole. I'm gonna remove that tab and then there's gonna be a series of them underneath and I'm just gonna go with every other tab. So there should be a tab here you remove, leave one, remove one, leave one, and then remove one. Now I'm gonna show you how to take off one of these tabs. They might be a little bit different for you, but with this series, this is gonna be a very thin tab and I find it's best just to get a flathead screwdriver and stab into the center of it. Just like that, this is in the center. Then I'm just gonna apply force to the side. This should kind of pop out. Just like that. And then you repeat that process on the other two. And now we're gonna grab this little bolt. It's gonna be welded onto a plate and what you're gonna do is where you remove those little plastic tabs where there's adhesive tabs, you're gonna place it right there. With that in place, I'm gonna take a little plastic and retaining clip and slide it on. Gonna be a little bit tricky to do. We're gonna block the camera just for a second. There we go. And it's gonna hold in place just like this. This is gonna prevent this from pushing through when you put your brackets on. When this is done, then you can gonna repeat this process on the other two holes. When you're putting your brackets on, they're all gonna go in the same way. So you're gonna line up that bolt with that hole on top of your bracket just right there. Right now I'm working on the center one. With the other ones like your rear in front you are gonna have a tab that wraps around the back right here. Starting off with a flat washer, a split washer, and then I'm gonna put on my bolt or my nut. Once you have it on there, you'll just kind of keep threading it. Eventually you're gonna reach a point where you're gonna get a little bit of resistance. That's gonna be a good time to stop. Now if you feel like it's just kind of sliding around and it's not gonna tighten up at least a little bit where you can do it, you just pull down as you're tightening that nut so that plate doesn't spin around on you. And now I can move over to the other brackets. And for this next part, this is gonna be kind of hard to see underneath our vehicle so I'm gonna show you the hardware now. We're gonna have our M6 hardware. So that's gonna consist of this bolt. You're gonna have two flat washers on here. One is gonna go on first and then the next one will go on with your split washer and then your nut. And I'm gonna show you that a little bit more in depth now. Now we're gonna start using that hardware. So I'm going over to my brackets again and you're gonna find that on your vehicle you have this little hole here. That hole is gonna line up with a hole on the side of this bracket. I've already lined mine up, but if yours isn't lined up, you can just simply push it back and forth until it is. That's why you wanna leave this a little bit loose when you're starting off with. As you can see, I only have one washer on my bolt at the time being. And I'm gonna push this through the other side. Just like that. The reason I do it this way is 'cause it's gonna be a little bit easier to put my nut into place from the side. Now I'm gonna put on my washer and lock nut. We're gonna move back over to our bracket now and you're gonna find that you have this hole on your vehicle, it's gonna be underneath. This hole should be lined up with a hole on your bracket. If it's not, you can just simply push this over to the side either which way until it is. That's why we didn't tighten this down all the way. Now I'm gonna show you our M6 hardware again. I only have that one washer on it right now because one is gonna go on one side of the bracket. Try to push that through. With that through, I'm gonna put that other washer and that split washer on. Get it on just like that. I'm gonna grab our nut. And thread that on. Again, we're only gonna do this hand tight. There's gonna be two of these that go on each one of your brackets. And once you're done with that, you repeat that process, with the other two brackets. And from here we're gonna have our running board. What we're gonna do is grab these C clamps. These are gonna come with your kit and the actually gonna go into the running board itself as you see where exactly, I'm gonna flip this over and you're gonna see that we have this sort of channel right here. Those clamps or brackets are just gonna go right into place like that and slide down. What I recommend doing is just trying to align this to the brackets on your vehicle. And once you have all three of these on there, then you can just roughly put it into place. We'll eventually reach the point where we need to install our M8 hardware. That's just going to be this bolt, split washer and flat washer. And the way that's gonna install is it's gonna go through your bracket, into this plate and this is gonna be two per side. When you do this, you're just gonna loosely install them, just hand tight. And this will hold everything into place. And I wanted to show you guys what this is gonna look like when we actually install it. So we're underneath our vehicle, the running board and the brackets, and that plate is just about in line. You're gonna push this through until you can grab it into one of those holes. If it's not perfectly lining up, what you can do is just go to either side, push it a little bit, try again. Sometimes you can use that bolt to kind of grab onto the lip of that hole so it can line up and you just loosely thread that on and then you just repeat that process on all the other spots. And with this roughly in place, what we can do is really just push this back and forth. What we're trying to do is just find the right spot for this and it's really just gonna be up to you. Me personally, I don't like this section back here, be anywhere past this point. That's just personal preference. I want it a little bit further away from my tire. And then I also recommend just kind of pushing it as close to your vehicle as possible. 'Cause even if it's all the way out, you're not gonna be getting any extra space because we do have this wall here, so I'd just like mine to be pushed in. So it's just more of a clean look. But again, it's up to you. And once that's done we can tighten all all our bolts. And from here you're just gonna repeat that on the other side and just make sure you do torque down all those bolts to the specs in your instructions. And after that I just recommend testing it out to make sure it's gonna be sturdy enough to hold you. Right now, that's feeling pretty good. But that'll do it for our look at the installation and some of the features of the Aries running boards on our 2024 Dodge Durango. I'm Matt, thanks for watching.


Do you have a question about this Nerf Bars - Running Board?
Info for this part was:
At etrailer.com we provide the best information available about the products we sell. We take the quality of our information seriously so that you can get the right part the first time. Let us know if anything is missing or if you have any questions.


Thank you! Your comment has been submitted successfully. You should be able to view your question/comment here within a few days.
Error submitting comment. Please try again momentarily.