
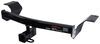
etrailer Trailer Hitch Receiver - Custom Fit - Matte Black Finish - Class III - 2"


To see if this custom-fit item will work for you please tell us what vehicle you'll use it with.


Hit the road with confidence! Whether towing a camper, hauling gear, or getting the job done, this hitch is built for adventure. A fourth layer of matte black powder coating resists corrosion, ensuring strength and durability for every journey.
Rated for 2,000 lbs of gross trailer weight (GTW) and 200 lbs of tongue weight (TW), this hitch is built to handle small trailers, campers, and lightweight cargo carriers. Whether you're heading out for a weekend getaway or hauling extra cargo, this hitch provides the durability and security needed for worry-free towing.
Unlike standard glossy hitches, etrailers hitch features a matte black carbide finish, making it more resistant to scratches and better at hiding dirt and scuffs. The added fourth layer of powder coating ensures superior corrosion resistance, making it ideal for long-term use in various weather conditions.
No drilling or welding required - this hitch mounts directly to your vehicle's existing frame attachment points. The included complete hardware kit and straightforward instructions make it a great DIY-friendly option.
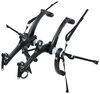
Designed to accommodate a wide range of hitch-mounted accessories, this 2-inch receiver is ideal for bike racks, teardrop campers, and small utility trailers. The standard sizing ensures compatibility with most hitch accessories on the market, making it a go-to choice for adventure and utility needs.
The square-tube construction enhances durability and provides a clean, streamlined appearance. This design ensures a strong and stable connection while integrating seamlessly with most vehicles for a factory-like fit.
Built with precision robotic welding and high-quality steel, this hitch ensures long-lasting strength, a precise fit, and consistent performance. Designed for reliability, it meets rigorous quality standards to provide a dependable towing solution for years to come.
When you purchase a hitch from etrailer, you have access to lifetime technical support from towing enthusiasts. Whether you need installation guidance, troubleshooting tips, or advice on accessory compatibility, our team is here to help every step of the way.
California residents: click here
Videos are provided as a guide only. Refer to manufacturer installation instructions and specs for complete information.
Hi, I'm Danny with etrailer, and today we're gonna take a look at and I'm gonna show you how to install the etrailer Hitch on our 2021 Chevrolet Trailblazer. This is pretty well behind the back fascia here, and it has a nice black finish, which is gonna match your OEM bumper. This hitch has a two-inch by two-inch hitch receiver, which is going to accept most of your accessories you'll be using with your Trailblazer, like a bike rack, cargo carrier, or a light-duty trailer. This hitch is gonna have a total towing capacity of 2,000 pounds, and that is gonna be the trailer plus what ever is inside of it or on top of it. And the tongue weight of this is going to be 200 pounds, and that is the amount of pressure pushing down on the hitch receiver. So, if you're deciding to tow that jet ski to the lake or if you have a heavy e-bike back here on a bike rack, do make sure to check your owner's manual and make sure you're towing what your vehicle can handle.
Now I'll go ahead and get you a couple measurements. So, from the ground to the top of our hitch receiver is gonna be about 11 1/4. So, that is pretty close to the ground, so you may wanna consider getting accessories with a bit of a rise just so you make sure you don't bottom out when you're going up a steep hill. Now, the next measurement here is from the center of the hitch pin hole to the outside of the bumper, and that's gonna be about 6 1/2, so that's important to know if you have a folding accessory like a bike rack, and you wanna make sure when you fold that, it doesn't come into contact with your bumper. If you are planning on towing with your Traverse, it does have these nice, accessible safety chain loops where clevis-style or an S-hook can easily fit.
You will need a 5/8-inch pin and clip to secure your accessory. Now, most of the time when you buy an accessory it will come with it, but I would recommend upgrading to a locking hitch pin just so you have that extra sense of security when you're out on the trail and you have something in your hitch. Please leave a review or comment on how you like this hitch and how it's serving you on your adventures and what kind of accessories you're using with it. Now, as far as the install goes, this is pretty simple, but you do have to take the entire rear fascia off, so it's a little time-consuming. So, if you don't have the time or tools to do this yourself, then please feel free to check out our Dealer Locator.
We can find a professional in your area to get this done for you. But if you're ready to get this installed, follow along, and I'll show you how to do it. Starting off here, we're gonna want to take our fender piece off or mostly off. I'm gonna try and stop it about here. And I'm gonna pull on the bottom.
There's gonna be fasteners. And this piece is actually, there's pieces going down into this piece, so it might be easier to pull out on this one as well, and get this piece out. And I went ahead and popped the first one, and I'm gonna get a trim panel tool back here and try and pop the rest. (panel pops) Right there. There's one in the back. I'm just gonna go along here, carefully popping these out. (panel pops) Now, the instructions do say to take this entire piece off, but it's a bit of a pain getting these back in here when they come out into the vehicle like this one did. On the other side, as you can see, we had to put all of 'em back into where they go, but this side, I'm gonna try and kinda stuff some paper towels in here, 'cause all we need to get to is this fastener right there. Now I'll take a seven-millimeter socket and get this bolt removed. In the wheel well, there is going to be three more fasteners, and I'm gonna use a T15 Torx bit and get these all removed. (driver whirring) I got the hatch open, and there's gonna be another T15 fastener at the bottom. I'll go ahead and get this removed. And now I'll take a pick, and get these covers removed. You can also take a flathead screwdriver, get these removed. And there's gonna be two more T15 screws that we'll have to remove. (driver whirring) Now we can pull our taillight out. Now, this is really secured in here, so it's very difficult to get this out. I went ahead and taped around it just so I could get a trim panel tool and kinda loosen this up, but I'm gonna go ahead and give it a tug out and shake it a little back and forth so I can get it loosened up. And you're just gonna have to work on this, it's a little difficult. Now, I did get this out, and how I did it was I pulled applied pressure with my palm on the back here, and sometimes you can apply pressure up here too and give it a little bit of taps and just get this removed. You just wanna pull straight out, 'cause all the fasteners are right here, they're going straight back into it. Now we can go ahead and get our lights outta here. This top cover is gonna have a white plug, and I'll push down on the tab here, and get this unplugged. (plug pops) And I'll take the bottom light out, just turn it counter-clockwise, and that'll come right out and I'll just get this set to the side. Now, make sure everything we did on the passenger's side you do on the driver's side as well. Now, up under the vehicle, I'm gonna take my T15 bit, and I'm gonna get this fastener removed on either side. And then coming in towards the center, there's gonna be two pushpin-style fasteners, and I'm gonna use a trim panel tool and get these removed. There's a notch in one side, and I'm just putting one side in there, giving it a twist, and they should come out. Now we can go ahead and get this fascia removed. I got Scott over there helping me on the other side. I'm gonna start over here. I did have to peel this back a little bit more just so I can get my hand in here. You just wanna work your way up, get this popped out. (panel pops) Lift up on these clips here, grab the bottom. (panel pops) Oh, there it is, okay. All right. And don't pull it back too far, 'cause there is gonna be two plugs back here, and you're just gonna wanna pull back on this red clip. There's a lot of gunk on it, so I just went ahead and used this screwdriver, and now I'll get this unplugged. And now we'll get this set in a safe area. We're gonna wanna take both of our plugs off of our bumper beam. We'll reinstall these later. And this one actually just slid out of the clip, so I'll just slide that back on when I put the bumper beam back on. We're gonna get this removed, but before we do that, I'm gonna go ahead and cut around this caulking just to make this a little easier for us. I got a 15-millimeter socket. I'll go ahead and remove these three nuts on either side. (driver whirring) And we are gonna be reinstalling these. With those removed, we can now pull off our bumper beam. (beam pops) And you may need to cut a little bit more of that caulking, but looks like ours popped off, so I'll get this set to the side. All this excess caulking needs to get removed so our hitch can sit flush against the frame. I've got a scraper here, I'm gonna get this all removed. (scraper swooshing) With all that cleaned off, we can now put our hitch into place. (hitch clanking) So, I'll let this rest on those. I'll have one hand on it while I put on our bumper beam. (beam clanks) And holding this on, I'll go ahead and thread on our factory nuts. (nut rattling) Now we can tighten and torque all of our hardware down, and do torque these down to the specs in the instructions. And if you don't have a torque wrench at home, you can usually rent one from your local auto parts store, or you could buy one from us at etrailer. (indicator beeps) (wrench clanks) (indicator beeps) Now we can put our electrical connections back on, and go ahead and put everything back the same way we took it off. And that was a look at the etrailer Hitch on our 2021 Chevrolet Trailblazer. If you have any further questions, then please feel free to reach out. I'm Daniel, thanks for watching.

Super nice service and great products
Info for this part was:
At etrailer we provide the best information available about the products we sell. We take the quality of our information seriously so that you can get the right part the first time. Let us know if anything is missing or if you have any questions.


Thank you! Your comment has been submitted successfully. You should be able to view your question/comment here within a few days.
Error submitting comment. Please try again momentarily.