
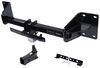
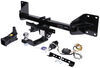
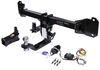
Stealth Hitches Hidden Trailer Hitch Receiver w/ Towing Kit - Custom Fit - 2"


To see if this custom-fit item will work for you please tell us what vehicle you'll use it with.
Tow your small trailer with this completely hidden trailer hitch. Remove the ball mount for a fully concealed look when you're not towing. Use the included receiver attachment to mount a bike rack or cargo carrier. Trailer wiring included.
Features:
Specs:
Note: The included receiver attachment is only for hitch-mounted accessories and cannot be used for towing. To tow with this hitch, you must use the included ball mount attachment.
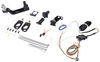
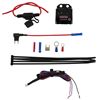
This Stealth Hitches trailer hitch includes everything you need to hook up your trailer for towing. The ball mount pops into the hitch's center block so you can attach your trailer's coupler to the hitch ball. The wiring harness lets you power your trailer's lights. And the safety chain loops let you attach your trailer's safety chains. A receiver attachment is included as well for those times you need to use a bike rack or cargo carrier instead of towing your trailer. This all-in-1 solution saves you the headache of scrambling for missing parts, so you can get on the road faster than ever.
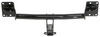
Nothing can ruin the clean, stylish look of your vehicle like a giant piece of metal bolted beneath the bumper. Luckily, with the Stealth Hitches trailer hitch receiver, you never have to worry about messing up your vehicle's lines.
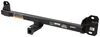
This hitch installs behind your bumper, keeping the cross tube concealed and leaving only the ball mount visible. Even better, the ball mount can be easily removed from the cross tube when it's not in use, so you won't see any trace of the hitch. This means that you can retain that clean, from-the-factory look for your ride, while still being able to tow your trailer on the next family road trip.
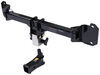
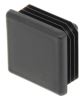
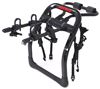
This hitch also comes with a removable 2" square receiver, which can be used to mount any variety of hitch accessories, like your bike rack or cargo carrier.
Both the ball mount attachment and receiver attachment can be installed and removed in seconds with no tools required. Simply pop the selected attachment's base up into the stainless steel block at the center of the hitch until it automatically latches in place.
Be sure to then press the lock on the side of the block to fully secure the attachment. When you're finished hauling, use the included key to unlock the latch. Then turn the handle on the block clockwise and remove the attachment. You can stow the attachments in a safe place like your vehicle's rear cargo area, or you can use a convenient carrying case (391CASEC - sold separately).
And when you're not using an attachment, the included hitch plug covers the center block's opening to protect the hitch's body from dirt and debris.
The included wiring splices into your vehicle's wiring harness, which is located in your rear cargo area, on the passenger's side. Once you've made all of the necessary connections, insert the provided fuse into the in-line fuse holder.
Once installation is complete, the 4-way connector will be stowed beneath your vehicle, near the trailer hitch. A magnetic clip is included to attach the connector to your hitch.
It is recommended that you use a small amount of grease on all electrical connections - the plugs on your automobile and the 4-pole connector itself - to help prevent corrosion.
At etrailer.com we're committed to the products we sell, and to our customers. Our experienced and knowledgeable staff are available via both phone and email to address your questions and concerns for the lifetime of your hitch. The technicians at etrailer perform hitch installations on a daily basis, making them a valuable resource for do-it-yourselfers. The one-on-one, personal service you'll receive comes straight from an expert in the towing and automotive field. We've installed it, we've wired it, and we've towed with it, so whatever your question, we can answer it.
 Alternate Instructions
Videos are provided as a guide only. Refer to manufacturer installation instructions and specs for complete information.
Hey neighbor, Kevin here with etrailer, and today we're gonna be taking a look at and showing you how to install stealth hitches and trailer hitch receiver, with the optional towing kit, here on our 2025 BMW X5. Now, you've gone and you've spent all of this money on a nice fancy BMW. The last thing that you want on there is a rusty old ball mount or receiver tube making that look all grody at the back here. So that's where Stealth Hitch came up with their idea of a removable receiver tube, or with a towing kit, which is also optional. What this does is it just pops right into place into the receiver block, which is nicely hidden up behind your fascia, so that way when you aren't towing it looks like you just have a factory vehicle. But when it is time to take out the toys, you can easily just unlock it and slide your receiver tube or your towing ball mount into place.
So taking a closer look at our receiver block, we have on the passenger side, a latch that you'll twist up towards the front of the vehicle, and that will lock in place to where, when you have your receiver tube, you can just slide it right up in there. You can hear it lock right in. On the driver's side, we have a lock core, which also has a little cap that you'll place over it to help protect it. That way, if you do get some water that seeps through your fascia, it's not gonna mess that lock up and corrode it to where you can't get the key in. Alongside our receiver tube, we also have two little tow hooks, and that's for our safety chains, and that is only going to be used if you have the optional ball mount.
If you have this receiver tube, you can only use this to haul a bike rack or a cargo carrier, or any other hitch-mounted accessory that's not a trailer. It even says so right on the label, "Not for towing." So you'll definitely wanna make sure that if you do plan on towing a trailer, you pick up the wiring and ball mount kit, which I have right here. Our wiring is hidden right over here to the side. It's gonna have a seven way connector that we'll install. And then it also comes with a optional adapter to go from seven pole down to four pole.
That way, if you're towing a smaller trailer that only has lights and no brake, you're not having to have a seven way on it. Now, this is going to slot right into place, just like the receiver tube will. Push it up in there. It'll lock into place, and then you'll be able to tow. Now, when it comes with the safety chains, you will only be able to use the S-hook style.
The larger clevis style is not going to work right here. There's just not really enough room for it to fit through. Whereas with the S-hook, you can still get it up in there. You might want to invest in some quick links though. You can have those just thread right on here, and then they'll give you a little bit of an extension so you can easily get your safety chains in place. Put the receiver tube back in place and go over one other important feature. This is gonna require a 5/8th pin and clip, which will not be included with your kit, but typically that is included with whatever accessory that you're hauling around. If you don't have that with the accessory or maybe you just lost it, you can pick another one up from here at etrailer and be ready to go. All right, now to give you guys some measurements. When we measure from the ground up to the top inside edge of our receiver tube, we're getting 23 inches. Now, we're gonna subtract eight inches to make up for our lift. So that puts you right at 15 inches of clearance from the ground. That's really good. Typically we wanna see about 12 inches. The other important clearance issue is with our hitch pin hole. Now typically on most trailer hitches, it's kinda sitting back behind the fascia. On this one it's actually in front of the fascia, so you should not run into any kinda clearance issues when you fold up your bike rack or your cargo carrier. Now, there might be an issue once you have that lift gate come down, actually open up. So you might wanna double check that before you have your bike rack or whatever folded up and then have that open and accidentally hit it. Now, when it comes to the install for our trailer hitch along with the wiring kit and ball mount combo, it is going to be a very tough install. This is one that I would not recommend doing at home. If you are a mechanic, you have all the tools, all of the special ins and out knowledge that comes with working with fancier cars, then yes, go right ahead, get it yourself, go and tackle it. But if you are not, if you're feeling like this might be a little bit too complicated, I highly recommend checking out our dealer locator, which is going to allow you to look up shops within your zip code that'll help get your trailer hitch installed. Now, if you are that DIYer and you are gonna do this yourself, stick around, we're about to start the install. Starting out, we will open up our rear hatch here, and we're gonna pull out two panels. We've got one on the left, one on the right. This one on the left, if you just press down that button, it'll unlatch it and you can pull it right on out. We'll set that to the side. And then over on our passenger side, this one doesn't have a latch but is very simple to pop out. You just stick a little plastic trim panel tool and you can pry it out. There's gonna be two little clips that pop right in, right there, that will pop out of the way. And then we are gonna move to the middle section here. I've already lowered my seats down. And in the back, there's gonna be two clips that we're gonna pop out. So if we look right here, we'll pop that up, and there's gonna be a Torx bolt on both of these, and you're gonna need a T30 Torx bit. (electric wrench buzzing) And once we have those both loose, (electric wrench buzzing) that'll allow us to lift up our tray here in the back. In front, I'll unlatch it. We'll let that drop back down just a bit, because we're gonna pop out that gas strut right there, and to do so, you just need a tiny little screwdriver, and you can pry up on the little tab, pop this out, get a little bit closer. There we go. And we can pull the whole panel out now. Now we're gonna have seven push pin fasteners. There's one here, here, we've got three on the front here, one more, and two more on the sides. And for those, you can just use a tiny little screwdriver. Get those started to pop up. Sometimes they're loose enough, you can just pull it out by hand. Sometimes you'll also need a trim panel removal tool. We're lucking out in this case. They are pretty loose. And we'll pop each one of these out so that we can pull this out and get access to our battery. With all those push pins removed, we can lift up our tray and pop it right out through to the side. Next we're gonna have four screws, one here, here, here and here, and those are all gonna require a T20 Torx bit, and we'll remove each one of those. (electric wrench buzzing) We should be able to lift our threshold up out of here. It's gonna fight us on the lip just where this gasket is going around the rear hatch. We can slide it out. Next on our passenger side, we're gonna have a little plastic cover we're gonna pop out. And I'm just using a little 90-degree pry tool. Get that in and pull that out, and reveal another screw that we're gonna need to remove. Next, using an eight millimeter socket, we'll remove that screw. (electric wrench buzzing) Next, on the front of our passenger side panel, we're gonna have a little plastic circle we're gonna pop out and reveal another screw. For this screw, we'll be using a 10-millimeter socket. (electric wrench buzzing) Next, we will pull out this trim piece. You're gonna wanna just pull straight towards the front of the vehicle and then lift up. As you lift up, you can start to turn it out because there's a long plastic piece that's gonna be right at the bottom, right here, that kinda curves into a little slot right here. Then we can just lay that down. Now, behind that trim piece is another plastic rivet that's gonna be holding down our whole side panel here. So we'll pop that out. Next, we'll have two more rivets we're gonna pop out of the side. So we got one right here, and then another right back there. Next, we can just pull inwards toward the center of the vehicle to dislodge the side panel. Now, there's still another piece kinda holding us in a little bit, so be careful over here. You could easily break a plastic clip. I'm gonna have to slowly pop this out. And I am gonna grab my trim panel tool and try and slowly pop that out of its clip. So I did not end up having to remove the cover that goes over this. At this point, you're just getting pinched by this clip here for the door. But once we get it out enough and loose in the front to where I can pull it away. We do have a couple clips we're gonna take out though. So we've got this wire harness right here we'll pop out. And that one cannot be dislodged. That's for a light. So we aren't gonna be able to fully remove this, but we'll be able to at least get it out of our way. All right, taking a closer look, we we inchesre able to get that out. It did have a clip. Just from where I was standing before, I could not see it. So we can pull this whole trim panel out. Using a 12-millimeter socket, we're now going to release the nut that's holding on our taillight, that is right above our fused box, way in the back there. (electric wrench buzzing) The last little bit I'm gonna do it by hand so we don't end up losing that nut in the wall here. So on the driver's side, same thing. It's going to be in the same exact location. They even have a little strip of the soundproofing cut. So if you can kinda see in there, it's right behind this little tab. So I'll pull that down. That way we can access the taillight here. There we go. Now we're gonna be removing the panel that covers our taillight assemblies, and this you're just gonna pull straight back. Looks like there's only two little clips holding onto the tabs right here and here. Let's do the same thing on both sides. On both sets of taillights, we're gonna have two T30 Torx bits that we're gonna need to take out those screws, and then also an eight-millimeter socket just for this little screw at the bottom. (electric wrench buzzing) Now we'll just pull out to the outside edge of our vehicle, and then we're gonna have a harness to disconnect. We'll pull up on our red tab. I might need to get a little screwdriver to get in there. Just can't quite get it with my fingernail. Once we have our red tab pulled up, you can then press in on that little black piece right there and pop out your harness. Next, you're gonna be taking the wheel well trim out, and to do that, we are gonna wanna put some painter tape along this edge, because we're gonna be prying in here to pop this out 'cause there's clips that are holding this in place. And so, then we can protect our paint using a little bit of painter tape. It's gonna have us have something to press against without actually scratching up the paint. So I'm gonna try and get that real deep into that little crevice there, and I'm just gonna tape my way up along the curve. Now that I have this all taped up, our goal is to get this bottom tab out first, and then there's gonna be three tabs as we work our way up. So we're gonna try and get a little bit of space here. If you want, if you can get your fingers in behind the wheel well liner to also pull up on that as well, that's gonna be super helpful. But we'll try and pry that out. There we go. Then once we get that out, it's pretty simple, just keep prying along here. There we go. And with that loose, we've now revealed one of our screws, and we'll use an eight-millimeter socket to remove it. (electric wrench buzzing) And we'll set that aside. Now we're gonna take out our reflectors. These are super easy to damage, 'cause it typically gets kinda hung up and pinched on that outer edge, and then you snap it. So we're gonna be really careful using our 90 degree, just kinda pop that forward, pop it right out of place. So this is gonna be another eight-millimeter socket. (electric wrench buzzing) Pop that off, and then we're gonna do the same thing over on our driver's side. All right, this is gonna be 26 screws in total that we're gonna be removing from the rear side of our fascia, all the way from our quarter panels here, all throughout the middle here, and those are all gonna require a 10-millimeter socket. So we'll begin just by popping each one out. (electric wrench buzzing) As you get through this, you'll start to have some of these panels come down, the side panels easily just pop right out of place. Put those aside. Our main panel right here is gonna come out. And then we're gonna have two little eight mills, one on either side here, that we're gonna pop out as well as part of those 26 screws. (electric wrench buzzing) (electric wrench buzzing) And we'll set all of our trim aside. Starting from our wheel well, we're gonna start pulling out and work our way up. Once we get up to here, there's these little black plastic clips, and if you take your trim panel tool, you can kinda sneak it in there. Push down on that. Pop it right out. We'll just keep working our way along. Then once we get past that, we can kinda lift up enough to just get it over that black plastic and start pulling it backwards toward the back of the vehicle. 'Cause there's one more clip that it's hanging up on right here up top, and that's where we had a bolt going through originally. And there we go. That was that guy right there. And then there's two more clips. As we work our way down towards the center of the vehicle, you'll see we have tabs here, here, there, there. And that, same thing. You can kinda press up against it so you can get it off the black part, which is hidden real close there. So we did angle our lift gate just a bit so that we can get access to that. You're gonna need to keep some pressure on it. That one's out, and just keep working your way across. Now with all of our clips disengaged, we can slowly pull out on our fascia. I wanna be careful 'cause there can be connectors hidden behind here. I have some on my side, so we'll pop that off, just pulling on the two tabs on either side, and then we can set this to the side. I'm just gonna flip it up. Next we'll lower our exhaust on both sides. You'll see this little setup with a isolator here, this little rubber guy. Right above that you're gonna have a nut that you'll remove. (electric wrench buzzing) Now typically I'd say you also need to put some straps down to support your exhaust here, but there is already a support brace that's made out of metal in all the frameworks so we don't have to in this case. But we can pop that right out of the way because we are going to be removing this cross beam right here and replacing that with our trailer hitch. We're also going to remove this little plastic Christmas tree rivet outta here. You can probably get it out by hand. If not, use a panel removal tool. Just pop that out, and that's our wire harness leading out to our lift gate sensor. So to gain access to the top two bolts on either side of our cross beam, we are gonna have to remove this plastic. To do so, there's just little push pins. So you will have to have this angled. About a 45-degree angle is probably gonna give you enough space. Just push those out. With those out, we can remove the panel itself. Now, they do have little push pins I can see, or not push pins, but little clips built into 'em that I have to pry on just to get it out of the other piece it's snapped into. Now, on the front of these, if you push towards the front of the vehicle, you can get that little tab. On this side, you'll probably need your removal tool just to kinda pop that. On the front, you can kinda push on it and get it off of that little lip there. Same thing on this side, but you might have to kinda reach your hand in behind the cross beam to get to it. And there's a second clip behind it as well you have to kinda pry against. There we go. So here's that second clip that was catching on right in that second hole there. Now we can disconnect our lift gate sensor mounting panel. This is gonna have five plastic rivets. And we can disconnect that as well for right now, just so it's out of our way. Using an 18-millimeter socket, we will now remove the flange nuts that hold our cross beam on. (electric wrench buzzing) (electric wrench buzzing) (electric wrench buzzing) With all eight removed, we can then remove our cross beam, being real careful that we don't accidentally grab our wire harness. Now we can install our hitch. Let's slip it past that wiring first. Make sure we're good on that side. And we're kinda catching on the paint here. They over sprayed just a bit. So I'm gonna use a rubber mallet and just kinda persuade it into place. Now, since the old exhaust or cross beam had a spot for our exhaust hanger to mount to, we have to add on our own that came with our kit. You wanna make sure that you have that tab facing out so that the exhaust hanger can actually match up with it. So we'll just get those in place, and then we're gonna thread on our factory flange nuts again, and we can tighten those down and torque them as well. And as you're doing this, before you fully tighten it down, this is slotted so you can move it back and forth and really get that fit just perfect, so that way you can easily mount up that exhaust hanger. Now, before I get these set, I wanna make sure that I had this mounted up with our exhaust hanger. We're gonna have a bolt, a flat washer, and a flange nut in our kit, along with those brackets. And on this, we're gonna have the tab stick through that first hole. The back hole is gonna be where we stick our bolt. Get it to line up. There we go. Once we pull that through, we can then use our flange nut. We'll just get that started. And once we tighten that down this should sit a little bit more level, and then we can fully tighten up our bracket on here. To tighten this up, I'm gonna be using 13-millimeter sockets on both ends for both the flange nut and the bolt. (electric wrench buzzing) And as we tighten that up you can see it lifts right back up into place, and now we can fully tighten those down. (electric wrench buzzing) With those all tightened down, you can now torque it to the specifications listed in your instruction manual. You don't wanna go too tight with this. You could easily break off a stud if you do. (torque wrench beeping) Now we can reinstall those trim panels that we popped out to get access to our bolts. These will just pop right in, and go in place with those two plastic rivets. Now for our next part we would be installing the receiver block here. This is gonna be the differentiating point for most of you out there. If you're getting the towing kit along with it, there's gonna be a couple extra things we're gonna add on right here. If not, you would just be slipping that right into place, putting your bolts through, and continuing on with the installation. Now for us, since we are also adding on the towing kit, we have these parts right here. These are gonna be our safety chain loops. So these would mesh up with it right here. You wanna make sure that you're putting the handle on the passenger side and the lock over on the driver's side. We'll slip in one of our bolts. That's gonna help hold up our receiver tube. Let's slip in the other one. And then we're also gonna have this mounting bracket for our seven way. So we'll slip that into place too, and this is gonna have the tab facing so that that extra portion is facing towards the rear of the vehicle. So when we slide that on, it should be kind of forced up to the front there so that it's kinda hidden more back behind our fascia. Once we have that in place, we'll then put on our lock nuts and tighten 'em down. Now we're gonna torque it down to the specifications listed in the instructions manual. They don't really make it easy for you to get that back bolt, but you wanna make sure that you are keeping pressure on it as you tighten it up. (torque wrench beeping) There we go. Just next to our trim panel that we just put back on, we have a grommet right here, and this is where we're gonna sneak our wiring through. Now, I'm gonna use a 3/8th drill bit and I'm gonna just very slowly keep chunking away this rubber until we pass through. Since there's a wire harness here, I don't really wanna poke through too hard. I wanna make sure that I'm not gonna end up wrapping up into that with my drill bit. There we go. Quickly stop yourself just so you, like I said, it's real easy for these drill bits to just grab and then yank you forward and really cut up all that wiring. So we wanna make sure that we're not going all the way through and grabbing onto anything. From this point on, now I'm gonna use a pick and make sure that I'm not touching anything else, and then I can finish clearing out the other side of our grommet. So if you've unbundled your harness, the bare wire that has no casing going over it is going to be splicing in on the inside here. So we'll have to look for those functions. But before we get to that, we are going to take the other side that's gonna live on the outside of our vehicle, this case right here, and we're going to tie that in through that grommet that we just cut through. I've already put one of my sticks through there to fish it out. And what we'll do is, I'm gonna stick that slightly in there and then I'm just gonna tape all around it, because now we have to force this out that 3/8th hole that we just drilled. It's a lot easier if you taper it real tight at the end there with all those wires and then kinda work your way up. Now we'll pull it through our grommet, or force this through the grommet. You might need to also push on it from the backside too, just because it is a lot to pull through. So I've already ran this over. I ran it up over the hitch at this point and then I came back down. I zip tied it real tight right here, but I left this guy alone over here just because we are going to have to peel back all that tape we put on there initially so that we could sneak it through that grommet and then wire this into our seven way, which is also included in our kit. Once we have those out, you can kinda shake it loose. With this intersection taken out, we will then loosen up this set screw right here, and that's gonna release this guy, which is going to allow us to slide our wiring through. And we'll get a good healthy amount through there, so that we can actually hook it up to that center section. Pushing. There we go, with that out of the way. Now, the back of your center section will be labeled, but it is labeled incorrectly for how we're gonna be doing this. So starting off, the center is gonna be our purple wire, that's for your reverse light circuit. So we can get that right out of the way. Twist that up. And each one of these terminals is just held in with a set screw. So with your using your little Phillips head screwdriver, you'll be able to loosen 'em and tighten 'em back up. Nice and tight. From there, we wanna find black. Black is one of the only ones that is labeled correctly, and is where we're gonna start. And right here. And tighten it down. Following along, so we have our black on this terminal right here, following that's gonna be green, and then from there we have blue, white, yellow, and then brown. Now we've made all of our connections, I'm gonna pop this back into place. And we will come back and test this with our seven-way tester before I go ahead and put RTV sealant inside of there. That's just gonna help protect this so that nothing can corrode. It's gonna have it all glooped over it so that all that wire's protected, we don't have to worry about anything rusting out, corroding over time, or any kind of connections accidentally crossing over into a different one and then you're running into issues later on down the road. Now, while you're doing this, the bottom of our seven way is going to require this side right here where it's a full cut through, 'cause there's a tab that's gonna be right in the way. So as you're doing this, you'll wanna make sure that you're putting it into the correct spot. And just so that we don't lose those set screws, we'll thread those in right now. Just hand tight. And then we can keep working on the connections inside of our vehicle. Depending on the model and year of your vehicle, there are gonna be some different instructions when it comes to the wiring on the inside. So since ours is 2025, we are gonna have to run our green and yellow wire all the way from back here up to the front quarter panel inside of our passenger side of our cabin. Now, all the way up at that front, there is a little panel we're gonna pop out, and there's all of our wiring that we're gonna tap into right there. Now, to get to that point, we are gonna have to remove quite a bit of trim. We're gonna be taking out the trim for the threshold, and probably both the middle seat, and then also up in the passenger seat, just so we can sneak that through. And you are definitely gonna need some extra wiring. They don't really give you enough to make it the full way, and if you did you'd be super, super tight. So you wanna pick up some extra wire. 14, 12 gauge, something like that would be good enough to make it. Probably a good 10, 15 feet would be more than enough to give you some slack there so you can easily just snake it through everything. So our module's starting right back here, and I've traced my yellow and green wires up through the wire harness here. I've slid it right through that plastic so that I can help hold it up outta the way. I did remove the trim panel right here, which also does have a Torx bit screw that we had to remove. That way, I could get into this area a little bit better and sneak it in behind this trim panel right here. So at this point, I snuck it down into there, but I didn't fully sneak it all the way through. I didn't pull this up, I left this in, and I just kind of tucked it up under here. So what you're seeing snuck into this is actually just, I had extra length I had over here and then I kinda tucked it all behind that piece, and then I was able to just keep going along, tucking it in. And then once we get up to that center spot between the two front row and the back row, you could easily get it in there 'cause there's a lot more room. Now up here, I did have to remove this trim panel. I removed this piece here as well. There's two little turn pieces that you'll unclip. You can drop down that top piece and then there's going to be a light you can disconnect. I also disconnected this, which also has a light in it as well, just a little push connector. And then I finally removed the quarter panel piece that's right here, which also has a screw in it, and once we got that out, I am now into that second harness. So there's one switch, and then another switch that the harnesses plug into. That second harness was kind of faced out so it was a little bit easier to get to. And in the guide, they're showing a blue wire for the left turn signal, and then a blue and yellow wire for a right turn. Right now I'm hooked up to that blue wire so we can test it and make sure that this is our left turn signal. There we go. So we know that's good. So I can use the quick splices that are provided in the kit to connect to that, and then I'm gonna test for my right turn. Now we're gonna use a quick splice. I'm gonna pre-press this in for my wire I added on. Just 'cause it's a little bit thicker, it's fighting me a bit. Get that in there. And then we can put the other side onto our blue wire for our left turn, and we'll flip that cap over, and this is going to press into it and it cuts into the casings so that it can transfer that signal between the two wires. All right, both are fully clipped in. Tug test is good. So now we can just tuck all this back here and put in our panels. All right, both are fully clipped in. Tug test is good. So now we can just tuck all this back here and put in our panels. The next part, we're gonna be removing this panel. I've already eyeballed it a bit by peeling up here, and you can get in there. And I started the first one and you can see up, looks like there's one right about here, at least that I can see, and there's probably gonna be at least one or two more right up in there. That will have to pop out. And one of our clips just dropped. We'll need to pick that up and put it back on. If you do have that pop out, most of these are just pushed right into place. There's a little opening. You'll just slide it right back in the socket. You can see it right there. That's the one it fell out of. So if that does happen, don't be worried. It's not hard to put 'em back. So just like that, I found it. We'll pop it right back in and we're good to go. Looks like there's one more right here. Lemme just go up to the front and grab it. I'm gonna try pry in. I'm gonna grab my pry tool. There's one more, it feels like right in this area. Kind of an awkward spot just 'cause of everything around here. Oh, actually came right out. So we are good. So I was being held up by that little one hidden on the inside there, if we we inchesre looking at it up against the window. But there's also another clip, it's not actually tying into anything, it's literally just to hold it against that other piece of fascia. So if that pops out on you, you can literally just pop it back in and you're good to go. So up top, following the instructions, we tested and found that the gray and brown wire is gonna be good for our the brown wire on our wire harness. And then there are a few different black wires in here, but there's one that's a really, really, really small gauge, and that's the one that we are looking for for our break. So I've also spliced that into our red wire. Now, down below, we have our module, and I've already stuck on the double-sided tape on one side. I'm gonna slap that up right up along the side there once I get the other side of our tape off. And then all this excess wire, I'm gonna zip tie up, but I just wanted to get this set first. That way I knew how much length I needed to actually zip tie. And we can set that just like so. Give it a good couple presses, get that tape on there. And then we can clean up our wiring. The last two wires that we're gonna have are our blue and our purple. The blue is gonna run up to a brake controller. We aren't gonna get a brake controller in this. Our neighbor's honestly probably not even gonna use the wiring just because they are only wanting this hitch just for a bike rack. So they don't honestly need that brake controller wire. And then the purple is for a reverse light circuit. Now, you typically are only gonna need that if you have a boat trailer, especially one with surge brakes. That'll help you if you have a lockout for the surge brakes to be able to back up. But since we don't have that, we're just gonna tuck that to the side. If they ever do need to get into here and install a brake controller, all they'd have to do is just pop out that one little side panel and they'll have access to the whole fuse area, as well as this bundle of wire. Included in your kit is a fuse holder. We're gonna pop the fuse out of that, 'cause we don't want that active just yet. One side is gonna connect with a butt connector to our black wire coming off of the module, this guy. And then the other one is gonna go to our post on here. So we have this little nut right here we're gonna remove, then it's a 10 millimeter socket. We'll slap that right on there and reinstall that nut, and be good to go with the power. Before I do that, I am going to try and trace this through and sneak it under some of the plastic to help hold it. And the extra length, I'm gonna try and keep all in that corner. On every step of this they tell you to cut the wire down to the right length. But in my experience, having a little bit extra is definitely the better option. So I always try to save some and just zip tie it up. And then once we get here, we can zip tie our black wire to some of that regular harness that's there and connect right up. Little pull test. Good to go. Now we can remove this nut, and we'll slide on on our ring terminal and then just reinstall that nut. And I'm gonna try and just tighten this down so that our ring terminal slips past the casing. So I'm gonna keep a hand on there. I'm gonna give that a last little. There we go. In your kit, they're gonna have a ring terminal, and that's what this guy is right here. This is designed to go to this ground bolt right here, and we're just gonna undo it, just enough to slip this in under it, and then we'll tighten it right back down. Good enough. There we go. Tighten it back on. Now we can clean up the excess wire with some zip ties. Finally, we can stick in our fuse. And before we go any further or put anything back, let's go ahead and check all of our signals at our seven way, make sure everything's coming through and we have no issues, starting with our running lights we'll roll through. Now I have on our brakes. We have our left turn. And we have our right turn. Now that I've confirmed everything is functioning, I'm gonna push my connectors back out. And on this backside, I'm gonna fill this in with some RTV sealant, just to protect everything. Nice stuff about this is that if you ever did need to come back in here, this will pretty much rip out really cleanly. So if you did have to ever work in here, you can just kind of pry it right off and be good to go, but does a really good job of sealing it all up. Once we have that, we'll make sure that we're putting this in the correct way. So I wanna pull it so that that completely open tab is facing down. Now that it's in, we can set those set screws. And then I'll push this casing in just a little bit more so it's really grabbing it with that white piece, and then we'll push this set screw in as well. In your kit, you're gonna have a couple of things of hardware to go along with your seven way bracket. One of them is gonna have two longer screws, it'll have a flat washer, and the flat washer's gonna go on our screw first. We'll slide it through up against our bracket. And then after that, we're gonna have a lock washer and then a nut. I'm just gonna get that started. Just hold that up, and then we can grab our other screw and get that one going as well. Now, when you are tightening up the bracket itself, I raised mine up to kinda flush it out along with this bracket. That's kinda up to you how you want it, whatever height. You might wanna play around with it a bit, see what works for you. There are slots in this bracket right here so that you can adjust it. We got about an inch of movement there that you can really get to. That said, we'll keep adding on our hardware. All right, now we can reattach our kick sensor, and for that we'll just be reusing three of the push pins that they had on there originally. So that'd be those three center ones, just popping it right into our plate that we have on our hitch, and then reconnecting our plug right here on the end, right in that center. And with that installed, we should be good to start putting on the rest of our fascia and reinstalling all of the trim panels we removed. Now, on your final piece of trim here that's right where the hitch sits, we're gonna have to trim out a little bit of it. So there's already a cut from the factory. We're just adding on one little portion to kinda even it out. So we are gonna go around that curve, straight across, and then just down, just kind of the same way that it was on the other side. So I'm just gonna use my oscillating tool. (tool buzzing) Then you can just come back with a razor blade and scrape off any little burs that you still have. (electric wrench buzzing) Now with everything back in place, that will do it for the install side of this. The only thing you have left to do is decide whether or not you want to tow a trailer with the ball mount, or if you wanna haul around a bike rack or cargo carrier with the receiver tube, make sure that it's unlocked with the key over on the driver's side, and then you can just pop your accessory right into place. But with that said, that will do it for the installation of the Stealth Hitch trailer hitch receiver here on our 2025 BMW X5. My name's Kevin. Please feel free to reach out to us via our experts link, a comment on this video, or a phone call to our customer service department. We'd be happy to help you out on your journey.


Do you have a question about this Trailer Hitch?
Info for this part was:
At etrailer we provide the best information available about the products we sell. We take the quality of our information seriously so that you can get the right part the first time. Let us know if anything is missing or if you have any questions.


Thank you! Your comment has been submitted successfully. You should be able to view your question/comment here within a few days.
Error submitting comment. Please try again momentarily.