
To see if this custom-fit item will work for you please tell us what vehicle you'll use it with.


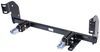
Fully welded vehicle trailer hitch is strong and durable. Draw-Tite's Tested Tough guarantee ensures that this hitch exceeds industry standards. The combination of an e-coat base and a powder coat finish provides excellent rust protection.
Features:
Specs:
Draw-Tite's Tested Tough program provides testing standards far superior to those outlined by the Society of Automotive Engineers (SAE), the go-to source for engineering professionals.
Each Draw-Tite trailer hitch receiver undergoes extensive fatigue testing and static testing with the ball mount that is either supplied or recommended for use with that particular hitch, thus ensuring results that are applicable to real life use. Fatigue testing is also conducted on hitches rated for use with weight-distribution systems.
In addition, Draw-Tite performs static testing on a simulated automobile, as opposed to the rigid fixture used for SAE testing, resulting in a more true-to-life scenario.
At etrailer.com we're committed to the products we sell, and to our customers. Our experienced and knowledgeable staff are available via both phone and email to address your questions and concerns for the lifetime of your hitch. The technicians at etrailer perform hitch installations on a daily basis, making them a valuable resource for do-it-yourselfers. The one-on-one, personal service you'll receive comes straight from an expert in the towing and automotive field. We've installed it, we've wired it and we've towed with it, so whatever your question, we can answer it.

California residents: click here
Videos are provided as a guide only. Refer to manufacturer installation instructions and specs for complete information.
Hi, everyone, Aiden here with etrailer, and today we're gonna be taking a look at, and later be showing you how to install, this Draw-Tite Class Three trailer hitch receiver on our 2024 Mazda CX-90 plug-in hybrid. Now, while the Mazda CX-90 is a larger SUV, a trailer hitch receiver is gonna make it that much more functional, whether you are looking to tow a small trailer, this hitch is up to the task, or, like our neighbor today, if you plan on just using it for a simple sports and rec accessory, like a bike rack, that's our neighbor's gonna be using hers for today, so that she can get her bikes to the trail. But this would be great for a cargo carrier too if you find yourself on those long family road trips needing a bit more space out of the inside, you can take some of those items and just move them out to a basket. Regardless of what you use it for though, your specs are gonna be the same across the board. You get a 5,000 pound gross trailer weight rating, that's how much weight the hitch is rated to pull, and a 500 pound maximum tongue weight rating. That's the max downward pressure on the end of the receiver tube, and that'll be a really good weight rating for really any cargo carrier or bike rack out there.
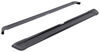
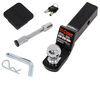
Just keep in mind that's what the hitch is rated for, not necessarily your vehicle, so it's always a good idea to go to your owner's manual, check those specs, and go by the lowest rated component, whether it be the car or the hitch. All those accessories are gonna attach using the two inch by two inch receiver tube right here. That's gonna work for the widest range of accessories, and it'll secure those using a 5/8 inch hitch pin and clip. Now the hitch pin and clip is not sold with the hitch, or included. You will need to pick that up separately, but most accessories like bike racks will come with them.
Just something you wanna check on in case yours doesn't, you can always pick up one etrailer, or you can pick up a locking one if you wanna keep your accessories safe when you're not around. The safety chain loops at the bottom are gonna be this loop style. They're gonna work well for your smaller S-hooks as well as your larger clevis hooks. Now it's worth noting if you do plan on using this to tow, this can be used with weight distribution but your towing capacities will remain unchanged. A few measurements you wanna watch out for are gonna be from the center of the hitch pin hole to the outer face of the bumper, which for us today is sitting right at four inches.
The hitch is pretty well recessed under here, giving us a nice clean look. But with that four inches to the hitch pin hole, you wanna watch out for any folding accessories like bike racks to make sure that you have enough clearance to not hit the vehicle. And then another thing we can check out is our ground clearance. From the ground to the top inside edge of the receiver tube here we're looking at 14 1/2 inches. That's important to know if you do plan on using a ball mount, you wanna make sure you find an appropriate rise or drop for your trailer, so that you're towing level.
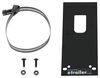
I think with this you might be pretty good just getting a straight shank ball mount, but it's always a good idea to check your gear and see how it matches up. But I think my favorite thing about this hitch for the Mazda is it's clean, finished appearance. Everything's tucked up underneath the bumper, so the only thing visible is that receiver tube. And luckily your CX-90 has a really nice cutout for that hitch to sit, so all you gotta do is remove that panel and that receiver tube will go right in there. No cutting or trimming required, which is really nice. But as far as that install goes, it's not technically difficult. All the things that need to be done for it are pretty straightforward. The biggest problem is space. Everything is extremely tight up there and especially if you're doing this on the ground, I think you might find it really frustrating and time consuming. So if that doesn't sound like something you really wanna get into, don't let it deter you. We've got our dealer locator tool you can use to find an installer that's local to you who can help you get that hitch installed and take care of it for you, so you don't have to get your hands dirty with it. But if that is something you wanna tackle, you can follow along with our install here. And if you do decide this is the right hitch for you, we'd love to hear a review or a comment on this video to let us know how it's working out for you and your Mazda CX-90 plugin hybrid. But without further ado, let's check out that install now. To start off our installation, we need to remove our hitch cover here and a number of other push pin fasteners on the underside of our bumper fascia here. The hitch cover though will have its own two push pin fasteners. You can just use something like a flathead screwdriver to pop in the corner there. And what I like to do, once I have it pried under, is just give that flathead a twist. That'll pull the center out and you can pull the whole thing. And there'll be nine other push pin fasteners for that fascia, starting right to the outside edge of the seam here, and just working our way across. So with all those push pin fasteners removed, we can remove the hitch cover. This is kind of on there pretty good, but pull it kind of straight down and out and get those clips released. This isn't gonna get reused, you can set that to the side before coming kinda to the side of this panel here and up into this cavity. And it's pretty tight up in here because we've got this panel in the way. But right at the top you're gonna be a square nut here, this little plastic thing, and a 10 millimeter screw off to the back of the vehicle, kinda next to it. I'm gonna focus on this first. Your instructions say you can grab it with some pliers, give it a quarter turn and remove it. But I found, and we found here at etrailer from other installs, that this doesn't wanna cooperate. I'm just gonna let you know now this piece will probably break when you try to remove it, but it doesn't need to get reinstalled. So if you need to kind of mangle it to get it out of there, then so be it. But I'm just gonna grab onto it, try to rotate it, but I'm also going to just kinda wiggle and pull on it and get it out of there. Okay, I got that quarter turn, but still not necessarily wanting to come out very nicely. But this is making it easier to pry on. And if need be, I can always break out a drill and drill this little clip out. Perfect. Now I left that 10 millimeter screw for last, because I already did the other side. It's the exact same over there. And once that's down, we can pull this whole panel away. Now up here we're gonna have a oblong hole, that's where that really stubborn plastic clip came out of, and a circular hole here. We need to enlarge this to fit our hardware for our hitch. So I'm gonna take a bur bit, kinda work away at it, and periodically test with my carriage bolt or my spacer block to make sure it'll fit through. And once we are happy with the size of that, we can test our hardware one last time, make sure it fits. I'm gonna go back through, clean up the edges, and just do a little bit of spray paint over there, just to leave any exposed metal no longer exposed. And on the upper outside edge, because of this panel, you're not gonna be able to see it, I can't even really see it, but there is gonna be a sticker that is covering up a threaded hole that we'll need for some of our hitch hardware. So just get that removed on either side, then we can move forward. So we're gonna get our first bits of hardware fed through the hole we just enlarged, taking our fish wire lead and bringing it through that back oblong hole and out the other end that we enlarged. I'm gonna pop on a spacer block, and thread on a carriage bolt. Once we've got that threaded on, we can start feeding this hardware up through that hole we enlarged, and pull it down through the other side. This seems a little bit tricky to get it fed up the right way, but I found that you can even twist it around in the frame there a little bit. And usually we'll find a path that works, just like that. Pull that down through, and leave that fish wire lead attached. It's gonna help us pull that through the hitch later, but first we need to take a half inch washer. Also feed that on, 'cause it's gonna get sandwiched between the hitch and the vehicle frame there. And to help us hold it, we're just gonna get some pieces of tape and tape that up on either side. Now if your Mazda is like ours, where you've got this plastic panel kind of above the exhaust, it's gonna be very much in your way when you go to raise the hitch in place. So kind of up on the inside edge here, there's one and two push pin fasteners. The other fastener that's holding that in is riveted towards the bottom, but if you just pop these two push pin fasteners out, it should give you a good amount of room to swivel this outta your way and work. We're just gonna do the same method we did before with a flathead screwdriver to pop those out. Try to keep my hand out of the way, but it's pretty tight in here. And that should give us more room to work. Now with an extra set of hands, Joe's gonna help me out here, we're gonna feed those fish wires through the top hole on our hitch here, and push this up and into place. It's gonna be really tight here, so I'll try to stay outta the way as best I can. But we need to get this up real high. And like I said, this is a super tight fit. So once you've got it in place, just get a nut, pull that pull wire off, and just get one nut attached on either side so that you can at least have this hold itself up in place, and not give you nearly as much trouble for the rest of the hardware. So that was kind of a roller coaster getting the hitch up in place. It was again, probably really hard to see while we we inchesre in there, but the thing we we inchesre into is the exhaust isolator. The hitch can certainly swing past this, but not very gracefully. You gonna have to push on it quite a bit or really just get the angle of approach perfect. So that's kinda what we were fighting against, aside from just limited space for our hands and everything. But here's a better look at that single nut we got in place. We're gonna do our outer hardware, and return back to this after the outer hardware is in. That outer hardware is just gonna be one of these larger bolts in our kit, and a conical washer, with the curved side facing in towards the hitch. And here's where that's gonna go in, just thread that in on either side, and this will be the new thing holding our hitch up into place so we can fix the rest of the hardware hands-free. I'm just gonna get this pretty well started by hand as best I can. We're turning our attention to that carriage bolt. We can remove the nut we installed just as a keeper. And the new hardware combination is going to be a large flat washer, it's gonna hold that in place, a lock washer, and do your best to apply a little bit of side pressure to the bolt here while you reinstall that nut that we started with in the first place. With all the hardware in by hand, we can go back through and snug things down using a 22 millimeter socket for the larger outer bolts, and an 11/16 socket with some sort of extension for those carriage bolts, because the hitch will be in the way of itself. (tool whirring) Make sure you do this on both sides. Now this is gonna be a tight squeeze for your torque wrench. Once you get to this point, make sure you check your instructions to get the proper torque specs for your hardware, because those larger outer bolts will have a higher torque spec then the carriage bolts that are sticking straight down. Now if you don't have a torque wrench, you can always pick up one here at etrailer, or you can typically rent one or check one out from an auto parts store. I will say with the higher torque spec, you may consider a 1/2 inch drive, just to give yourself a little bit more leverage. You can get away with 3/8 if you don't mind putting some extra muscle behind it. But you also gotta think, if you're doing this on the ground at home, you might not want to do that. It just might not be nearly as easy of an angle. (torque wrench beeps) We will just repeat that though for our remaining hardware. (torque wrench beeps) After torquing everything, I went ahead and reinstalled the push pin fasteners for the little corner pieces. And at this point, we're ready to reinstall our facia support panel. So make sure you grab it. We want these slotted ends facing forward, and I'm just gonna pop those up into place. I'll kind of show you on this side here that it's gonna feed around the carriage bolt like that, and I will have to flex it just a little bit to get it to fit around the hitch there. And once it's there, it'll hold itself in place, more or less. In your kit there's gonna be some more of these flat washers, and these nuts here that have a little dimple in them, these are gonna be your lock nuts that will go onto the carriage bolt end over the fascia support panel on either side here. Just get that loosely installed on the other end. Now, towards the rear of the vehicle, where we removed the 10 millimeter screws at the very beginning of the install, we're gonna get some new longer hardware. You wanna put a lock washer and a flat washer on there. And in between the fascia support panel and where that small weld nut was, we're gonna put this spacer block. Now, like everything else on here, it's really tight, and we really can't fit the camera and my hand's in there at the same time, so I'm gonna get it installed, and we'll go back through and show you where we placed it once I have it in. And here's what that finished product looks like. I will say it's a super-tight squeeze with the way the hitch is shaped. It's gonna be really tough, so for your socket, you want a short one, you're gonna want a swivel for your ratchet, and some sort of extension. And just take it slow and try to squeeze in there as best you can. And of course the final thing is just buttoning up your remaining push pin fasteners to secure that fascia support panel. The only thing that didn't get reused was the hitch cover panel here, and the fasteners that held that in place. But that'll do it for our look at and installation of this Draw-Tite Class Three receiver hitch on our 2024 Mazda CX-90 plugin hybrid. My name's Aiden. Thanks for watching.

Everything fit well and instructions were good. You need to have a little mechanical touch, but all is good!!

The install was easy to complete on my Madza CX90.
Does the job!
The install looks clean and neat once completed. By only complaint is that there must be a trick to re-installing the valance that the rear bumper clips to. It was EXTREMELY difficult to get the small bolts into the frame in the tiny space left over. The angle of the hitch frame makes it virtually impossible to use a socket/universal joint to finish the job. It took more time to finish the valance than it did to install the hitch.
Info for this part was:
At etrailer we provide the best information available about the products we sell. We take the quality of our information seriously so that you can get the right part the first time. Let us know if anything is missing or if you have any questions.


Thank you! Your comment has been submitted successfully. You should be able to view your question/comment here within a few days.
Error submitting comment. Please try again momentarily.