
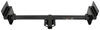
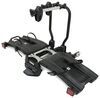
Blue Ox Trailer Hitch Receiver - Custom Fit - Class III - 2"


To see if this custom-fit item will work for you please tell us what vehicle you'll use it with.
Thank you! Your comment has been submitted successfully. You should be able to view your question/comment here within a few days.
Error submitting comment. Please try again momentarily.
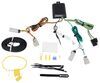
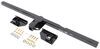
This fully welded trailer hitch receiver bolts onto your vehicle's frame with no welding required. Textured black powder coat over e-coat shields against rust and corrosion. Mounting bracket for wiring is welded on for a clean look.
Features:
Specs:
At etrailer.com we're committed to the products we sell, and to our customers. Our experienced and knowledgeable staff are available via both phone and email to address your questions and concerns for the lifetime of your hitch. The technicians at etrailer perform hitch installations on a daily basis, making them a valuable resource for do-it-yourselfers. The one-on-one, personal service you'll receive comes straight from an expert in the towing and automotive field. We've installed it, we've wired it and we've towed with it, so whatever your question, we can answer it.

California residents: click here
Videos are provided as a guide only. Refer to manufacturer installation instructions and specs for complete information.
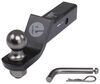
Hi, everyone, Bruce here at etrailer. Today, we're gonna take a look at and install the Blue Ox trailer hitch receiver on our 2023 Ford Edge. Now, if you do have a Ford Edge and you've got a trailer hitch receiver on there, just let us know how you're using that trailer hitch. Are you using a cargo carrier, bike rack, utility trailer, or all the above Now, the gross trailer weight rating on this hitch is 4,500 pounds with a 675 tongue weight rating. The tongue weight rating is just any downforce pushing down on our receiver tube. We have a two-by-two receiver tube opening, which will accommodate many accessories like bike racks, cargo carriers, and just your standard ball.
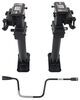
Now, looking at our safety chain loops here, it is a flat plate that is welded to the receiver tube that will accommodate the old Hess style hooks and also the bigger clevis hooks. And our pin and clip is just gonna go into our hole in the receiver tube and you're just gonna lock it down. There is one measurement I do wanna give you, and I'm gonna measure from the center of our pin hole to the edge of our bumper. And the reason I'm giving you that measurement is, if you've got any accessories, folding accessories like a bike rack or even a cargo carrier, that will tell you how long of a shank you need to actually fold that up and keep it from hitting your bumper or your hatchback. Let's go ahead and measure that.
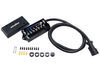
And from the center of the pin hole to the bumper, we're looking at about five inches. The Blue Ox hitch does have a tab welded to it to go ahead and put a bracket for your wiring. A lot of your hitches out there do not include that and you've gotta buy an extra bracket, but I think that's really nice that they do put that in for you. That way, you can maintain your wiring in the same position all the time. What I'd like about this Blue Ox hitch on our Ford Edge is it is quite hidden.
Basically, all you're gonna see is receiver tube and your wiring. So that just makes a real nice finish, when you're looking at the back of the vehicle, you don't have a cross tube from a hitch going across here that you see or anything, so it's just a nice look and will definitely help you for your towing adventures. As far as the installation goes, the directions are pretty straightforward. I'd say the hardest part is just trimming the little heat shield that you gotta trim, but it's really not even that bad, I really think you could do this at home. But if you don't want to give it a try at home, check out our dealer locator on etrailer.com.
But if you do wanna give it a try, stick around, I'll show you how. To begin our installation, we do need to remove 10 bolts. And I'm just gonna go ahead and show you where they're at. We've got two here on the passenger side. You'll have a, these are T15s, then you'll have a 10-millimeter here. And then along the bottom here, we've got bolts to go along the bottom to remove, and we're gonna remove that whole piece. I'm gonna start with the Torx screws. (instrument whirring) (instrument whirring) And on the passenger side still, we've got a 10-millimeter we need to remove. (instrument whirring) And we can go ahead and drop this little plastic piece out of the way. On the driver's side, we've got a 10-millimeter we're gonna go ahead and remove. (instrument whirring) And now we've got six eight-millimeters we need to remove. (instrument whirring) Now we can go ahead and remove this piece and go ahead and set it aside, we are not gonna reuse it. We're gonna strap the exhaust up 'cause we do have to lower it down. The reason we're using the strap is we can control how far that's coming down. And we're gonna take some silicone or you can use soapy water on our muffler isolators here and squirt those down, you're gonna have one on the passenger side and then one on the driver's side as well. Grab a pry bar, and we're just going to pry this off. Now, on this oval hole here, this is towards the front of the vehicle and we are on the passenger side. So we've got to get these carriage bolts inside the frame here to come out in these holes here. You got two on the side and then two on the bottom. So they give you fish wires, but this hole's not big enough to let that carriage bolt go through. So we're gonna go ahead and make that hole a little bigger. And I just got a step bit that I'm gonna use, and we're just gonna make it big enough where we can get that carriage bolt to slide in there. (instrument whirring) Grabbing one of the fish wires, we are gonna go ahead and fish a wire through. We're gonna start with the back hole here. And what I'm gonna do is take the end that's coiled up and it's gonna go through here, and we're going to get it to pop out right up here where we widen that hole. You may wanna get a hook or some type to go ahead and grab that fish wire. Now that we do have our fish wire poke through, we're gonna take a flat plate that's gonna go on the fish wire first and then take a carriage bolt, and we're gonna screw that onto the end of our fish wire. Now, we'll take our plate and it will go in first, followed by our carriage bolt. Now, you notice I'm just gonna pull on this wire and we're gonna pull it straight down and out. Now, you're gonna want to leave the fish wires on it so you don't knock the bolts back in. If you do, if you leave the fish wires on, you can go ahead and just pull the fish wire and bring it back out. Now we're gonna continue that same process on these other three holes, and you will also have to do that same thing on the driver's side. All right, grabbing an extra set of hands, I got my buddy Brad here helping me. We're gonna go ahead and raise this hitch into position. You're probably gonna want an extra set of hands as well, just gonna make things a lot easier. Now, we've gotta take these fish wires and put them in the appropriate holes in our hitch. So just make sure you're getting the right wire in the correct hole. And now we can go ahead and just pull one of these fish wires off, I'm just gonna stick one nut on for now just to hold this up. Once I get this seated up against the frame here, I can pull these through with no problem. You're just gonna make sure you got the correct fish wire in the correct holes. That's the main thing here and that you, when you go to tighten this or put it on hand tight when you're holding it up there, just make sure you don't push that bolt up into the frame 'cause you'll lose it and you'll have to fish it back out. Now go ahead and put all the rest of our nuts on and gonna snug them up, and we will come back by and torque them down, which we're gonna do now. And you're just gonna torque those down to the manufacturer specifications. We do carry torque wrenches here at etrailer, or you can rent one from your local auto parts store. This heat shield on the passenger side, we do need to trim it a little bit. You see my white line, and I'm gonna use a multi-tool, or you could use tin snips or even a utility knife. (instrument whirring) Let's lay that up there and make sure we got enough cut off 'cause just remember, you can always cut more, but you can't add it. We did have enough cut off here, and you're just gonna replace the one 10-millimeter nut that you took off on this piece here earlier. And then we're gonna take our Torx screws that went back in here and go ahead and reattach this. (instrument whirring) Once you have everything torqued down and you get that heat shield back in place, that does complete our installation of the Blue Ox trailer hitch receiver on our 2023 Ford Edge. I'm Bruce. Thanks for watching.
Ratings & Reviews

The main reason for this one vs others is that it has the bracket for mounting the plug.
Installed myself with one person helping. I watched videos of etrailer hitch installments and was well prepared. Less than an hour. Installation was actually easy. I like it.
I think/ hope this is a good choice
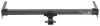
One issue— came with 7 carriage bolts— 8 is needed.
Called and received another package of hardware within a couple days. Wow. I was impressed.
Issue— the new package had 7 carriage bolts. I only needed one carriage bolt but again the package came with “7”.
So. Be prepared
Info for this part was:
At etrailer we provide the best information available about the products we sell. We take the quality of our information seriously so that you can get the right part the first time.


Victoria H.
3/1/2025
I'm glad you were able to get that sorted out Ricky and that with a buddy to help you, install was a breeze!