
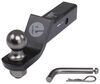
Blue Ox Trailer Hitch Receiver - Custom Fit - Class III - 2"


To see if this custom-fit item will work for you please tell us what vehicle you'll use it with.


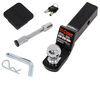
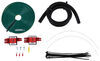
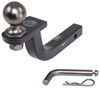
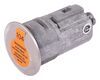
This fully welded trailer hitch receiver bolts onto your vehicle's frame with no welding required. Textured black powder coat over e-coat shields against rust and corrosion. Mounting bracket for wiring is welded on for a clean look.
Features:
Specs:
At etrailer.com we're committed to the products we sell, and to our customers. Our experienced and knowledgeable staff are available via both phone and email to address your questions and concerns for the lifetime of your hitch. The technicians at etrailer perform hitch installations on a daily basis, making them a valuable resource for do-it-yourselfers. The one-on-one, personal service you'll receive comes straight from an expert in the towing and automotive field. We've installed it, we've wired it and we've towed with it, so whatever your question, we can answer it.

California residents: click here
Videos are provided as a guide only. Refer to manufacturer installation instructions and specs for complete information.
Hello neighbors, it's Brad here from etrailer, and today we're taking a look at installing the Blue Ox trailer hitch receiver on a 2016 Nissan Rogue. Now this is what your hitch is gonna look like when it's installed, and it's a really clean look. Because it's a hidden cross tube, the only thing you're gonna see hanging down below the vehicle is gonna be your two-inch-by-two-inch receiver tube opening, as well as those safety chain loops that are on the bottom portion. But the rest of it is gonna be tucked behind the fascia. Something that's really neat that you might have interest in is adding trailer wiring. This has a bracket that allows you to put a four-pole bracket to get a nice, solid mount.
Now looking at the receiver opening, I mentioned it's two inch by two inch, and that's the standard for a lot of accessories out there. So if you're looking for a bike rack, a cargo carrier, or even a ball mount, you're gonna have tons of options available. All of those are gonna stay in place with a 5/8 pin and clip. Now keep in mind the hitch does not come with the pin and clip, but many times when you pick up accessories they'll have them included. And if you're gonna leave an accessory on the back of your vehicle long-term, you might wanna look at a locking pin and clip.
It's a really good deterrent from someone just walking by, pulling out your pin and clip, and taking that accessory with them. The plate-style safety chain loop has some oval shapes that are kind of offset, which is nice. Super easy to hook up a standard S-hook, or even a larger Clevis-style is gonna work on here super easy. So that way, when you're hooking up your trailer, you can have your safety chains attached. Now speaking of towing, you're gonna wanna adhere to the weight capacities, not only of the hitch, but also what the vehicle's recommended to tow.
So take a look at your vehicle's owner's manual, see what it's recommended to tow, and then compare that with the hitch, as well as any accessories you'll be using, so your ball and ball mount, and take the lowest number across the board so you stay safe. But as far as numbers of the hitch, pretty good rating. You have a gross trailer weight rating of 4,000 pounds, which is gonna be the weight of the trailer plus the accessories loaded onto it. So that allows you to really tow a small utility trailer, some jet skis, kayak trailers, a decent amount of things. And something else that's gonna be important is gonna be tongue weight, and that's gonna be the pressure that's on the inside of the receiver tube opening.
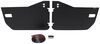
A lot of times that's gonna come down to suspended accessories, so bike racks and cargo carriers. And with 600 pounds a four-bike bike rack should be no problem. Same with a cargo carrier. If you're going on vacation, you have it all loaded up, more than likely I don't see you going over that weight capacity. Now when choosing accessories, you're gonna wanna make sure that it works with the vehicle, and we have tons of test-fit video. So if there's a specific product you're looking at and you wanna see how it interacts with your Rogue, take a look at that product, and put your vehicle in the fit guide. You'll be able to see how those interact with it. And the big thing is, is a lot of your cargo carriers and bike racks may have the option to stow in a vertical position. And you wanna make sure that you're able to do that. Some vehicles, it'll actually hit or make contact with your vehicle, and we don't want that. So measuring from the center of our hitch pin hole to the furthest point of our fascia, we're looking at about five inches. So you might wanna look at something with a slightly longer shank. The same goes for a ball mount, just so it sticks out a little bit further, but this kinda concaves down, so I'm not too worried. The main thing is, is with those folding accessories that you can actually use that feature. And keep in mind, even when they're in that vertical position, if it does fit, you're not probably gonna be able to open up your rear hatch without folding those down. But that's kind of the nature of those folding accessories. As far as ground clearance goes, from the top of the receiver tube opening to the ground, it's gonna be 13 inches. And that's really gonna be accounting for choosing a ball mount. And the best way to figure out the proper rise or drop is to measure your trailer when you have it nice and level from the ground to the top of the coupler. Take that measurement, compare it with the 13 inches, and then you can figure out that rise or drop necessary to get everything level. Something else to keep in mind when you have suspended accessories in place, like a cargo carrier or bike rack, it's gonna extend the length of the vehicle. So as you go up an incline, they're gonna tilt towards the ground first. So just something to keep in mind when you're going up a steep incline, or over rocky and rough terrain. Now when it comes to the installation, if you're worried about getting this installed on your own, this really isn't that bad of a hitch to get installed. You're gonna be removing two plastic panels, and then from there you really do just raise the hitch up, put the bolts in place, tighten and torque it down, and then you're pretty well good to go. Now something that's kind of maybe potentially a problem for you is gonna be the weld nuts on the frame. If your vehicle's been subject to, you know, winter weather with salty roads, it's very possible you'll have some corrosion under there, and those can be really tricky to get that hardware started. So it might be a potential that you'll have to use a tap to clear those out. It kind of depends on your vehicle and the condition that it's in. But step by step, it's really not that hard of an installation, and adding the hitch is totally worth it. So that little bit of installation, you'll be able to use the hitch the rest of the lifespan of the vehicle. But if you don't have the place, the time, the tools, or even the want to do the install yourself, I totally understand. You can find someone to get that installed for you by using our dealer locator, that we can find someone to install your hitch for you in your area. That way you can be on the road using your hitch, and not have to worry about that installation. But for you DYIers doing this at home, follow along, I'll show you how to get your Blue Ox trailer hitch installed on your Rogue. To get our installation started, we're gonna get underneath the fascia, and we're gonna be removing some plastic panels on both sides. These panels do a good job of keeping everything tidy under here, but they're in the way of where we're gonna raise our hitch up into place. So the first thing we'll tackle is gonna be the plastic push pins. So on each side there's gonna be four of them. There's one, two, three, and then one on the side here, making a total of four. And it's gonna be the same on both sides. The plastic push pins, you're gonna have slots, and it makes it really easy with a trim panel tool or a flathead screwdriver to pry that center portion. And if you kind of just wedge out that, it should start to release. If the whole thing comes out, that's kinda normal too. And if they break, don't be worried. This is kind of normal with plastic push pins, but if you take your time, get that center pulled out, you should be able to remove the plastic push pin. So we'll continue on with that. And once we get the plastic push pins out, there is gonna be one more additional screw, and that's gonna be tucked on the backside. So if you kind of go back here, there's a portion that has an inset that attaches to the rear cross member. And there's a Phillips head screw, we'll get that taken out, and then we'll get both of our panels removed. I got my first panel removed, and the Phillips head screw is a plastic push pin. So just loosen it up enough. It's kinda like prying off the center of the other ones. But that'll release this and allow you to pull that out. So I'm gonna set this aside and get my other one taken down. Our next step is going to be removing our bracket that we have on our frame. And you'll find that there's gonna be two bolts that go horizontal on the frame, as well as two on the bottom. So you're gonna probably need an extension here, and an 18-millimeter socket is gonna get these removed. Once we take that bracket down, we are not gonna be reinstalling it, so you can discard it, you can keep it for later. But just know that we aren't putting it back on. Now it's a little bit more narrow on the bolts that go horizontal. So I'm gonna take off my extension to gain access to those. And if your vehicle has been subject to winter weather and salt corrosion and rust buildup, you may wanna soak these in a penetrating oil to just kind of help them along. But I think with 1/2 inch ratchet, these come off fairly easily. So I have some good news for you. If you're following along with the instructions in this video, you don't need to lower the exhaust. I mentioned that you wanna pry off the isolator, support the exhaust, so on and so forth. But I mocked this up, and you shouldn't have any issues. Having it lower will make it slightly easier, but if you have an extra set of hands to kind of wedge this in, you don't have to lower the exhaust. It's just gonna make it a little bit easier for everyone involved. So the next thing we need to do is test to make sure that our hardware is going to fit into our factory weld nuts. And being that this is, we're in Missouri, Midwest, we have lots of snow, which means salt, and that's going to translate to corrosion in these weld nuts. And that can be a real issue. And the reason being is if this hardware doesn't wanna thread in nice and easy, it really makes for a pain in the butt when you're trying to raise up the hitch and thread these in. So I'm already getting resistance here. You can take a socket and try to drive it in, but don't fight it, you don't wanna damage the thread. So if you're at a point, you know, run your hardware through all the mounting points. So on this driver's side we're gonna have one, two, three. And then there's two on the passenger side. So these already, I can tell, has quite a bit of rust here. So if you're at the same point as me, there's a few ways to tackle that. For minor ones best bet, take some penetrating oil, and just spray into those threads. And you can let that soak for a little bit, kinda break down the rust. And then a tube brush, like what we have here, is a good way to knock off some of the the basic kind of buildup. You know, take some of that crud out of there to help it along. But if you're still fighting it, the chances are that you may need to use a tap. And if you've never used a tap, they're not too terribly hard to do, but you can mess things up pretty quick if you don't know what you're doing. The tap that we're gonna be using today is an M12 by 1.25. So you're gonna wanna grab something standard. And all we're gonna do is start clearing those threads out with this. So it's really key to make sure that it threads in nice and easy in the beginning, and keep it squared up as possible. So don't fight it, make sure that you can get the threads started, and it should go in fairly easily. And then from here, we're already spinning by hand pretty easily. We're gonna just run this through, run it out again, and make sure that it's nice and clean. And then we'll test our hardware. So at this point we're gonna raise our hitch in place. And it's pretty heavy, so I have Joe helping me. And you're gonna wanna have three of your bolts set up on the driver's side, two on the passenger. And you'll see the conical tooth washer, there's teeth on here, you want that facing towards the metal on the hitch. So as we raise this up, we're gonna try to get one started on each side, so it supports the hitch. Then we can get the rest of the hardware in. So getting this to squeeze in, just kinda slide that over the exhaust tip first. As you raise it up, I would suggest on the driver's side going up first, and over that exhaust hanger. And then once you have this pretty well lined up, you'll just get that hardware started. And this is why clearing out those holes really makes it important, makes this easier to be able to do it by hand. And with one started on each side, we'll just continue putting the hardware in place. Once you have all your hardware started, there is, it's a slotted hole, so there's a little bit of wiggle room, side to side, so just line this up as center as possible. And then we're gonna snug it down with a 19-millimeter socket. You don't need to get crazy here, so if you're using an impact, just get it snug, we'll come back with a torque wrench to get it properly torqued down. Now, the torque wrench is gonna be important on this, because you wanna make sure it's gonna be tight enough to be able to tow or put accessories in here long-term, but also too tight can put stress on the hardware, and especially with weld nuts. This is gonna be an important step, because it makes sure that it's gonna be properly tightened down. If you don't have a torque wrench, that's totally okay. You can get one here at etrailer, or you can go to an auto parts store and generally rent one for free. The torque settings are found in the instructional manual, so just get your torque wrench dialed into the torque setting, and we'll go through and torque down our hardware. And once you have all your hardware torqued down, you've officially installed your hitch. But those plastic panels, to get those back in place, passenger side, I had zero issues. On the driver's side, I did have to trim a little bit. You can omit those panels, but if you wanted it to go back, I just cut along where the hitch is located, about roughly an inch or so, maybe a little bit more. The section I cut out, this is it. So as long as you make clearance for the side plate of your hitch, you should be good. Now, something else you may notice on ours is the four-pole trailer wiring. And this is a really cool hitch, because it already has a bracket there that allows you to pick up a four-pole bracket, not included, but we have these available here at etrailer to give you a nice solid mount for your four-pole, instead of using your safety chain loop. I really like this. It gives it a nice finished look. So if that's the case, you might wanna pick up wiring at the same time as your hitch. You can get it all knocked out. And predominantly those are gonna be wiring that live inside the vehicle. But there is a grommet that's located behind this panel, that you could run that through and get it mounted up. But with that being said, you've officially installed your hitch. All that's left to do, load up your accessories, put in your pin and clip, and hit the road. Hopefully this video helped you get your hitch installed on your Rogue. And if you did it yourself, or had someone install it, either way, let us know how it went, and also how you're using your hitch. Send us some pictures or leave us some comments. We'd love to see neighbors out there using your hitch, and the adventures that you go on. But with that being said, thanks for following along and seeing the installation of the Blue Ox trailer hitch receiver on a 2016 Nissan Rogue.
Info for this part was:
At etrailer we provide the best information available about the products we sell. We take the quality of our information seriously so that you can get the right part the first time. Let us know if anything is missing or if you have any questions.


Thank you! Your comment has been submitted successfully. You should be able to view your question/comment here within a few days.
Error submitting comment. Please try again momentarily.