
Roadmaster Direct-Connect Base Plate Kit - Removable Arms


To see if this custom-fit item will work for you please tell us what vehicle you'll use it with.
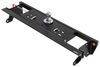
Designed for use with motor-home-mounted tow bars, the direct-connect brackets are virtually invisible, easy to mount and remove, and they eliminate the need for a quick-disconnect crossbar on your tow bar. Installs on your vehicle's frame.
Features:
Note: Roadmaster direct-connect base plates will only work with Roadmaster tow bars that slide into a trailer hitch, such as the Nighthawk, Sterling, Blackhawk, Blackhawk 2, Falcon, or Falcon 2. These base plates will not work with tow bars that require a hitch ball.
The drawbars, or front arms, on this base plate kit are supremely easy to mount and remove. Just insert them into the brackets and twist to lock them in place. To remove each arm, simply tug the built-in pull pin to disengage the lock, twist the arm back and pull it out of the bracket. Once the drawbars have been removed, the remaining brackets are virtually invisible. On most automobiles, the brackets are mounted within the grille, where they remain not only unseen, but protected from scrapes and scuffs as well.

California residents: click here

Have not installed it yet
Do you have a question about this Tow Bar Base Plate?
Info for this part was:
At etrailer we provide the best information available about the products we sell. We take the quality of our information seriously so that you can get the right part the first time. Let us know if anything is missing or if you have any questions.


Thank you! Your comment has been submitted successfully. You should be able to view your question/comment here within a few days.
Error submitting comment. Please try again momentarily.