
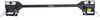
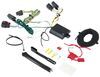
Roadmaster Crossbar-Style Base Plate Kit - Removable Arms


To see if this custom-fit item will work for you please tell us what vehicle you'll use it with.
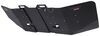
Roadmaster's crossbar-style brackets are virtually invisible, easy to mount and simple to remove. Brackets install on your vehicle's frame to provide attachment points for your tow bar.
Features:
The drawbars, or front arms, on the crossbar-style series base plate kit are supremely easy to mount and remove. Just insert them into the brackets and twist to lock them in place. To remove, simply twist the arms back and pull them out. Once the drawbars have been removed, the remaining brackets are virtually invisible. On most automobiles, the brackets are mounted within the grille, where they remain not only unseen, but protected from scrapes and scuffs, as well.

California residents: click here
Videos are provided as a guide only. Refer to manufacturer installation instructions and specs for complete information.
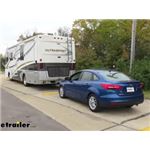
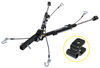
Today on our 2018 Ford Focus we're gonna be taking a look at, I'm gonna show you how to install the Roadmaster EZ4 Base Plate Kit with removable arms, part number RM-524443-4.This is what our base plate looks like when it's installed. It's gonna be one of five main components in a flat tow setup. The other four are gonna be your safety cables, your tow bar, your wiring, and your braking system.Your base plate's gonna give you a solid connection point between your RV and your Ford to safely flat tow your vehicle.Our base plate's gonna be compatible with quick disconnects and all Roadmaster tow bars.It is gonna come with removable arms. Simply pull the spring loaded pin, twist, and remove. When not in use, maintains a nice clean look on the front of the vehicle. When you're ready to use it, the pin is gonna go on the notched side, so you know which side you have the correct way.
You're gonna push it against the base plate, twist it so it locks into place.Base plate does come with a quick disconnect bar. Simply drops into place. And it's gonna come with two snap rings to hold it in place. Simply slide the arm to the inside of the bracket, line up the holes, slide your pin through, snap the ring over.These are gonna be our safety cable hook-ups. Make for easy connection.It's also gonna have two rods to attach our six-volt plug for our diode wiring.As far as the instillation goes, it is time consuming.
Front fascia does have to come off. And there's quite a few parts that have to be installed. Other than that, it's pretty straightforward. You will have to drill a few holes, but there is no welding required. It will come with all the necessarily parts.First thing we need to do to start our installation is we're gonna be removing our fascia.
To start that, we're gonna remove a couple of push-pin fasteners and some T-30 torques head screws up here on the top side under the hood. For a push-in, you can use a flat head screwdriver. I'm gonna use a trim panel tool. We'll pull out the center. If it separates, no big deal.
Just make sure you pull out the base with it. You can always put the two back together. We're gonna have a second one on this side.Take a T-30 torques bit, we're gonna have one bolt here. We're actually gonna have one on driver's side and passenger's side. Going to remove those. We're gonna have a black one here in the center.We're gonna have a torques head bolt on each side, right next to our stop here.Next thing we're gonna do, is we need to remove the headlights. We're gonna have two T-30 torques bits, or torques head screws. One on the lower side of the light, and one on the upper side of the light. Go ahead and remove those. We'll disconnect the lights, and we'll set our lights aside.You're gonna have a little tab here. What you're gonna do is you're gonna pull up on it, like this, and slide it off. And we'll set the light aside.Now we're gonna repeat this same process on the other light.Next we're gonna take T-27 torques bit, we're gonna have a torques head bolt here, torques head bolt here, and we'll take our trim panel tool or screwdriver, and we're gonna have a plastic fastener we need to remove here. We're gonna do that on both sides of the vehicle.Underneath the vehicle, or underneath our front fascia, we're gonna have some plastic push-pin fasteners. We're gonna have three on our driver's side and three on our passenger's side. We'll just remove those the same way we did the ones from the top.Next we wanna pry our hook latch cable out of the holder. Like that. And we're gonna remove the cable.Now with an extra set of hands, we're gonna pull our fascia off. We're gonna start from the outside and work our way in. There's gonna be a little tab here down underneath where your headlight was. Make sure you pull up on that as you start pulling it off. And we'll set our fascia aside somewhere safe.We'll take our T-30 torques bit. We're gonna have two screws holding this underliner here to our splash guard. Go ahead and remove those, and you're gonna have two on the passenger side of the vehicle also.Next, we have two options here. This lower inaudible 00:05:27 air dam here, you can either cut out the big notch here, or big opening here, and then cut these out. Or there's two T-30 torques bit, or screws. There's one here, and there's one here. We can just remove the whole thing, which is what I'm gonna do.If you decide to cut it, just follow directions on what lines to cut it on.All you're gonna do is you're gonna slide this little tab to the center, and you're just gonna push down on the backside to release it.And we'll take our T-30 torques bit. We're gonna have torques head bolt on this bottom liner, right here towards the lower side of the engine compartment. We'll have one on each side. Then we'll remove our liner, and set it aside.Next, on our passenger side, we're gonna remove our washer bottle. 10 millimeter socket, we're gonna have a bolt here, we're gonna have a bolt on the backside. You may need to use a swivel to get this one, because our fender liner does not go in far enough. We're gonna go ahead and unplug our wiring, because we are gonna be removing this all the way. One on here. That one right back here.Once you take the bolts out of your washer bottle, then the directions are gonna tell you, "Take it off, dump it out, and refill it later," to move it away from the frame. What I did is the filler neck will actually come off right here. I dropped the bottle down, left it connected, and just raised it up, you can see how I have it here, and just ran a zip tie to just hold it in place.Next, we're gonna take a 10 millimeter socket on our passenger side, we're gonna remove the horn. Some vehicle models may have a horn on the driver's side, it also needs to be removed.Take the bolt out. We'll slide the horn off.On the passenger side only, this tab here that we had our washer bottle mounted to, we need to take that and we need to fold it down flat. I'm just gonna use some channel locks.They actually tell you to cut out a circle here with a hole saw bit. These frames are pretty strong, so use a Dremel tool with a cutting blade, is what I'm gonna use. And I'm actually just gonna cut a square. What we're trying to do is open a hole to the center of our frame rail, because we're gonna have to put in some handle nuts to get to our bolts. So again, you see how I have marked out here. We're gonna go ahead and cut that out.Once you have them cut out, we're gonna take some Rustoleum paint, cover up that bare metal to resist any rust or corrosion later on down the road.On our driver's side, we need to disconnect the fastener holding on a wire loom to the side of our frame rail. We'll just use our trim panel tool, and we'll pop it out.Next we're gonna take our brace here, on the driver's side. How you know you have the right one, these three holes are gonna be on the outside of the frame rail, and this angle is gonna face towards the back. So it's actually gonna . and it should line up with the three holes.We're gonna take our 3/8 by 1 1/4 bolts, and we're gonna temporarily slide them in the outermost holes, then we're gonna take a third one and we'll put Red Loctite, we wanna make sure we're using Red Loctite on all of our hardware. We're gonna put on a lock washer, we're gonna slide this into the center hole. And we're gonna take the nut plate, we're gonna go through the hole in the frame that we cut. We're gonna line it up with that center bolt. And we'll thread on that backing plate. Then we'll go ahead and remove these two that we had temporarily, make sure you have a lock washer on. Go ahead and put your Loctite on. And you're just gonna repeat the same thing with the next two bolts.Next we're gonna take this plate, this nut plate, you can see how it's offset, and we're gonna slide it into the hole. And there's a hole right down inside in the bottom of our brace. And it's right over on this side. We're gonna line up the hole. We're gonna take a half inch bolt and bolt up through that brace. Take your half inch bolt, lock washer, make sure you put Loctite on it. We're gonna go up through the hole.Next on each side, what we're gonna do is we're gonna trim, you can see where I have the line. We're gonna trim the bottom part of this shock absorber off. We'll just use a Dremel tool with a cutting blade.Take an 8 millimeter socket. We're gonna remove our computer box. We're gonna have three bolts: one here, you're gonna have one on the backside, straight back here, and the other one's gonna be up here on top. There is a T-30 torques bit holding the liner in right here. You may have to remove that to get to the bolt, which is back up in here.And we're just gonna take it, and we're gonna set it down just like this. Make sure it's out of the way so it doesn't get damaged.Next we'll remove our wiring harness from the top of our frame rail. Right here. We'll take this bracket here. You'll know you have the right one, this side here is gonna be on the outside of the frame rail. And we're gonna set it in place just like this.The hole that we just pulled our wiring out, we're gonna take a half inch drill bit and we're gonna enlarge that.We'll take a 1/2 inch by 1 1/2 inch bolt, black washer, we're gonna go down through the hole like that. Then we'll put our half inch backing plate on.Now we'll take our half inch drill bit and drill out this back hole here. I'm gonna use a half inch to start it, just to give me the indention, then I'm gonna use a smaller drill bit to drill a pilot hole. It'll make this big one go in a lot quicker.Once you have your hole drilled, you're gonna take your half inch by two inch bolt. You're gonna have a pipe space, you're actually gonna have three pipe spacers. You're gonna have two of them that are the same size, one that's a little bit smaller. We're gonna use one of the two larger ones. Pipe spacer's gonna go in between this bracket and the hole. Bolt's gonna go down through like that.Then we'll take our handle nut through the hole that we cut in the front. And line it up with the bolt. And we'll thread the nut plate or the bolt into the nut plate.Once you're done with one side, you're gonna repeat the process on the other side, with the exception of removing the computer box. That is only gonna be on the driver's side.Next we'll take a half inch bolt, lock washer, we're gonna raise our main receiver brace up behind our side brackets. We're gonna run our bolt through our top hole. And we'll put a nut on the back.On our passenger side, our washer bottle bolted here, this hole in front of it, we're gonna enlarge it to a half inch. Then we'll take the lower brace, gonna make sure that this is facing in, this part is going up towards the bottom of the frame rail. How you'll know you'll have the right, correct side. We'll take our half inch by two inch bolt, black washer, we're gonna go through our side brace, through our lower bracket, and through our main receiver brace. Gonna put a nut on the back.This clip right here in the back, we're gonna remove that.Next, we're gonna line our hole up. Hold this firmly against the pinch weld. And we're gonna drill a half inch hole in our front hole here. We'll use that as our guide, and we're gonna do the same thing here. Start out with a half inch, that'll mark my spot, and then I'll go to a smaller drill bit to use it as a pilot hole.Next we're gonna take this backing plate. You see how the holes are offset They're gonna match the holes on this lower bracket. It's gonna go up behind that pinch weld. We're gonna have a long bolt like this. We're gonna put a flat washer on it. Come in from the inside of our pinch weld, then we're gonna go through this very most rear hole. Put a flat washer on front, follow that with a nut.The forward hole. Half inch by 1 1/2 inch. We're gonna go through from the outside in. Make sure you have your lock washer on it. Make sure you also go through that plate, and then we're gonna put a nut on it.The only difference between our driver's side and our passenger's side is that our passenger's side, this rear most hole, we're gonna put the smaller pipe spacer followed with a flat washer, and then a nut.Next we're gonna go around and tighten all of our hardware.Once you have all your hardware tightened, you're gonna go back through and torque everything to the specifications in the instructions.Then your handles here, you're gonna need to cut them off, bend them out of the way. I'm gonna take my Dremel tool and I'm actually gonna cut them off flush with the frame.Next, our 8 millimeter bolt, we're gonna reinstall our computer box. We're gonna take this nut off, slide our computer box back up, and we're actually gonna go through . run our bolt through it. Once you get your back nut on, just replace the other two 10 millimeter bolts.And then on our passenger side we're gonna mount our horn. It's gonna mount right here in this hole. Just like that. What we might have to do, is this tab actually folds up. This is too thick, this bottom bracket is too thick, so you might have to fold that down to get the holes to line up. You're gonna have a bolt, nut and the washer in your kit. And then washer on, and then inaudible 00:18:28. Take an 11 millimeter socket and wrench, and tighten into place.Next we're gonna remount our washer bottle. First, this nut here on the back side, we're gonna take it off. We're gonna take out this fender washer and leave the pipe spacer installed. Turn this back down here. We'll reinstall our fender washer, and then reinstall the nut.Before reinstalling your fascia, it's a good idea if you're putting a braking system in or wiring the wiring it, it's a good idea to go ahead an do that now because it's a lot easier to run your wires up here to the front of the vehicle with the fascia off.You're gonna have some trimming that's gonna be required here on the front, on the fascia. It's a good idea to do all that at one time.Once you get that done, then you're gonna reinstall the fascia in reverse order from the way you took it off.Now you can see here, I've already cut the fascia out. How you're gonna do that is, how I did it is I just slid it into place. I put one bolt right in the top, and I took some side cutters, this plastic's pretty easy to cut. Just took some side cutters and just started cutting around it. That way I can keep everything as close as possible, and it looks as neat as possible.That'll do it for a look at installation on the Roadmaster EZ4 Base Plate Kit with removable arms, part number RM-524443-4 on our 2018 Ford Focus.

deffinetly will use again!
Do you have a question about this Tow Bar Base Plate?
Info for this part was:
At etrailer we provide the best information available about the products we sell. We take the quality of our information seriously so that you can get the right part the first time. Let us know if anything is missing or if you have any questions.


Thank you! Your comment has been submitted successfully. You should be able to view your question/comment here within a few days.
Error submitting comment. Please try again momentarily.