
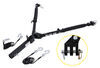
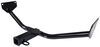
Blue Ox Base Plate Kit - Removable Arms


To see if this custom-fit item will work for you please tell us what vehicle you'll use it with.


Custom designed to fit your vehicle so it can be safely towed behind your RV, this base plate has easily removable arms that offer a seamless look when you're not flat towing. Base plate bolts directly to your chassis, so no welding is required.
Features:
Specs:
This base plate's hidden design creates a clean and seamless look. The bracket arms are easily removable, creating a slick appearance when you're not flat towing. Because the arms can be removed, you also won't have to worry about banging your leg into any protruding arms when you walk by.
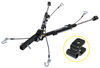
Attaching and removing the bracket arms is a breeze. To attach the arms to the base plate, simply insert them into the receivers and rotate them until they lock into place. Once you're finished towing and want to remove the arms, pull the pin to disengage the lock, rotate the arms, and remove them from the receivers. Finally, plug up the now empty receivers with the included receiver covers to help keep dirt and debris out of the base plate and provide a finished look.
Flat towing your vehicle is much more convenient than using a trailer or a tow dolly. These other options take up much more storage space, leaving you less room both at home and at the campsite. In addition, securing your vehicle to a trailer or tow dolly can be a hassle and more time consuming than hooking up with a tow bar.
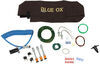
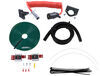
There are 5 basic components needed when flat towing a vehicle: a tow bar, a base plate kit, a safety cable set, tow bar wiring, and a supplemental braking system.
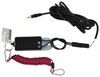
The tow bar links your towed car to your motorhome. It attaches to the custom-fit base plates that install on the frame of your towed car. Safety cables ensure that your towed car does not separate from your motorhome in the event that your tow bar becomes detached. Tow bar wiring allows your towed vehicle's signal lights to sync up with your motorhome's tail lights, which is required by law in most states. Finally, the supplemental braking system - also required in most states - brakes your towed car when the brakes in your motorhome are activated, preventing wear on the motorhome and decreasing braking distance for your entire setup.

California residents: click here
Videos are provided as a guide only. Refer to manufacturer installation instructions and specs for complete information.
Hi, I am Daniel etrailer, and today we're gonna take a look at and gonna show to install the Blue Ox base plate kit on our 2026 Chevy Trax. When flat towing a vehicle behind your motorhome, there are gonna be five main components you'll have to keep in mind. You've got your base plate, your tow bar, your wiring, and your safety cables, and then, of course, a braking system. One other thing you will need most likely is going to be a battery disconnect. A lot of these newer vehicles need to be disconnected from the battery, and this is a lot better than just taking that negative post off every time you wanna flat tow. Now this video's gonna focus just on your base plate, and that's gonna be the device that connects directly to your vehicle's frame that gives you attachment points for your tow bar.
Now, do keep in mind that this is gonna be for the Activ Trax. Definitely check our fit guide to make sure you get the proper base plate for your specific vehicle because it will change depending on if you have the Activ or not. This is what your base plate's gonna look like all hooked up, and it's super easy to disconnect. I'll just get our tow bar out of the way here. And then you have these arms, you just pull this pin, rotate it, it'll slide right out, and you can stow this away in your motorhome or in your Trax.
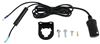
Get this unhooked from our safety chain loop. And one thing I really like about this base plate is why I would pick it is it has attachment points for your seven-pole plug here. If you didn't have this, this would be really challenging to try and get this somewhere 'cause it's all plastic. And it also has attachment points for your breakaway switch. So again, it's really hard to attach this somewhere.
So it's really a nice feature. I got everything unattached, so you can get a look at what your base plate's gonna look like when you're driving around. Maybe you got to the campsite, now you unhooked. It looks pretty good, in my opinion. They've designed it really well, where it's just going to be in this area.
So really, all the trimming I had to do was just a little bit in these sections. Your base plate is gonna have a nice, matte black finish, which looks pretty. As far as the arms go for your base plate, definitely check to see if you need an adapter for your specific tow bar. And if you have any questions about that or anything flat-tow-related, please feel free to reach out and we'd be happy to help. We do this a lot, so we'd be happy to point in the right direction. As far as getting your base plate installed, it is fairly in depth. You are having to take the entire fascia off. So if that's not something in your wheelhouse or you don't have the time for it, definitely check out our dealer locator. We can find a professional in your area to get this installed for you. But if you wanna do it yourself, follow along in this video, we'll walk you through the process. Starting off, I got the hood open, and we're gonna be removing six T15 Torx bits on this front piece of our fascia. (drill whirring) (drill whirring) (drill whirring) (drill whirring) (drill whirring) (drill whirring) Put some tape on the seam that we're gonna be working with just so we don't chip any paint. And I'm gonna come back over to our wheel well and take that T15 and a angle bit. (drill whirring) Get three fasteners. (drill whirring) If you need more room, you can turn the tire out a little bit. (drill whirring) (drill whirring) It is gonna be another fastener a little bit above those fasteners we just took out. I'm gonna use a flat head. This is just a push-in style. I'm gonna use that, get the head, and then pull that out. And we need to take the wheel well fender off. And to that, I'm gonna peel back the liner so I can get back there. And I need to pull out and I'm just gonna use flathead. I'm gonna pull this back. (wheel well liner popping) And that way I can get back behind here. There's a series of fasteners holding this in and I'm using eight millimeter socket and I'm just gonna put that on top of there so it can disengage. I'm start at the bottom, and it's gonna be kind of hard to see. I'll show you once we get it out here, just pull as I'm pushing down on those, so I get one more. (tool whirring) So as you can see, these are those fasteners or they're blue color. I'm just pushing this right over there and squeezing these tabs in. And I'm just gonna pull it out. Do this a couple more times. (panel popping) And we're wanting to get to this fastener that's securing our front fascia on. So I'm just gonna get one more fastener out there. Looks like it's gonna be a white one. Got it peeled back, and it looks like our white fastener did stay attached. So let's get this removed and then slide that back in our slot. (panel popping) At this point, I'm gonna grab some rags and kind of stuff this in there, so this can hold it away from our fastener. We'll take a seven millimeter socket and get this removed. (drill whirring) Now you want to go ahead and repeat this on your other side. Up underneath, there is gonna be three fasteners on both sides. (drill whirring) It's gonna be right under the wheel well. (drill whirring) (drill whirring) In the center of the fascia, there's gonna be another T15 fastener. (drill whirring) And there's gonna be two more on the sides. (drill whirring) A little bit further back, I'm gonna use a seven millimeter socket and get these bolts removed. (drill whirring) (drill whirring) (drill whirring) (drill whirring) (drill whirring) (drill whirring) And lastly, we're gonna have a push-pin-style fastener on both sides. Just get my flat head, let me get this taken out. And we can remove our fascia. I got Scott over there giving me a hand to get this off. We're gonna start on the edges and work our way out. We're just pulling this off the clips. (panel popping) Just pulling it straight back. I'll lift up on this section. (panel popping) On the driver's side, there is a wire that has some push clips, and I just removed those so we can take our fascia and set it to the side. With the facial removed, we can get to this plastic shroud. We're gonna remove this. It's gonna be push-pin-style fasteners. If the core falls out like that, it's no big deal. You can always just put that back in. Underneath the shroud, it has two clips on both sides. I'm gonna push in, just pull out, so this comes out a little bit. Do that on the other side. With those clips removed, I can rotate this up and pull down and get this out of the way, and we will not be reinstalling this. On the passenger's side, there's going to be a windshield wiper fluid container, so I'm gonna get a 10 millimeter socket. We're actually gonna get this removed and pushed over so we are gonna have some more room to work. (drill whirring) Right above that fastener, give me another one on top of the bumper bean. You use a ratcheting 10 millimeter wrench (ratchet cranking) and get this nut removed. (metal clacking) (metal clacking) It is gonna be another nut closer to the wheel. I have an adjustable adapter to get this in there just to tight. (drill whirring) In the engine bay, I'm gonna remove this push-pin style. (metal clacking) The instructions do say to remove all your lines and your electrical plug and get this out of the way, but I have it rotated, so I'm gonna just zip-tie this up, and hopefully that'll give us enough room to work. (tool whirring) (tool whirring) Using a 15 millimeter socket, we'll remove these four bolts on our bumper. Do this on both sides. (drill whirring) (drill whirring) (drill whirring) (drill whirring) (drill whirring) On all the hardware that we just took out, I'm gonna get red Loctite, put this on the threads, so that's ready for when we can put this back in. And we can put our base plate in place. I got Jonathan give me a hand 'cause this is a bit awkward. We're gonna go in between the bumper beam and our frame, (metal clacking) just like that. I'm gonna line all of our holes back up, take a bolt, and get this started, so this can hold the weight of it for us. (metal clacking) (drill whirring) We got that in there, and we noticed that the holes weren't perfectly lining up, so we are gonna have to take the entire bumper beam off and kind of widen these holes out furthest away from the center. So I'll take a 10 millimeter. (drill whirring) There's gonna be three supports. (drill whirring) (drill whirring) On both sides, there's gonna be a push-pin-style fastener. Get this removed so we can take this bumper off. I have a trim panel tool, and that's gonna help me get this out a little bit easier. It's kind of hard to get at. (metal clacking) All those fasteners out, we can take this off, flip it over, and then enlarge these holes. I have a die-grinding bit, and I'm just going to round out the holes closest to the outside. (drill whirring) (drill whirring) And on the support brackets, I did loosen the top bolts, just so this can have a little bit of movement from when we put this back in place. Once we wallowed out the holes, we can put this back, just like we did before, and make sure that all of your bolts will line up. So I just put all four on both sides, and now we can tighten back up our support brackets. So I'll just start with the top (drill whirring) and get these snugged up. (drill whirring) (drill whirring) Tighten the bottom. (drill whirring) (drill whirring) (drill whirring) Now take in my 15 socket again, I'll tighten up all of our bolts that are going through our bumper and base plate. (drill whirring) (drill whirring) (drill whirring) With everything snugged down, I'll come back through with a torque wrench and torque everything down to the specs in the instructions. (torque wrench beeping) Now, if you don't have a torque wrench at home, you can usually rent one from a local auto parts store. (torque wrench beeping) Next up, we do have to drill into the frame so we figured out how to make more room. Because it is a pain to take this off, so I did just pop the neck off of our container. I was able to swing this a little bit more outta the way. I popped some of the lines off and I use a bungee cable to kind of support this so I can get under there. In the frame inside of this oblong hole, there's two holes drilled through, and it's gonna go on our side bracket. That top one is not big enough for our hardware to fit through, so I will have to use 1/2 inch drill bit and get that opened up. (drill whirring) (drill whirring) With that drilled out, we can put our bracket in place. And it's a good idea to cover that bare metal. So I just put some spray paint on that so I don't rest in the future. And you want that swooping part to be facing out, and this oblong hole facing out, and the smaller holes will be going into our base plate. So I'll slip this back here, use our smaller bolts, put those through. (metal clacking) On the back, I'm just gonna secure this with a nyloc nut. And for the hole that we just drilled out, that's gonna get our larger bolt with a flat washer and lock washer and some red Loctite. Get this put through. (metal clacking) And on the backside, I'll take our wire nut, and that's just gonna be our nut with a piece of wire welded to it, get on the back. And you can bend this a little bit, make it a little easier depending on the angle. I'm just going to twist the head of the bolt. (metal clacking) And for our other hole, it's gonna be the same larger bolt. And on the back, I'm gonna put our nut. Now I did cut the wire off just 'cause I can easily get my hand up here. It's a little bit easier just to twist this side. (metal clacking) On the driver's side, it's gonna be the same exact process. You're just gonna have a plug in your way. So we're just gonna get this removed (metal clacking) and out of our way for now. Looks like on our driver's side, both those holes are opened up, so we might not have to drill. I'm gonna line everything up and see, but looking good. (metal clacking) With everything in place, we can tighten and torque it down. (metal clacking) (torque wrench cranking) (torque wrench beeping) And the bolt that's going through the top, it's a bit hard to get to. You may need to have a swivel adapter to get the socket on. (metal clacking) (torque wrench beeping) And on your handle nuts, if you didn't already cut them off, it's a good idea to get rid of those, so you can just wiggle 'em back and forth until they snap loose. I grabbed our safety cable and I, you wanna wrap this somewhere around the frame. So I just wrapped it right around here and use our quick link. Now I did also zip-tie everything back, just so this isn't flopping around or rattling you go down the road. Once you've torqued everything down, you can put your washer fluid container back in place. And now's a good time to run any other components you may need, like, I've already started running our diodes. And then after that, we can put our fascia back on. Now, after test fitting the fascia, I did make some cuts. So as you can see, I just cut this section of that honeycomb out. This is where our base plate will sit, and I just did that on both sides. And we can put our fascia back in place. I fully got the fascia back installed and I put our seven-way where the bracket is on our base plate and our breakaway switch. And once you've done that, that's does it for the look at the Blue Ox base plate kit for 2026 Chevrolet Trax.
Customer Satisfaction Score:
93% were satisfied with this product
7% of customers were not satisfied
Ratings & Reviews

Great service

Fast shipping, good price, good product, easy install.
Delivered promptly!
Got package as told
Info for this part was:
At etrailer we provide the best information available about the products we sell. We take the quality of our information seriously so that you can get the right part the first time.


Thank you! Your comment has been submitted successfully. You should be able to view your question/comment here within a few days.
Error submitting comment. Please try again momentarily.