
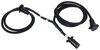
Roadmaster Rear Anti-Sway Bar - 1-1/2" Diameter
Item # RM-1139-197
Our Price: $412.70
Confirmed to Fit
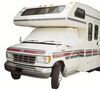
2005 Ford Van
E-450 - Emergency Vehicle
Will this fit?
To see if this custom-fit item will work for you please tell us what vehicle you'll use it with.
In Stock


- All Info
- Reviews (1838)
- Q & A (0)
- Videos (2)
- Photos
2005 Ford Van - Roadmaster Rear Anti-Sway Bar - 1-1/2" Diameter
- Anti-Sway Bar
- Roadmaster
- Rear
- Steel w Polyurethane Bushing
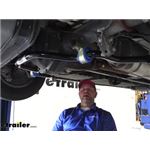
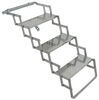
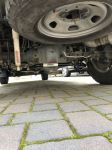
Minimize sway and driver fatigue by improving the stability and driveability of your Ford Van. The bar on this sturdy, effective anti-sway system mounts to the rear axle and to the frame to balance weight transfer and reduce body roll.
Features:
- Minimizes side-to-side movement to improve overall stability of your vehicle
- Lets you execute turns and quick maneuvers with confidence
- Allows for a level ride, even on irregular surfaces
- Reduces driver fatigue - minimizes effort required to keep your vehicle in line
- Diminishes effects of crosswinds, passing motorists and shifting cargo
- Designed to fit your vehicle and work in conjunction with its suspension system
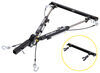
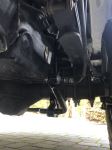
- Attaches to rear axle and to chassis - uses weight of axle to brace frame as it shifts in turns
- Engineered to avoid interference with most popular aftermarket add-ons and accessories
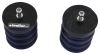
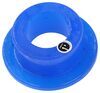
- Made with polyurethane bushings instead of the standard rubber variety for a longer-lasting system
- Polyurethane is durable and resistant to damage caused by oil, gasoline and ozone
- Less wear means less give in the system and better support
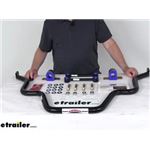
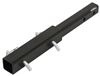
- Constructed of thick 4140 chromoly steel for superior strength
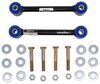
- Includes heavy-gauge mounting hardware, easy-to-follow instructions and bushing lubricant
- Works with front anti-sway bar (sold separately) for absolute stability - available on certain applications only
- Made in the USA
Specs:
- Bar diameter: 1-1/2"
- Limited Lifetime Warranty

Benefits of an Anti-Sway System
The Roadmaster anti-sway bar does for side-to-side movement what a good pair of shocks does for up-and-down motion. You will notice a marked improvement in your vehicle's stability as the bar works to balance weight transfer and reduce body roll. The anti-sway bar acts as a link between your vehicle's frame and its rear axle, using the axle as a brace to more effectively balance the shifting weight of your vehicle as you maneuver it. Lubricated bushings allow just enough pivot and rotation to compensate for the pressure placed on one side of your vehicle when it goes into sudden maneuvers, hits crosswinds or encounters shifting weights.

Superior Construction
The Roadmaster anti-sway bar is made of 4140 chromoly, a chromium and molybdenum steel alloy. This type of steel is considerably harder and stronger than the standard 1020 steel that is typically used in anti-sway applications. In addition, the larger diameter of the bar increases its torsional roll stiffness. The result is a bar that is not only stronger than the competition, but also nearly 30 percent better at resisting sway. The polyurethane bushings and grommets used at the attachment points are durable yet flexible, ensuring that the system is neither so rigid nor so malleable that it becomes ineffective.
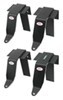
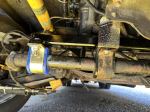
1139-197 Road Master Anti-Sway Bar - Rear
Installation Details


Video of Roadmaster Rear Anti-Sway Bar - 1-1/2" Diameter


Videos are provided as a guide only. Refer to manufacturer installation instructions and specs for complete information.


Video Transcript for Roadmaster Rear Anti-Sway Bar Installation - 2017 Ford E-Series Cutaway
Shane: Hi, I'm Shane with etrailer.com. Today, I'm going to walk you through how to install Roadmaster's Rear Anti-Sway Bar on our 2017 Ford E-450 Cutaway motorhome. Upgrading your rear sway bar is going to enhance your driving ability. It's going to make your ride a lot more comfortable. With our factory one on, what happens is our motorhomes are sit so high, when you're passing a tractor trailer, you get a crosswind. What happens is the top of the trailer or the top of the motorhome wants to lean like this.
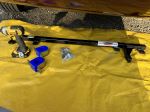
The higher we go or the thicker we go with our sway bar, it's going to reduce the amount of movement the top of our RV gets. It's going to make the steering a lot better for us, again, because we're not going to be fighting it to try and keep it on the road.One thing I do want to show you is the difference in the new sway bar to the old one. You can see the difference in how thick the new one is compared to the old one. This is really going to help reduce a lot of that sway and body roll you get. Our factory bar's only going to be about 1 1/8" thick where our new one's going to be 1 1/2".
It's going to be a solid steel, chrome-moly, black powder coat finish. Really going to help reduce the risk of rust and corrosion. Our bushings are going to be a little bit different than our factory ones also. Our factory ones are going to be more of a rubberized, where these are going to be polyurethane. The difference is is rubber bushings tend to break down.
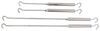
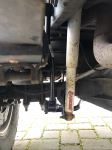
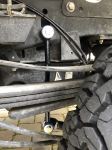
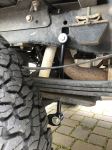
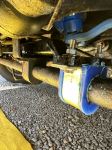
You get the road salts and everything on them, they break down. With our polyurethane bushings, you have a lot less risk of your polyurethane bushings breaking down over time.Our end links are also going to have the same polyurethane bushings. For this particular motorhome, we do need 11" end links, and you can find those here at eTrailer along with your sway bar kit. And the reason we need it to be 11" is so that our sway bar is sitting level with the ground, our end links are going straight up horizontal from the bar and, if you notice, our attachment point has to be above our leaf spring when we drill our hole. As I mentioned, we are going to have to drill a hole for our end link because these do not line up with the holes for our factory end links.
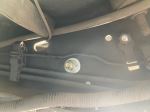
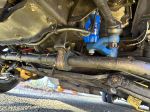
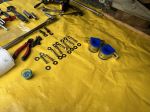
So you just want to make sure you take your time when drilling the holes. You're going to have one hole you have to drill in each side for the top of your end link. This kit is going to come with all the necessary hardware to get it installed, including new bushing clamps. That being said, they are going to mount directly in the factory holes already on your factory brackets.Now that we've gone over some of the features, let's walk you through how to get it installed. To start our installation, we need to remove our old sway bar. We're going to start with our end links where our sway bar connects into them. We're going to take a 9/16" socket and we're going to remove the nut that's on the bottom. We'll have one on each side of the vehicle. We're going to take our sway bar. I'm going to shift it down like that. We're going to have two brackets here and on the other side. We need to remove both of those. We use a 1/2" socket to remove the two bolts that are holding these brackets in place. Be careful here because the sway bar can be a little bit heavy. What I'm going to do is loosen them like this where we can get them off with fingers. I'll get a second set of hands to help me pull it off the rest.Now we'll take our new sway bar, get it ready. We're going to need our bushings that we're going to be putting on. We're going to have one for each side. You get a little bit of grease or lubricant for the inside of your bushings and you're also going to have Loctite. Your hardware that you took off the lower brackets, we're going to be reinstalling that. We're going to put a little bit of Loctite on and we're going to put these smaller washer on each one of the bolts. So now what we're going to do is we're going to take our bushing, our poly bushing, and it's going to split like this. Take your grease, and we want to spread it along the inside of it. Now get you a good coating on there. I'm going to take it like this, and we're going to match how it is on our other one. We're going to slide it right over the bar, and then our bracket, we'll slide right over the top. We'll do that same thing on the other side of the bar. Take each one of our bolts and put some red Loctite on, because what happens as you thread this up into the bracket, that Loctite is going to spin, it's going to be coated all the way around the bolt itself.As I mentioned, get an extra set of hands, use the same hardware that you removed to begin with to put our sway bar back up into place. If you come up here, one thing you're going to notice is that where our end links met our original one, they're in a different location. So what we're going to have to do is now we're going to put on our new end links, mark on the frame rail and then we're going to have to drill a hole for our new hardware. And we'll take our 5/8" socket, and we're going to move our factory end links. With our sway bar sitting level with the ground, we put on our end link. Now what we need to do is make sure that our end link's vertical, and we're going to mark the inside of it right on the frame rail, and we've got to drill a hole. You want to make sure you check the inside of the frame rail before you drill all the way through. Make sure there's no wiring or anything like that you're going to have to move.Now before you tighten your end link onto your bar, you want to make sure that the bolt head is on the outside. Then you go flat washer on the inside, bolt through the bar, flat washer, and then nut. Once you have your hole drilled, you're going to use that same combination, same exact way, going through the frame rail. On your driver's side, inside the frame rail, you're going to have a couple of hard lines. I would suggest popping these little plastic holders off, flatten them two down against the bottom of the frame rail when you drill your hole. That way you don't make contact with them and cause any damage. We're going to come back and torque our hardware. We're going to torque these first, and then we'll move up to these. We're going to torque them all to the specifications in the instructions. Once you get all your hardware tightened and torqued to the specification in the instructions, you're ready to hit the road.I'm Shane with etrailer.com. That's going to do it for a look at and installation on Roadmaster's Rear Anti-Sway Bar on our 2017 Ford E-450 cutaway.
Customer Satisfaction Score:
90% were satisfied with this product
10% of customers were not satisfied
- Wrong item was ordered
- Did not arrive in time
- etrailer mistake
Customer Reviews
Roadmaster Rear Anti-Sway Bar - 1-1/2" Diameter - RM-1139-197
Average Customer Rating: 4.8 out of 5 stars (1838 Customer Reviews)
Minimize sway and driver fatigue by improving the stability and driveability of your vehicle. The bar on this sturdy, effective anti-sway system mounts to the rear axle and to the frame to balance weight transfer and reduce body roll.by: Don12/11/2023
Ford
Originally, I was sent the wrong linkage for my 2022 Ford E-450. I found this out after installing the sway bar. The etrailer rep wouldn't just send me the correct linkage and I would send the ones sent by mistake back. The only way to get the correct linkage would be for me to uninstall the sway bar from the vehicle, package the complete assemblies and then return the large/heavy assembly back. At this point etrailer would then send me the correct linkage included in the correct kit. I didn't have the time to deal with all that so I resolved the incorrect linkage myself.
Hope this helps,
Don C.
by: Earl04/15/2023
After someone shipped the wrong instructions with my kit sent E350 instead of E450 which I didn't notice. First time out lost the left hand link arm. But etrailer got me in touch with Road master and they got things straightened out. The guy with Road Master was just as confused as I was, but helped get thing right. Parts installed and down the road. Factory sway bars are not up to the load that these RVs put on them and are dangerous to drive.I would recommend spending the money and be safe.
by: Ken06/16/2021
2017 Ford F-450 Super Duty
About a year ago I upgraded the front and rear anti-sway bars on my 2017 26A class C Winnebago on a F450 cutaway chassis. This is the simply the best upgrade to date. It eliminated the body roll and awkward handling in a crosswind as well as the snake like movements experienced when passed by semi trucks. The addition of the Roadmaster anti-sway bars has allowed us to travel 70 to 75 mile per hour on the interstates with confidence and has reduced the fatigue of a long days drive.
by: David B10/15/2021
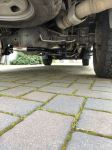
Heavy duty sway bar, not an easy install as there is little room for drilling new hole for links if you are to follow directions explicitly. My motorhome did not allow a perfectly vertical install of links, close, but not perfect. Longer links, even if they had to be beefier would be a better option. Got to see a lot of what goes on below the deck of my motorhome. I will say that with both front and rear new bars there is a great improvement in drivability.
by: Derik06/12/2022
Still needed to drill in frame for holes to get arms to be level..however once installed it really helps on those off camber turns and 18 wheelers zipping by at 80+ mph..
by: Sam 12/02/2021
2015 Ford E-Series Cutaway
I had this installed at my local truck tire supplier and it installed very smoothly and although I have only driven it a little way it seems to have really reduced the sway but only further driving will tell.
by: David 09/15/2022
Great product and service
by: James 07/25/2023
2017 Ford E-Series Cutaway
by: James09/01/2021
2017 Thor Freedom Elite Motorhome
by: Larry M.03/03/2023
I have a 2017 Ford F350 Super Duty SRW, and we haul a heavy truck camper (Lance 1055.) I have Stable Load Uppers and HD airbags, but wanted to add a sway bar to add that extra layer of control, even though my truck has handled the camper well over the last 2 years and 10,000 miles. My truck did not come with an OEM sway bar installed, so I needed this kit that included the End Links too.
The Roadmaster Rear Sway Bar and End Links sold on etrailer are top quality products. They are robust and well made, with quality hardware to match. The product deserves a 5-star, and even unloaded, my truck handling improved right after installation, with improved cornering and no real impact on ride quality in my opinion. I have not yet loaded up our camper or towed our boat, but I have no doubt this sway bar will substantially reduce sway and will improve control and handling when the camper is loaded.
So why 4 stars and not 5?
1. I researched this product and the installation in detail. I planned on installing it myself and expected to find plenty of detail on etrailer's site, or Roadmaster's site, or the internet. My most pressing question was about where to mount the end links, and the orientation of the sway bar arms since I wouldn't be using the OEM end links. That information was no where to be found on the etrailer site, Roadmaster's site, or in any installation manuals. For a product and supplier that has likely sold lots of these to Ford Super Duty owners, I was surprised to find how little info was out there. The installation video on the etrailer site was helpful, but did not include any information for the end links, as they had a 2015 Super Duty and used the OEM end links already installed. I contacted etrailer and they told me to contact Roadmaster for more info on where to locate the end links with this kit.
2. I contacted Roadmaster. They told me they had no instructions and that despite my truck already having the cut-outs for the OEM bracket that attaches the OEM end links to the frame, that none of those holes may work for me. So they suggested I connect the sway bar brackets to the axle first and then see where the arms would line up with the end links. The tech also suggested that it wasn't critical that the end links were perpendicular
to the frame, but that I should try install the end links to allow the arm of the sway bar to hand as close to parallel as possible. No bueno. When I installed this the 14" end links (center hole to center hole) didn't allow for the arms to hang parallel to the frame. And I don't think it matters as the orientation of my sway bar and the arms looks about like every video or picture I could find on the internet of this year/model truck and this sway bar kit. It seems to function fine.
3. Installing it was a bear, especially the way they instructed me to. And I had to make some modifications to fit my truck, as the sway bar arms were rubbing up against my airbag mounting brackets. I got it installed, but the thin instructions turned what should have been a 60 minute job into 2 1/2 hours. A bit frustrating.
All in all, this will do the job intended and will provide me with peace of mind next time we load our camper. I am a bit frustrated that there were zero installation instructions specific to my year/make/model of truck given it did not have an OEM sway bar and the end links had to be installed with a bit of guesswork. You will also note in my pictures that I had to mount the end links to the sway bar arms differently on each side to make the bar fit around my air bag mounts.


by: Neal02/09/2023
This product arrived on time, and is as described in company literature. I have installed the sway bars and the sumo springs on my 2019 Ford E3 26 foot Thor motorhome. Installation is fairly straightforward. Having said that, I am a retired farmer and I am quite familiar with this type of work. Having the proper tools makes the job go much quicker and easier. Installation of the front sway bar took a little under an hour. The rear sway bar is a bit more complicated to install, but he can be easily accomplished by someone of average mechanical skills, equipped with the proper tools. I strongly recommend removing the rear wheels to facilitate installation of the springs and the sway bar. I have not driven my motorhome yet, but will be taking an extended trip in March. I am looking forward to an improved ride.


by: Terry04/02/2023
Fairly easy install. Drilling the hole in the frame was decent started with a 17/64 pilot hole then the 17/32 final hole. Take your time and let the drill do the work.
Do be aware of the hole placement on the drivers side as there are brake lines and wiring there.

by: Ernest10/26/2022
OH My! If you are thinking about getting one for your P32 wide body. Please don’t hesitate. It REALLY Works. Take the white knuckle effect out of driving. EASY installation! Easy Ordering from etrailer. Roger helped me get through the buying process and shipped to my house in 2 days! Thank You!!


by: Michael11/03/2022
This sway bar is the real deal. Easy to follow instructions but I had it installed because I'm lazy. It took one hour labor


by: John03/01/2024
Replaced the anti-sway bar on our 2019 F350. No special tools or jacks needed for the installation. Now our Lance 850 truck camper doesn’t sway nearly as much as before. Big improvement. Very pleased!


by: Jose 04/21/2024
Major driving experience I upgrades my 2020 Thor Motor Coach KW-29 with front & rear sway bar, front steering stabilizer shock, All 4 front/rear Koni shocks, & Rear End stabilizer to chassis all together best investment on my RV improvement handling, body sway when 18 wheeler passing u up minimizing body sway from minor to none at all, reduce fatigue while driving course correcting steering reducing stress. Each component was felt the improvement but all together it’s been major improvement & experience
by: Tony07/16/2023
I installed both front and rear Road Master anti sway bars on our last RV and they made a tremendous improvement in handling. It was easy for me to install by myself in my driveway on out Coachman Leprechaun 319MB. I highly recommend this product.


by: Bill 04/18/2023
The last thing to upgrade my front suspension on my 2018 Winnebago Aspect 27k. Money well spent! Easy installation, the ride greatly improved. Etrailer shipped this fast and I'm very pleased. Thanks.
by: Man Bear Pig05/31/2023
This is on a 2004 Dodge 2500 with a 2500 lbs truck camper, Dirt bike on a hitch rack, and 2 mountain bikes on a front rack. The sway bar definitely helps. This one fit well around my stupid 5" exhaust that was installed by the previous owner. The Hellwig would not clear it. I have the Timbren SES and wedges in my leaf springs as well. The sway bar is a nice addition to those items. What I really notice is that when making emergency maneuvers or going off road, the truck corrects quicker than before and feels safer and less likely to tip over. I would not say the bar by itself will solve all of your issues, but couples with other remedies, it will help make your top heavy overloaded ride feel safer. With all my additions, I can confidently go the speed limit and often times well above through the Colorado mountains with no issues.


by: Thom03/13/2024
After reading all the information regarding fitment for my 2001 Freightliner Chassis I purchased this rear anti sway bar kit which had a side note stating that if your chassis had different u bolts, which my chassis does I could contact Roadmaster engineering direct for the correct parts. I did contact them directly and they referred me to e trailer, who referred me to Roadmaster, pass the buck game. So after a year I have a half installed anti sway bar kit that is useless and unreturnable because it was half installed waiting for answers that never came. A waste of my time and hard-earned money NOT HAPPY.
by: John 04/16/2023
E trailer is.my go to place for anything towing trailering etc Absolutely the best products as well and the best service and the best people!!!!
by: Earl 04/15/2023
Free from the roller-coaster ride my 2022 thor motorhome had with the factory bars.I have questions about why these companies don't install the suspension while building the rv.
by: George07/13/2023
On my 2021 Mercedes Benz class C Tiffin Wayfarer this rear anti-sway bar fit perfect. I didn’t have to make any modifications to the exhaust. With help I had it installed in 2 hours and 50 minutes. The pictures on the instructions could have been clearer to understand.


by: John 11/22/2022
Significant difference when making turns and going around curves. These twin I beam suspension have a tendency to follow uneven road surfaces, this pretty much eliminated a lot of that. Installed it myself with the Roadmaster end links and the only complaint I have is I had to enlarge bolt hole for the end link bolt, other than that, well satisfied. I also installed the rear sway bar at same time, highly recommend replacing the front and rear sway bars together.
by: Ron 04/05/2024
It is beyond my comprehension why camper and motor coach manufacturers build their products so subpar concerning how they handle on the road. I’m thankful that ETrailer for their expertise and products to get my Class C coach road ready, safer and more comfortable to drive.
25
1680
Show More Reviews
See what our Experts say about this Roadmaster Anti-Sway Bars
- Rear Sway Bar that Fits 2018 Thor Vegas 25.2I checked with Roadmaster and the correct rear sway bar for your 2018 Thor Vegas 25.2 is the part # RM-1139-147 since it was built on a Ford E-450 Class A chassis. The part number you mentioned does not fit.
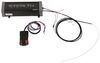
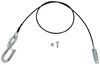
view full answer... - What Is The Center Of Eye To Center Of Eye Measurement On Roadmaster Rear Anti-Sway BarThe center of eye to center of eye measurement on The End Link Kit for Roadmaster Rear Anti-Sway Bar for Motorhomes # RM-590185-00 is 8-1/2 inches, the overall length is 10-1/4 inches. These end links let you install the Roadmaster Rear Anti-Sway Bar # RM-1139-197 for Emergency Vehicles. I attached a review video link below.
view full answer...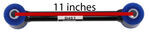
- Suspension Enhancements to the 2021 Thor Freedom Elite 30FE MotorhomeFor your 2021 Thor Freedom Elite 30FE motorhome, those upgrades you mentioned are going to do wonders to your rig's overall handling so they are a great idea. The correct parts are the Roadmaster Front Anti-Sway Bar # RM-1139-176, Roadmaster Rear Anti-Sway Bar # RM-1139-147. The anti-sway bars are constructed with higher-strength, thicker steel than OEM sway bars so they have much higher roll stiffness to combat sway, and the higher the roll stiffness the better sway control. Then for...
view full answer...
Do you have a question about this Anti-Sway Bar?
Info for this part was:

Expert Research:
Mike L

Expert Research:
Jameson C

Edited by:
Lindsey S

Video Edited:
Jeff D

Video Edited:
Chris R

Test Fit:
Shane H

Written by:
Mike S

Video by:
Jacob H

Updated by:
Isabelle B

Updated by:
Sabrina W
At etrailer.com we provide the best information available about the products we sell. We take the quality of our information seriously so that you can get the right part the first time. Let us know if anything is missing or if you have any questions.
Product Experts Available Now!
Call 1-800-940-8924
Thank you! Your comment has been submitted successfully. You should be able to view your question/comment here within a few days.
Error submitting comment. Please try again momentarily.