Counteract Tire Balancing Beads Injector Pump
Thank you! Your comment has been submitted successfully. You should be able to view your question/comment here within a few days.
Error submitting comment. Please try again momentarily.
- All Info
- Reviews (9)
- Q & A (0)
- Videos (2)
- Photos
Counteract Accessories and Parts - CA96FR
- Tire Balancing Beads
- Tools
- Injector Pump
- Counteract
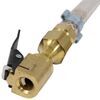
Injector pump allows you to install tire balancing beads directly into your truck or trailer tires through the valve stems. Tire balancing beads improve fuel economy and increase the life of your tires by keeping them balanced automatically.
Features:
- Counteract injector pump allows you to install tire balancing beads directly into your truck or trailer tires through the valve stems
- Connects to air line and air compressor (sold separately)
- Tires do not need to be dismounted to install balancing beads
- Installation of beads is quick and easy
Notes:
- If your tire has internal TPMS sensors, you will need to break down the tire to install these beads.
- Will only work with Counteract tire balancing beads.
CBB-IP-LG Counteract Balancing Beads Injector Pump
Installation DetailsCalifornia residents: click here


Videos are provided as a guide only. Refer to manufacturer installation instructions and specs for complete information.
Video Transcript for Checking Out the Counteract Tire Balancing Beads Injector Pump
Hey everybody, how's the going Today, we're going to be going over the Counteract Balancing Beads Injection Pump. So here is what our injection pump looks like. This clear canister here, this is what's going to hold our beads, we have a metal collar, which secures it to the valve, we also have an open and close lever here on the actual valve. This other end here is going to be a braided hose with an air chuck, and that's going to grab on to the valve stem there on our tire. So in most instances, the injection pump here, isn't going to be required to install the tire balancing beads. However, if you've installed these using the traditional method, which is the little pump, the handheld pump you use to pump the beads into the tire there, is that little clear too, you're going to know it takes quite a while.
I think I spent three to four minutes just on one of these smaller bag on these trailer tires here. Whereas with this injection pump here, once we got everything set up, it only took us about 20 seconds, so it's going to drastically cut down on the amount of time it takes to install the tire beads into our tires. Now, if you we're just simply using the entire beads to balance your trailer tires one time, you didn't have any other uses for them, then honestly, this product probably isn't for you because it's going to exceed the cost of the kit. But if you guys own a shop and you frequently have yourself installing these tire beads, a lot of semi shop, big group shops, actually install these quite often, therefore, this is one you'd want to consider one of these pumps. 'cause it's going to take the time it cuts down to install the tire beads in the tire drastically.
So now that we've gone over the injection pump, let's go ahead and show you how to use it. So the first thing we need to do is make sure we have our proper safety equipment. So we're going to be using these safety glasses that they provide in the kit for you. Once we have these on, we can begin. So first thing we're going to do is we're going to take our inflation valve here.
So that's what this looks like. So we need to make sure that the valve is closed. Right now, it's in the closed position because it's perpendicular to the valve. If it was parallel to the valve like that, that way it's open. If you always want to check, you can actually blow through that little nipple there.
If air passes through, then you know the valve is open, and if it doesn't, you know it's closed, but this is the closed position. Once we've done that, we're going to go ahead and flip this over like that. And there's going to be a little groove here in this metal ring that we're going to insert the O-ring that comes in your kit. So we're just going to simply drop right in there. It's not a super tight fit, but it does fit in there nicely. Next, we're going to take our plastic fill container along with our bag of beads and we're just going to simply pour the beads into the container. Make sure we get them all in there, just like that. And the next thing we're going to do is we're going to take this metal collar here. You can see me have a stop on the bottom in the threaded in. We want to make sure that the threaded in goes in first, like, so, and then it should catch in there just like that. Once we have that in there, we're going to grab our valve here. Now it's kind of tricky to do this because we have to make sure that that O-ring stays in place. But if we just take the plastic container, line up the lips with the O-ring, then hold it on there, now we can begin threading on the collar. So again, I'm kind of pressing down on the valve and up on that plastic container to seal that O-ring sort of trap it in place. And then I'm simply tightening the collar. Now once I've got it on there good, I'll give it a couple more turns for good measure. Once about as tight as I can get it by hand. So the next thing we need to do is with our trailer secure here, we need to note the orientation of the bow stem. So you can see the bowel stem on this particular tire is at the bottom. We need it to be at the top in order to fill it with beads. So what we're going to do is we're going to take a four jack. I'm just going to lift the trailer by the axle there, just enough so I can get the tire off the ground and then I'm going to spin it so the valve stem is going to be located up top. So now these next few steps here, we kind of have to do in rapid session. So I'm going to go ahead and explain them as best as I can, and then we'll walk you through them. But ensuring that the valve is closed, we're going to take our air chuck here and attach it to the nipple there on our valve. So now what we need to do is we're going to set this down, we're going to turn our attention to our wheel and tire here, we're going to take our valve step core remover, we're going to stick it in the valve stem, and we're going to remove the valve stem core. We're going to let about half of the air removed from the tire, deflate from the tire. And then we're going to take the air chuck on our valve there, and we're going to clamp it over the stem. So again, we do need to kind of be quick about this. You also want to make sure that you have a good grip on that valve stem tool in the valve stem when it comes out 'cause if it's not, it will only go flying across the rim. So we'll go ahead now. Take that out. We'll let about half of the air come out of the tire and then we'll attach the air chuck there from our inflation kit. Now right about half of the air out of the tires, and then I just simply plant on the shelf there and that'll stop the tires from deflating further. Now, the next thing we're going to do is we're going to grab our valve here. So we're just about ready to open it up. We want to make sure if the clear plastic container is facing down in the six o'clock position, and then once we let the air enter into the tire here, we're going to be slowly rotating this up to fill the beads in the tire there. So we'll go ahead and show you that. Now we should only do letting this valve be open for about 20 to 40 seconds. By that time, we should have all of our beads in there because we want to make sure that we don't over pressurize the tire, so you need to make sure you're pretty quick about this. I'll go ahead and open the valve now. Make sure you have your safety glasses on and I'll just slowly and gently turn the container here to fill the tire with beads. It looks like we got all of them in there. I'm going to go ahead and close the valve. Make sure we don't have any obstructions in our airline. It looks like most of the beads we're able to enter into the tire. So now the next thing we're going to do, this is actually kind of tricky. This is probably going to be the hardest part of our installation. So we're going to be taking the new valve core that comes with the tire beads, not the old one. We're also going to be taking our tool here to install the valve core. Now this is actually a torquing tool that Counteract offers, it's sold separately. And this is to ensure that we have the correct torque here of our valve core. However, you can use the one that you use to remove it with, it comes in your kit. I've installed many of them this way, and none of them have came loose. But if you want to do everything by the book, then we will need this torque wrench, but if not, you could just simply use the valve core remover that came with your kit. What we need to do is we're going to line up our valve core with the tool there, and I'm going to use my index finger there to just simply hold it on the end of our tool. So this next part here, you need to be very quick about this, but what we're going to be doing is I'm going to be removing the air chuck from the valve stem. I'm going to be pulling out away, I'm just going to drop it to the ground, and then after that's done, I'm immediately going to be shoving the valve core into the valve stem 'cause we don't want to lose our beads and the air out of our tire. So we need to be pretty quick about this. I'll go ahead and show you that. Now again, make sure you have a good hold there on the valve core. Let's go ahead and do this now. There is going to be a lot of air rushing out, so don't be frightened. We'll go ahead and tighten it down so we hear the port click. And that's all it is. That's pretty much that simple. What we're going to do now is we're going to take our tire inflator and we're going to refill our tires to the pressure recommended on the sidewall of the tire. Now, if you're doing this on a trailer, you always need to make sure you fill your tires to the Code PSI rating. It's usually located along the load range and that's always going to be on the sidewall of the tire. We've already found this one and it's 65 PSI, so we're going to go ahead and install our inflation truck and we will inflate the tires accordingly to the manufacturer's recommendations. So that's 65 there. Go ahead and remove our truck and install our new valve cap, and there we have it. And that's going to do it for our look at the Counteract Balancing Beads Injection Pump..
Customer Satisfaction Score:
98% were satisfied with this product
2% of customers were not satisfied
- Wrong item was ordered
Ratings & Reviews
4.4
9 reviews
This system did not work on my gmc retain or series pickup. The fire monitor in the valve stem seems to impede the head flow. Wish that was mentioned in description. Now I'm stuck with an expensive tool that does not meet my needs.
Excellent tool! We use this often to install bead balancing on preassembled tires on trailers and trucks. It does have a learning curve (cant feed it too fast) but once you figure it out, it is perfect for the job. Just ordered a replacement in Aug '22, the replacement came preassembled and the hoses were backwards, a simple fix.
This was the easiest way to install the Balance Beads
Fast service great people thank you.
Everything was A’s order
Straight forward, easy to use.
See what our Experts say about this Counteract Accessories and Parts
- Can Equal Flexx Balancing Beads Be Used W/ The Counteract Tire Balancing Beads Injector Pump?I spoke with Counteract, and they explained that the Flexx is not a balancing bead and is not injectable through a valve stem as the particles are too large therefore It is not compatible with the Counteract Tire Balancing Beads Injector Pump # CA96FR. If you are looking for a premium product with better performance and injection capabilities, you would need to use Counteract Balancing Beads like the Counteract Tire Balancing Beads Single Pack for Trailers # CA66VR.
view full answer...
Info for this part was:


At etrailer.com we provide the best information available about the products we sell. We take the quality of our information seriously so that you can get the right part the first time. Let us know if anything is missing or if you have any questions.


Heather A.
11/23/2022
I reached out to Counteract and this system is not compatible with valve stems that have TPMS. The beads would need to be poured in while mounting the tire.