
Replacing the Bearing, Races and Seals on a Trailer Hub

No parts are more critical for the dependable performance of your trailer than the bearings, races, and seals. To ensure that your trailer performs reliably, you should inspect the bearings, races, and seals and repack the bearings every 12 months or 12,000 miles.
- Shop for parts and tools
- Find recommended grease for your trailer
- Read about the complete process of removing, inspecting, repacking, and installing trailer wheel bearings
Watch the removal, inspection, and installation of trailer wheel bearings
| Parts and Tools | |||||
|---|---|---|---|---|---|
 |
 |
 |
 |

 |


 |
| Bearings, races, and bearing kits | Seals | Grease | Spindles | Grease caps and bearing protectors | Greasing tools: bearing packers, seal pullers, and grease guns |
Recommended Bearing Grease


Take off the Wheel and Hub

Remove Tire and Grease Cap:
- Remove the tire and wheel from the trailer.
- Now use a flathead screwdriver to remove the grease cap.
- You should be able to pry off the grease cap by working the screwdriver in a circular motion.
- If you have bearing protectors, tap on the cover as you spin the hub.

Remove Castle Nut on the Spindle:
- After the grease cap on the spindle is removed, the castle nut should be visible. The castle nut holds the hub and bearings in place.
- You will then see one of three devices that lock the nut onto the spindle. The most common is a cotter pin. Just bend it straight and pull it out.
- Then you may see what is called a "tang washer."
- Wipe the extra grease off the nut and look for a "tab" that is in one of the notches of the castle nut.
- With your screwdriver, push the tab back toward the spindle. Spindles with a flat spot on the threads are a dead giveaway that the spindle will use the tang washer.
- (These EZ lube spindles are "D-shaped" at the end and have a zerk fitting to transport grease to the bearing location.)
- Finally, you may see a type of "cage" surrounding the nut. This is also on an EZ lube spindle and will just snap off the nut.
- Use your screwdriver to gently pry off the cage in a circular motion around the nut.

Remove the Hub:
- If the hub is in good condition, it should slide right off the spindle.
- Use a paper towel to hold in the outer bearing as you pull off the hub.
- If the hub is stuck, rock it in a circular motion to help slide it off.
- If that does not work, use a mallet to tap the back side of the hub in a few places.
- If the bearing is frozen to the spindle, you will have to knock off the hub with some force.
- When this happens, often the hub will come off but the bearing and seal will stay on the spindle.
- In this case you will have to work off the frozen bearing by using a chisel to break it loose.
- If you chisel the bearing, be very careful not to hit the surface of the spindle, especially where the seal rides.
- Even the smallest of nicks can wear out the bearings and seals very quickly.
- If there are any nicks in the spindle where the bearings or seal sit, then you will want to replace the spindle or the entire trailer axle.
- If you run into a frozen bearing you may want to consider taking the axle to a local garage.
Disassemble the Hub

Remove Outer Bearing:
- Pull out the outer bearing and spindle washer.
- The outer bearing is closest to the outside of the hub.
- It is the one that hit the ground if you did not catch it when you were pulling off the hub.
- Set the bearing aside.

Remove Inner Bearing and Seal:
- Now you will need to remove the inner bearing and seal. (With luck it was not stuck on the spindle).
- Place the hub, with the wheel studs facing up on a hollow cinder block or on a couple of 2x4s.
- Then use a 1" wood dowel rod or scrap lumber that will fit into the center of the hub.
- Place the dowel rod against the inner bearing and knock out the bearing with the mallet.
- Do this in a circular motion.
- The reason for wood is that it will transmit the force of the hammer but will not nick the bearing or race.
- The grease seal will be pushed out by the bearing.
- If you are planning on replacing the seals, another option to remove the inner bearing is to simply punch a hole in the seal and pry it out with a flathead screwdriver.
- Be careful not to damage the hub and race when prying.

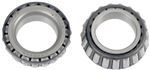
Clean and Inspect Bearings:
- Wipe down the bearings and check their condition.
- Look for nicks in the roller and dents in the roller cage.
- If you see any of these problems or if you see lines, spots, or discoloration of the metal, discard the bearings.
- If everything passes inspection, clean out the bearings and allow them to dry.
- The best way to clean out the bearings is by using a heavy-duty degreaser and a paper towel.
- Make sure to wipe down the bearing after it has been cleaned.
- In a pinch, you can use a low-suds dish detergent such as Dawn to help cut through the grease.
- If the bearings have to be replaced, look for the number stamped on the ends or side of the bearing.


Check the Seal:
- In cases where the seal is no longer round or the rubber seems to be dry rotted, the seal will have to be replaced.
- Often, removing the grease seal from the hub will damage it enough to require its replacement.
- If the seal does not seat well in the hub, it will not work properly.
- The easiest way to find a replacement is to find the numbers stamped in the rubber part of the seal.
- If you do not see any numbers, measure the inner and outer diameters of the seal.

Inspect the Race

Check the Race:
- Examine the surface of the race as you did with the
bearings.
Look for nicks and discoloration.
- If you see something you are not sure about, try running your fingernail over the mark; if it catches, the race will have to be replaced.
- Typically, if you have to get new bearings it is a good idea to replace the races, too.
- Also, like the bearings, the race will have an identification number stamped on one end.
- You can also use etrailer's bearing chart to find the corresponding race for the bearing that you have.


Remove the Races:
- If the races have to be replaced, get out your old flathead screwdriver and mallet.
- When looking through the center of the hub, you will see the edge of the race sticking out.
- Working from the inside out, use the screwdriver to grab the edge and knock out the old race.
- Use a circular motion.
- This job will take some time.
- If the race comes out rather easily or pops out on the third whack, chances are that the hub will need to be replaced too.
- Hub assemblies are available that include the bearings, races and seals.

Clean Hub:
- After the bearings and races have been worked out, clean the inner part of the hub.
- Remove any extra grease or buildup you see.
- Make sure that the inner hub is as clean as possible. This will help make it easier to reinstall the races and bearings.
- Also, if you are working on a drum, the cleaner it is the easier it will be to slide back over the brake assembly.

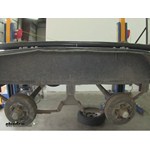
Clean and Inspect Spindle:
- Now you want to clean and inspect the spindle.
- If the hub slid right off you should be in good shape, but you will still want to double-check the area where the bearing and the seal sit on the spindle.
- Again, use the fingernail test. Simply run a fingernail across the spindle; if it catches, you will want to replace the spindle.
- Spend some extra time on the spindle where the seal rides.
- The smallest nick will wear out the seal very quickly.
- If there is a sizable nick or gouge, you may need to install a new spindle.
 Shop for spindles
Reassemble the Hub

Begin to Reassemble the Hub:
- Now that everything is clean and has passed inspection, start the reassembly process by installing the new races.
- First, place the race in the hub, thin edge towards the outside.
- Carefully tap in the race until it is level with the hub.
- After the race is level, the old race can be used to push the new race farther into the hub.
- Be careful not to get the old race stuck.
- After a couple of hits, switch to the biggest socket that you can fit in the inner part of the hub.
- Catch the outer edge of the new race with the socket and tap in the race, again, going in a circular motion, until the race bottoms out.
- Sometimes the tone of the tapping will change, indicating that the race has bottomed out.
- Make sure the race is in as far as it can go by feeling for a gap between the race and center of the hub.

Grease the Races:
- On standard utility trailers, grease just the surface of the races.
- There is no need to grease the entire hub unless you are working on a boat trailer.
- On boat trailers, grease is used not only to protect the bearings but also to help keep water out.
- Bearing protectors or bearing buddies can be used to make sure enough grease is in the boat trailer hub.
- Be careful when using bearing protectors not to overfill the hub with grease because too much grease can blow out through the grease seal. This can be especially messy on drums with brakes.
Repack the Trailer Bearings

Pack the Bearings:
- The next step is to pack the bearings with grease.
- You need to fill every space of the bearing with grease.
- You can use a bearing packer, or the bearings can be repacked by hand.
- If you are going to do it by hand, start with a gob of grease in your palm and then press the bearing into the grease with some force.
- Do this one section at a time and overlap the sections. Start on the front and then move to the back side of the bearing.
 Shop for bearing packers
Insert Inner Bearing and Seal:
- Turn the hub over so that the front side with the wheel studs faces down on the table.
- Place the inner bearing in the hub and install the seal on top.
- Tap the seal in a circular motion until it sits flush.
- Next, apply a thin layer of grease to the spindle.
- Then slide on the hub.
- Be sure the seal is set in the proper position on the spindle.
Insert Outer Bearing and Seal:
- With the hub already on the spindle, you can now install the outer bearing.
- Slide it in while rocking the hub back and forth until the bearing is seated into the race.

Install Washer and Nut:
- Next, install the spindle washer and tang washer (if necessary).
- Then install the castle nut.
- Tighten the nut until it stops or becomes snug.
- Rock the hub and push in to make sure the hub is fully seated onto the spindle.
- Then tighten the castle nut a little more.

Final Castle Nut Adjustment:
- To make sure the hub is seated properly, back off the castle nut until it is loose.
- Then tighten the castle nut snugly until it stops.
- Look to see where the cotter pin hole lines up with one of the notches on the nut.
- On hubs that use the tang washer or cage to lock the nut, you will have to do this by sight.
- Then back the nut off one notch, so that the cotter pin will fit through the castle nut.
- Install the cotter pin and then spin and rock the hub.
- When you rock the hub you should feel the hub barely moving front to back.
- Try experimenting by loosening the castle nut one more notch to feel the difference in the play in the hub.
- Then install the wheel and rock the hub again.
- On the outside edge of the tire, the movement should not be more than 1/4" inch.
- Any play should be barely noticeable.
- When you are satisfied with the adjustment, secure the cotter pin.
- Push the pin through the hole on the end of the spindle and through the notches on the nut.
- Then split the bottom of the pin to the left and right.
 Shop for spindle nuts, washers, and retainers
Install the Dust Cap or Bearing Protectors
The dust cap will install directly over the castle nut. You should be able to start installation of the dust cap with your hands by pressing it into the center of the hub. After it has been started, use a piece of wood to tap it in the rest of the way. Make sure the outer lip on the dust cap is tight against the hub or drum. The wood will help you to avoid damaging the dust cap.
The main purpose of bearing protectors is to keep out water. A grease-filled hub will have some pressure built up inside, and this is what prevents water from seeping in. When filling the bearing protectors with grease, be careful not to overfill them. To help prevent overfilling, the bearing protector will have a small hole that allows the excess grease to spill out the side.
It is not a good idea to fill the hub with grease on every trip. If the release valve is clogged, or the hub runs out of room, the grease will probably blow out through the grease seal. If you have brakes on the trailer and the seal fails, the brake shoes will be contaminated and will need to be replaced.
It is good practice to fill the hub until grease starts to move the pressure spring on the bearing protector. Check it to see whether the spring has gone down then add a little more. Bearing protectors come with bras (or covers) that are designed to keep the excess grease from flinging out of the release valve and help to keep your wheel clean.
 Shop for grease caps and bearing protectors
| Replacement Bearings | Race | |||
|---|---|---|---|---|
| Part No. | Description | I.D. | Part No. | O.D. |
| L44643 | Inner/Outer for BT8 | 1.000" | L44610 | 1.980" |
| L44649 | Inner/Outer for BTR, Outer for #84 Spindles | 1.063" | L44610 | 1.980" |
| L68149 | Inner for 3.5K Axles | 1.378" | L68110 | 2.327" |
| L68149 | Inner for 4.4K Axles | 1.378" | L68111 | 2.362" |
| 1779 | Outer for 22834 Hub | 0.938" | 1729 | 2.240" |
| 2788 | Inner for 22834 Hub | 1.500" | 2729 | 3.000" |
| LM48548 | Inner for AH25555F Agricultural Hub | 1.375" | LM48510 | 2.563" |
| LM67048 | Outer for 8-201-5, 8-213-5 | 1.250" | LM67010 | 2.328" |
| 15123 | Outer for 42655, 42656, 8-174-5 | 1.250" | 15245 | 2.441" |
| 14125A | Outer for 42865, 42866, 8-219-4, 8-231-9 | 1.250" | 14276 | 2.717" |
| 25580 | #42, 8K, 9K, Inner (Pre 10/89), Outer for #99 | 1.750" | 25520 | 3.265" |
| 31-71-3 | 50MM Cartridge Style, Nev-R-Lube | 50MM | - | - |
| 31-72-3 | 35MM Cartridge Style, Nev-R-Lube | 35MM | - | - |
| 31-73-3 | 42MM Cartridge Style, Nev-R-Lube | 42MM | - | - |
| 02475 | Outer for 8-231-8, 8-218-9, 8-187-7 | 1.250" | 02420 | 2.688" |
| 2585 | Outer for 8-232-5 | 1.313" | 2520 | 2.750" |
| 387A | Outer for 8-214-5, Inner for 8-260-5 | 2.250" | 382A | 3.813" |
| 395S | Inner for 8-214-5 | 2.625" | 394A | 4.331" |
| 3984 | Inner for 8-216-5, 8-214-8, 8-217-5, 8-272-5 | 2.625" | 3920 | 4.438" |
| 28682 | Outer for 8-216-5, 8-214-8, 8-217-5, 8-727-5 | 2.250" | 28622 | 3.844" |
| 28580 | Inner for all #99 Spindles | 2.000" | 28521 | 2.875" |
| JM205149 | For 090814 Hayes 10K | 1.969" | JM205110 | 3.543" |
| JM511946 | For 090814 Hayes 10K | 2.559" | JM511910 | 4.331" |
| HM212049 | Outer for 20K - 25K Axles | 2.625" | HM212011 | 4.813" |
| HM218248 | Inner for 20K - 25K Axles | 3.542" | HM218210 | 5.786" |
| LM11949 | Outer for AH15450E Agricultural Hub | 0.750" | LM11910 | 1.781" |
| 29749 | For AH30660F Agricultural Hub | 1.500" | 29710 | 2.563" |
| 501349 | Outer for AH60880F, Inner for AH35660F | 1.625" | 501310 | 2.891" |
| 506849 | For AH60880F Agricultural Hub | 2.165" | 506810 | 3.543" |
| 603049 | For AH45880F Agricultural Hub | 1.781" | 603011 | 3.063" |
| Wheel Bearing Kits | ||||
|---|---|---|---|---|
| Part No. | Outer Bearing | Inner Bearing | Seal | Seal I.D. |
| BK1-100 | L44643 | L44643 | 34823 | 1.249" |
| BK1-150 | L44649 | L44649 | 10-60 | 1.500" |
| BK2-100 | L44649 | L68149 | 10-19 | 1.719" |
| BK3-100 | 15123 | 25580 | 10-36 | 2.250" |
| BK3-110 | 15123 | 25580 | 10-10 | 2.125" |
| BK3-200 | 14125A | 25580 | 10-36 | 2.250" |
| BK3-210 | 14125A | 25580 | 10-10 | 2.125" |
| BK3-310 | LM67048 | 25580 | 10-10 | 2.125" |
| BK3-300 | LM67048 | 25580 | 10-36 | 2.250" |
| DL21792 | L44643 | L44643 | 34823 (12192VB) | 1.249" |

Ken M.
6/1/2022
Best trailer bearing advice I've seen. It could be improved by adding advice about removing and re-installing trailer wheels, and pictures that are larger and less dark. I know that's tough with black hubs and drums, maybe paint one white just for pics ? Other wise excellent info. I'm about to repack my boat trailer wheels and haven't looked at a wheel bearing for many years. I especially appreciate the description of the fine art of adjusting the spindle nut. I've heard of people actually ramming the nuts on with an air wrench, then wondering why the wheel won't turn!
Leroy
11/18/2021
I have a 4by 7 utility trailer,not really trusting the wheel bearings,can you tell me what hubs will fit,it’s a 2000 lb trailer

Kevin M.
5/21/2021
Liked article. I bought boat trailer hub and bearings all done. Rear bearing seal in place and no taper to axle. My kit has the outer bearing seal. Inner was already on. If I put outer bearing seal in there won’t be enough room for caps to be put in. I read 5 or 6 articles making sure I didn’t need that outer seal. None of them mention the outer bearing seal. Must be for different application ?? I slid it on placed outer bearing, washer, castle nut, cotter pin and cap. Bugs the ....! Out of me with that extra part.


Explore Expert Info
![Our Expert]()
on Trailer Bearings Races Seals Caps

on Trailer Bearings Races Seals Caps


Departments
Towing
- Trailer Hitch
- Fifth Wheel
- Gooseneck
- Towing a Vehicle
- Front Hitch
- RV Hitch
- ATV Hitch
- HD Truck Hitch
- Vehicle Wiring
- Brake Controller
- Ball Mounts
- Weight Distribution
Sports and Recreation
Trailer Parts
- Utility Trailer
- Boat Trailer
- Landscape Trailer
- Enclosed Trailer
- 5th/Camper Trailer
- Car Hauler
- Horse Trailer
Vehicle
Contact & Help

What our customers are saying:
"Thank you all for your communications and super service!"
Gary
Tustin, CA
Dave
8/23/2023
I have an older boat trailer, 1984, and would like a clarification on the bearings placement. Should the cones be positioned so that the narrow ends are facing each other on the spindle?