


Why the Burnishing (Bedding-In/Break-In) Process is Important with New Electric Brakes
Updated 11/17/2025 | Published 12/26/2024
Question:
Brakes Burnishing process. Do I really need to do this or I just can drive carefully and let the burnishing process happen slowly as I normally drive and brake? I am a little afraid of burning the brakes and drum.
asked by: Javier
Expert Reply:
Hello Javier,
As I would love to make your life easier and tell you it is not necessary, I cannot do so. Brake Burnishing (bedding-in, or break-in) should be done for the following reasons:
- Achieve Maximum Performance: Burnishing evenly transfers a layer of friction material from the brake shoes onto the drums, which is critical for achieving consistent braking performance.
- Reduces noise and vibration.
- Increases the life of the brakes: By properly breaking them in will help with uneven wear on your brakes and your drums. With the price of drums you don't want to be changing them out every time you change your brakes. We want to keep as much money in your pocket as possible.
- Can cause glazing: If you break them in slowly it can cause a glazing (a smooth, glass-like surface) to form on your brake shoes, reducing braking effectiveness.
I understand being afraid of "burning" the brakes, but it is a process that must be done, not just to prolong the life of your drums and brakes, but it will make the brakes as safe as possible. I have included a help article, please check out Step 4. It will explain the "Break-in" process.
Happy New Year! May 2025 be your best year yet! From, your friends here at etrailer.


Product Page this Question was Asked From
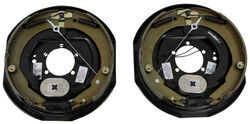
etrailer Electric Trailer Brakes - Self-Adjusting - 12" - Left/Right Hand - 5.2K to 7K

- Trailer Brakes
- Electric Drum Brakes
- Standard Grade
- Self Adjust
- 12 x 2 Inch Drum
- 5200 lbs Axle
- 6000 lbs Axle
- 7000 lbs Axle
- 14-1/2 Inch Wheel
- 15 Inch Wheel
- 16 Inch Wheel
- 16-1/2 Inch Wheel
- etrailer
more information >
Featured Help Information
Miscellaneous Media

Continue Researching
- Shop: GE Profile RV Refrigerator with Top Freezer - 8.3 Cu. Ft. - 12V - Stainless Steel - Reversible
- Shop: etrailer Electric Trailer Brakes - Self-Adjusting - 10" - Left/Right Hand Assemblies - 3.5K
- Search Results: go power inverter
- Search Results: rv power converter
- Search Results: reflective tape
- Search Results: 3 inch hitch
- Shop: Furrion RV Refrigerator w Freezer - 10.6 Cu Ft - 12V - Black - Right Hand Doors
- Search Results: coupler lock
- Shop: Easy Grease Trailer Hub and Drum Assembly for 3.5K Axles - 10" - 5 on 4-1/2 - Pre-Greased
- Shop: Dexter Electric Trailer Brakes - 12" - Left/Right Hand Assemblies - 7,000 lbs
- Shop: Dexter Nev-R-Adjust Electric Trailer Brakes - 10" - Left/Right Hand Assemblies - 3.5K
- Search Results: coupler pin lock
- Search Results: shunt
- Shop: Trailer Hub and Drum Assembly - 3,500-lb Axles - 10" Diameter - 5 on 4-1/2 - Pre-Greased
- Shop: Trailer Hitch
- Q&A: How Much Clearance is Needed Between Gooseneck Trailer Overhang and Bed Rails
- Q&A: Do Self-Adjusting Trailer Brake Assemblies have to be Initially Adjusted
- Q&A: Comparing the eTrailer and Dexter Electric Trailer Brake Kits
- Video: etrailer Easy Grease Trailer Hub and Drums Installation - 2020 K-Z Sportsmen Classic Travel Trailer
- Q&A: Installing Leaf Springs on Single Axle Trailer
- Q&A: Replacement Motor and Linkage For Kwikee Steps 9010000220
- Q&A: Trouble Shooting New Dexter Brakes Only Being Broken In on One Side
- Q&A: Will Torflex Lift Kit for #11 Torflex Axles Work With 3,500 lb Axle
- Shop: Windshield Wiper Blades
- Shop: Suspension Enhancement
- Article: How to Adjust Your Trailer Brakes | The Ultimate Guide
- Video: Americana Trailer Wheel Center Cap Feature Review
- Video: Flair-It PEX Bypass Valve Fitting Review
- Video: Feature Breakdown: TruRyde Electric Trailer Brakes
- Video: TruRyde Electric Brake Assembly Review
Kate F.
11/17/2025
Hi Javier, how did the brake burnishing process go with your trailer brakes? Did following the steps from the article make the process feel smoother and give you more confidence in the results? Your update could make it easier for others who are nervous about doing this step.