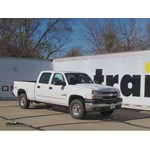
Brake Controller on 2005 Chevy Silverado Won't Apply Trailer Brakes With Brake Pedal
Updated 04/16/2016 | Published 04/15/2016
Question:
Hi there I have a 05 silvarodo 1500 and I am having issues with no brakes on trailer unless you are using the Manual override. I have checked the wires running to the box. No power being administered through the little red wire leading to box. I have a plug and play style wiring harness from gm. Now I dont know what could cause the issue. I have checked all fuses and all good. I dont know how to ckeck for power at brake switch. Is there a easy way to do this?
asked by: Lee B
Expert Reply:
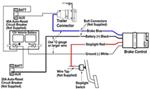
Let's begin by making sure you have the controller wired to the GM brake controller pigtail correctly.
The red pigtail wire connects to the black brake controller wire
The light blue pigtail wire connects to the red brake controller wire
The black pigtail wire connects to the white brake controller wire
The blue pigtail wire and the blue brake controller wire attach together
If the pigtail is correctly wired to the brake controller, then you'll want to check the CHMSL fuse. This fuse is located in the fuse box on the driver's side of the dash where it meets the door. Because the door to this fuse box can't be seen with the door closed, many folks overlook it. I've provided a photo showing where the fuse box is located and a diagram showing which fuse to check.
If the fuse is good, the third possibility is that your brake stoplamp switch is bad. GM trucks from the mid 2000s are know to have bad stoplamp switches. The white wire exiting the brake switch (located at top of brake pedal) should show power when the brake pedal is pressed. If it doesn't, and the fuse is good, the switch is bad and would need preplacing.
I've linked you to some FAQ articles about brake controllers that you might find helpful.


Product Page this Question was Asked From
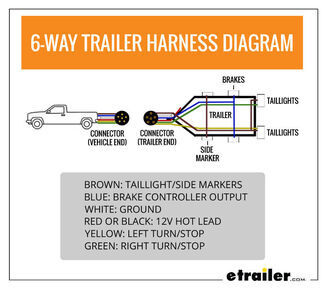
Pollak Replacement 7-Pole, RV-Style Trailer Connector Socket - Vehicle End

- Custom Fit Vehicle Wiring
- Trailer Hitch Wiring
- Vehicle End Connector
- 7 Blade
- Plug Only
- Pollak
more information >
Featured Help Information
Miscellaneous Media


Continue Researching
- Search Results: a60
- Search Results: 8~214
- Search Results: magnet clips
- Q&A: How to Determine the Correct Jack Height and Lift Needed for Replacement Trailer Jack
- Q&A: Best Replacement for a Jensen RV Stereo AWM910
- Video: DIY Installation for the Curt T-Connector Vehicle Wiring Harness - 2024 Kia Niro
- Video: Mount: Curt Trailer Hitch Receiver on a 2024 Kia Niro PHEV
- Search Results: 8~285
- Shop: Dexter Electric Trailer Brake Assembly - Self-Adjusting - 12-1/4" - Right Hand - 10,000 lbs
- Shop: Trailer Idler Hub Assembly for 3,500-lb Axles - 5 on 5 - Pre-Greased
- Shop: Dexter Trailer Hub and Drum Assembly - 5,200-lb to 7,000-lb Axles - 8 on 6-1/2 - Oil Bath
- Shop: Replacement Magnet Retaining Clips for 10" and 12" Electric Trailer Brakes - Qty 10
- Shop: Curt T-Connector Vehicle Wiring Harness with 4-Pole Flat Trailer Connector
- Shop: Dexter Nev-R-Adjust Electric Trailer Brakes - 12-1/4" - Left/Right Hand Assemblies - 10K
- Shop: Curt Trailer Hitch Receiver - Custom Fit - Class III - 2"
- Search Results: 8~219
- Search Results: slide out skis
- Search Results: backup camera
- Shop: Brake Controller
- Article: Our Team Picked The Best Camping Gear of the Year - Here Are Their Top Choices
- Shop: Suspension Enhancement
- Video: Comparing the Tekonsha Prodigy P3 and Redarc Tow-Pro Liberty Brake Controllers
- Video: An In-Depth Look at the Dexter Electric Trailer Brake Assembly
- Video: All About the Dexter Electric Trailer Brake Assembly-23-438
- Article: How to Install a Brake Controller on Chevrolet / GMC 1999-2006 Pickups
- Q&A: Brake Controller Quit Working On 2005 GMC Sierra 2500HD
- Article: Trailer Wiring Diagrams
- Q&A: Voyager Brake Control Wiring Diagram for Installation in a 2005 Chevrolet 1500 Silverado
- Article: Wiring Trailer Lights with a 7-Way Plug (It's Easier Than You Think)
- Q&A: P3 Brake Control Shows No Trailer Connected Even with Trailer Connected to 2002 Ford F-150

on Custom Fit Vehicle Wiring