
THIS ITEM IS NOT A FIT FOR
2018 Winnebago Minnie Winnie Motorhome
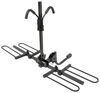
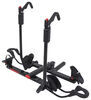
etrailer Trailer Hitch Receiver - Custom Fit - Matte Black Finish - Class III - 2"
Item # e59KR
Retail:$245.02
Our Price: $185.73
You Save: $59.29
2018 Winnebago Minnie Winnie Motorhome
Will this fit?
To see if this custom-fit item will work for you please tell us what vehicle you'll use it with.
This item qualifies for Free Shipping
In Stock


- All Info
- Reviews (12)
- Q & A (0)
- Videos (2)
- Photos
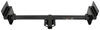
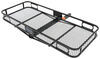
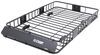
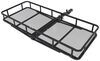
etrailer Trailer Hitch - e59KR
- Class III
- 2 Inch Hitch
- 3500 lbs GTW
- Concealed Cross Tube
- etrailer
- 525 lbs TW
- Custom Fit Hitch
This fully welded trailer hitch receiver bolts onto your vehicle's frame with no welding required. Matte black, powder coated steel is durable and corrosion resistant and creates a rugged look.
Features:
- Custom-fit trailer hitch lets you tow a trailer or carry a bike rack or cargo carrier with your vehicle
- Precision, robotic welding maximizes strength and improves fit
- Bolt-on installation - no welding required
- Complete hardware kit and installation instructions included
- Lifetime technical support from the experts at etrailer
- Matte black powder coat finish over protective base coat offers superior rust resistance
- Sturdy, square-tube design
- Ball mount, pin and clip sold separately
- Made in the USA
- Mounting hardware may be imported
Specs:
- Receiver opening: 2" x 2"
- Rating: Class III
- Maximum gross trailer weight: 3,500 lbs
- Maximum tongue weight: 525 lbs
- Not rated for use with weight distribution systems
- Limited lifetime warranty
Rugged, Matte Black Finish
The sturdy steel construction is protected with a matte black finish for added durability. This unique powder coating gives etrailer hitches a carbide-like appearance and a rugged look that sets them apart from traditional glossy hitches. In addition to being rust and corrosion resistant, the tough matte coating hides dirt, scuffs, and dings better than a glossy finish.


etrailer Technical Support
At etrailer we're committed to the products we sell, and to our customers. Our experienced and knowledgeable staff are available via both phone and email to address your questions and concerns for the lifetime of your hitch. The technicians at etrailer perform hitch installations on a daily basis, making them a valuable resource for do-it-yourselfers. The one-on-one, personal service you'll receive comes straight from an expert in the towing and automotive field. We've installed it, we've wired it and we've towed with it, so whatever your question, we can answer it.
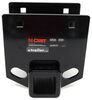
e59KR etrailer Class 3 Trailer Hitch Receiver - 2" - Matte Black Carbide
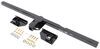
Installation Details
This Product Fits The Following Vehicles
- 2016 - 2018 Buick Envision


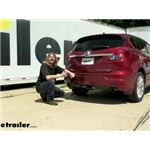
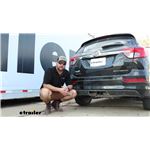
Video of etrailer Trailer Hitch Receiver - Custom Fit - Matte Black Finish - Class III - 2"


Videos are provided as a guide only. Refer to manufacturer installation instructions and specs for complete information.


Video Transcript for etrailer Class III Trailer Hitch Installation - 2017 Buick Envision
Hi there Buick owners, today in your 2017 Buick Envision, we're gonna be taking a look at, and showing you how to install Etrailers, class three, two inch trailer hitch receiver. And this is what our hitch looks like when it's installed. It is gonna be hidden completely behind the rear fascia. And you'll have an access cover here at the back that you can pull the panel off to reveal the hitch when you're ready to use it. We've just got the panel sitting here in the back of the vehicle. That way you can just store it in the rear compartment there.
So, when you're done towing, you can slap that cover back on and achieve a factory look, once again. So it's really cool that this hitch can be completely hidden. It does have a two inch by two inch receiver and it's a class three hitch. So it's gonna be great for all of your towing needs whether you're wanting to use this for accessories such as bike rack or cargo carriers or if you're wanting to get some work done throw a draw bar or ball mount in it, hook up a trailer and get some work done that way. You'll secure your accessories to your hitch with a five eights, hitch spinning clip.
Now one doesn't come included with the hitch, we've got plenty available here at Etrailer and I'd recommend locking ones to protect your investments. On bottom, we have hoop style safety chain loops with a very large opening that should accommodate just about every shape, size, and style of safety chain. You can see, we have no issue with our bigger one and our smaller chains here work very nice as well. So now I've got some measurements for you to help you when deciding on your accessories. From the center of our hitch pin hole to the edge of our rear bumper, we're right at about five inches.
That's important when determining if your accessories will contact the bumper when inserted into the hitch, and if they can be placed in the upright storage position without contacting the bumper. And from the ground to the top inside edge of our receiver tube, we're looking at right at about 15 and three quarters of an inch. And that's important if you need a drop, rise or raised shank on your accessories. And I will say with this hit here installed it is very close to the fascia. You should still be able to slide your accessories in, just be careful when going to slide them in cause it is so close that you do have the potential of scraping the bottom of your fascia right there.
Now that we've talked about some of the features of our hitch, why don't you follow along with us and we'll show you how to get it installed. We'll begin our installation here, underneath the rear of the vehicle. There are five bolts that we're gonna remove out of the bottom using a T-15 Torx. We're gonna start with the two in the center though, cause this cover here is removable, and we're gonna take that off. So zip bolt of those out of there, and then our paneling should just snap out of there. Sometimes you do need to check the tabs on the backside and release those, but in most cases it just kind of pulls down, just like that. So we'll just set this off to the side and then we'll get the rest of those bolts removed. And really the two that we have just on each side here we really don't necessarily need to remove those. We just need to get it to where it's released from the brackets here. So we can pull it back and flex that outta the way and get our hitch up. So now we're gonna remove the lowest nut on the stud here for our bumper beam right there at the bottom. We're gonna use a fifteen millimeter socket to do so. And we got those bolts removed from our shielding here. So if you need to peel that back out of the way just a little bit to get your tool up in there, go right ahead. After we zip it off this side, we're gonna head over to the other side and remove the same nut in the location located over here. Now we'll feed our bolts into position. This is the hole that we want our bolt to come out of right here and the larger one just a little bit further towards the front of the vehicle, is gonna be the hole we'll use as our access hole to get our hardware in. So take your fish wire. I put a little bit of a bend in it there, that'll just make it a little bit easier for us to go right in this hole and then come right back out the one next to it. And then on the opposite side, I also like to put a bend on here, and this just helps prevent my whole wire from pulling all the way through by accident. So now we're gonna take the end of that coiled wire here and slide on your spacer and thread on your carriage bolt. We can then take the spacer. We're gonna slide that up into the frame and then take our carriage bolt, follow that up right behind it. And that'll drop down just like that. On the other side of the vehicle, you're gonna have these same holes in the bottom of the frame. So we're gonna feed our carriage bolt in the same location over there on the passenger side. All right, so now with an extra set of hands, we're gonna feed our hitch into position. First, we need to get our fish wires fed through our pitch here and then we can get that up above the exhaust there. Now when we put our cross beam in here, we're gonna have to peel back on the face shell a little bit and work it around the bracket. There we go. And once you've got it around the bracket there, we just need to set it on top of the bolt that we had removed the nut from. And then if you just set it on top of there, just get your nut started by a turn or two and that'll hold our hitch up there, and make it easier to install the rest of our hardware. Now go back to the bolts that we had passed down, using our fish wire. Go ahead and take your fish wire off of there. Grab one of the flange nuts that come in your kit and thread it on the bolt. You do wanna be careful not to push the bolt up inside the frame, when you're doing this. So just be careful cause it can be easy. A lot of times I try to put side pressure and stuff on it if I can, but with this particular hitch, after you slide it on those bolts for the rear, you don't really have a lot of adjustment to be able to move this. So just very gently twist your nut onto your bolt. Here we go. And we'll do the same thing over on the other side. We can now go back and tighten our hardware down. So we're gonna go ahead and use a 19 millimeter for our nuts that we fed up for the carriage bolt and looks like where our exhaust is right here. We're probably gonna want to use a swivel on the end to be able to access that. And we'll snug down the other side. And we can grab our 15 millimeter once again that we had used to remove that bolt, or the nut here and go ahead and snug that back down. And now we'll torque our bolts to the specifications outlined in our instructions. And then we can reinstall the bolts that we had removed for our rear panel here. And you can either reinstall this panel or leave it removed, that's up to you. I would usually say if you're planning on using your hitch, leave it off. But if you don't plan on using your hitch very often, I would just go ahead and reinstall it and then you can always pull it down whenever you need it. That way your vehicle looks factory. So we're gonna go ahead and leave it off for now but you can see here that it would fully reinstall. We have no issues with clearance, that'll pop up in there And our hardware would line right back up. And that completes our installation of Etrailer's class three, two inch trailer hitch receiver, on our 2017 Buick Envision..
Customer Satisfaction Score:
97% were satisfied with this product
3% of customers were not satisfied
Customer Reviews
etrailer Trailer Hitch Receiver - Custom Fit - Matte Black Finish - Class III - 2" - e59KR
Average Customer Rating: 4.8 out of 5 stars (12 Customer Reviews)
This fully welded trailer hitch receiver bolts onto your vehicle's frame with no welding required. Matte black, powder coated steel is durable and corrosion resistant and creates a rugged look.by: DH04/26/2024
2017 Buick Envision
This receiver was a perfect fit for my 2017 Buick envision. Installation took me a couple hours (since I did not have a car lift available). The install instructions were accurate and simple to perform.
The installation process went exactly as advertised. I'm very pleased with this product!
by: Jeffrey A03/16/2024
2018 Buick Envision
Avg time estimate of 30 minutes would be appropriate with two peopl, electric or air tools and a lift. I did mine by myself using hand wrenches and the hitch is heavy enough to be ackward for one person. My install took one hour. Quality of the hitch and instructions is excellent. No out of spec holes, good alignment and nice finish. I would do another without hesitation. My primary use is a bike rack.
by: Cory 05/15/2024
2017 Buick Envision
Looking forward to using the new installed hitch. 4 bolts and a video to follow along. Perfect assembly with no issues.
by: Becky 02/21/2024
Quality products, easy to install
by: James 11/08/2023
2017 Buick Envision
Easy to install and looks great.
by: John 08/28/2023
very easy to order. Love the free shipp ing.
by: Robert 01/22/2023
Install easy works good
by: Adam10/12/2023
by: Henry 02/21/2024
by: Jahair04/30/2024
by: Alan 11/22/2023
by: Dave 03/08/2023
2018 Buick Envision
by: Jason06/29/2023
Product delivered as described. Easy installation for a novice installer. Would definitely recommend!


by: Donna 11/27/2023
Receiver went in, no problem! Very good instructions and the video was a big help too.
by: Stephen02/15/2019
Everything went exactly as expected. Took about an hour to install the hitch and wiring. I am pleased with this product.


by: Barbara 05/27/2023
The trailer hitch is tucked nicely under the car so it's not blaringly obvious. I bought this so I could use a bike rack. Since buying it and having it installed, I've used it once. With my bike rack, it's a little tricky getting the pin through the holes.
by: Tom 05/02/2023
The trailer hitch receiver along with it's instructions laid out the process needed to prep the car to receive the components. The install kit also provided a braided wire tool to allow threading a bolt up into the cars frame thru a small opening no ones hands could go thru. Exponentially simplifying the process. All bolting patterns matched the cars frame making the install quick. A plan came together nicely. Hitch works great.
by: Jim01/27/2018
Product is exactly as advertised. Nice fitting and easy install. Video showing actual install helps a-lot. Planning on using for bike rack I already owned. Would definitely recommend hitch.


by: Larry B05/08/2019
I bought the hitch and the bike rack and they both work excellent .


by: Russell07/22/2021
As soon as I got it, we put it on. Just went by directions. Had it on in 30 minutes. Great buy!


by: James 08/24/2023
The ordering process was easy, the videos and product descriptions were exact, and the price was the best I could find. Quality products and a great experience! I plan to be a repeat customer!
by: Debra 07/16/2021
Only took half an hour to install,I like that it is hidden when not carring my bike rack. Delivery was very prompt.
by: Thomas 04/12/2023
Assembled nicely. Had to modify facia cover to replace back on vehicle, no Biggy just cutting some material to fit.
by: Robert 10/11/2022
The Curt Trailer hitch receiver was well built and easy to install. I highly recommend it.
by: Gerald 05/08/2020
Just as described and very easy to install, no drilling cannot even tell car has hitch on it.
25
118
Show More Reviews
See what our Experts say about this etrailer Trailer Hitch
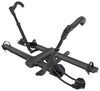
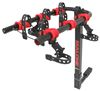
- 2017 Buick Envision Trailer Hitch Recommendation for a Bike RackI recommend going with the etrailer Trailer Hitch Receiver # e59KR for your 2017 Buick Envision because it has a matte black finish that blends in with any black trim on your vehicle and does a great job at hiding any scratches that might happen from road debris. If you don't already have a bike rack then I recommend the Kuat NV 2.0 # NV22G because it's a solid rack with a good reputation and attaching it to your trailer hitch will be easy since you just have a simple locking hitch pin....
view full answer...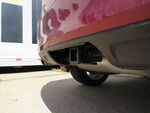
Info for this part was:

Edited by:
Lindsey S

Video Edited:
Jacob T

Video Edited:
Chris R

Test Fit:
David F

Test Fit:
Jacob H

Test Fit:
Ryan G

Video by:
Thomas T

Video by:
Rick G

Written by:
Justice A
At etrailer.com we provide the best information available about the products we sell. We take the quality of our information seriously so that you can get the right part the first time. Let us know if anything is missing or if you have any questions.
Product Experts Available Now!
Call 1-800-940-8924
Thank you! Your comment has been submitted successfully. You should be able to view your question/comment here within a few days.
Error submitting comment. Please try again momentarily.