


To see if this custom-fit item will work for you please tell us what vehicle you'll use it with.
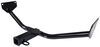
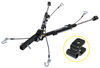
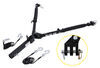
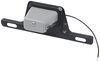
This custom-fit base plate kit lets you hook up your tow bar to your vehicle. Tabless design provides a clean, unobtrusive look for your towed car even when not hooked up. Simple bolt-on installation.
Features:
Specs:
Setting up these tabless base plates for use with your Demco tow bar is fast and easy. They easily bolt onto the ends of your tow bar. And because the tabs remain on your tow bar at all times instead of protruding from your vehicle, your car maintains a clean look when it's not being towed.
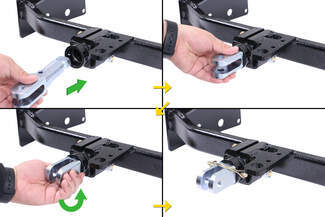
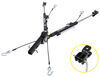
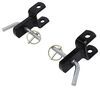
Using the Demco Tabless base plates to attach and remove your tow bar couldn't be easier. With the base plate tabs attached to your tow bar arms, simply insert the tabs into the receivers on your vehicle and twist to lock them in place. Insert the included pull pins to add an extra layer of security, ensuring the tabs stay put. To remove each arm, simply tug the pull pin to disengage the lock, twist the tow bar arm, and pull the tab out of the bracket.
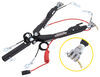
Keep dirt and debris out of the base plate receivers with the included covers. These high-density polyethylene covers easily snap into place over each pull point when your tow bar is not attached. Limiting internal corrosion makes it easier to slide the tabs in and out and helps to prevent seizing so that the tabs don't get stuck.
Demco makes adapters for use with other tow bars so that you don't have to go through the added hassle and expense of replacing your tow bar when outfitting your new towed car with base plates.
| Type of Tow Bar | Adapter |
|---|---|
| Roadmaster Tracker, Falcon 2, Falcon All-Terrain, Blackhawk, Blackhawk All-Terrain, and Sterling tow bars with serial numbers up to 14,500 | DM9523036 |
| Roadmaster Nighthawk All-Terrain, Sterling All-Terrain, and Sterling tow bars with serial numbers 14,501 and above | DM9523062 |
| Roadmaster Eagle and Eagle 8000 | DM9523014 |
| Roadmaster Falcon 5250 | DM9523023 |
| Blue Ox | No adapter needed |
| etrailer | No adapter needed |
| Demco Kwik-Tow | No adapter needed |
| Curt Rambler | No adapter needed |
California residents: click here
Videos are provided as a guide only. Refer to manufacturer installation instructions and specs for complete information.
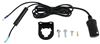
Hey, everyone, Ryan here at etrailer. Today on our 2024 Chevy Trax, we're gonna be showing you how to install the Demco base plate kit with removable arms. Before we do that though, let's take a minute, we'll check this out and make sure it's going to be the right base plate for you. Before we jump right in, I figured I'd address one of the main questions that we get asked in regards to setting up these flat tows, and that's what are the main parts that I'm gonna need. So there's a total of five main components. You'll have your base plate, your tow bar, your safety cables, your tow bar wiring, and your supplemental braking system.
And with the Trax, GM also recommends or requires rather, that you disconnect the battery whenever you're flat towing. And so to make that a little bit easier, you could always pick up an automatic battery disconnect switch as well. This is how the front of your Trax could look whenever you're not hooked up and flat towing down the road. And I think that's important because you're not always gonna be pulling the vehicle behind the motor home, right And when it comes to this base plate, I think they did a pretty good job of keeping everything clean and organized. It doesn't really look out of place there isn't super noticeable.
The matte black finish kind of helps it blend in and match some of the other plastic pieces on the vehicle. And compared to some of the other base plates available, when it comes to the appearance, they're all pretty similar. Honestly, I wouldn't say one has an advantage over the other when it comes to the looks. So can't really go wrong with any of 'em as far as that goes. Whenever you are ready to hook up to the motor home, what you're gonna do, you take these little caps, pop them out, which I do think it's nice that they include these and it helps with the looks and keeps the inside protected, right, from debris and stuff like that.
That way it'll stay easy to use in the future. But you'll take these removal arms, put them in, rotate 'em about a quarter turn and everything will line up. You'll take the pin and clip. Lock that in. (clip clicks) Same exact deal over here on this side.
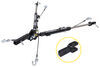
Once the arms are in, that's gonna give us the connection point that we need to hook our tow bar up. So in order to do that, you take the end of the tow bar, you'll line it up and then we'll put in the pin and clip. And the safety chain openings are pretty easy to get to and large enough to allow you to use pretty much any size hook that your cable might have on it. With that said though, this is what your vehicle can look like whenever you are hooked up to your motor home and flat towing it down the road. And I like it. Everything is fairly well organized, easy to see and get to even though everything is a little tight. But that's just kind of the nature of how this is gonna be set up on a vehicle like the Trax. It's a little on the smaller side, so you don't have a ton of room. But yeah, like I said, easy to see and get to and everything like that. The base plate is going to fit all the different submodels of the Trax with the exception of the active models. So whether you got an RS like we do today, an LT, LS, all those different types of models, this will bolt up and give you that attachment point that you need. One of the nice things about this particular base plate is how versatile it is. So it's going to be compatible right out of the box with a lot of different brands of tow bars. So we have the Demco Dominator tow bar paired up perfectly. It'll work with all the other Demco tow bars, etrailer.com tow bars, Blue Ox tow bars, Curt tow bars, and even if you happen to have a tow, we already, let's say maybe a Roadmaster for example, you wanna hold onto it and use it. Chances are really good you can still make it work by picking up an adapter end that lets you change everything over and allow you to hook it up to this particular base plate. One of the things that I do wanna mention is the use of what's called a high-low adapter, which you may or may not need. It just kind of depends on your particular situation and setup. But one thing I can tell you is the vehicle side of things and how to figure out if you're gonna need a high-low adapter, which is a piece that goes into the back of your motor home's hitch. It'll either lower or raise a connection point where your tow bar plugs into. And the whole reason being is you want the tow bar to be level or within a particular safe zone if you will. That way you'll get maximum performance outta your tow bar, less wear and tear on your vehicle suspension and tires and things like that. So on our vehicle what you'd want to do is measure. And we'll go from the center of the pinhole here down to the ground. And it's 15 inches on our RS model. And you'd want to do the same thing to your motor home. Center of the hitch pin hole down to the ground. And if that measurement exceeds three inches, you know, three inch difference. And that's when you need a high-low adapter. 90% of the time we'll need one with a drop in it. Motor home usually sits up higher, right So that's how you can figure that out. For example, ours has a four inch difference, but because the Demco Dominator has a drop, inch and a half drop, we didn't have to use an additional high-low. But if there was a significant difference in that inch and a half built-in drop that this tow bar has, didn't cover that spread, then you could always get a two inch or four inch drop to accommodate that. So just something I wanted to mention and try to help you out as far as figuring out if you're gonna need one or not. So when it comes down to it, a pretty nice setup. It looks good and works with a lot of different tow bars. As far as the installation goes, it's definitely time consuming. You do have to remove the front fascia and do a little bit of drilling. Nothing super complicated. Like I said, it just takes a little bit of time. With that said though, if this is something that you know you don't wanna mess with, have a place to work on it, whatever the case may be, you can always use our dealer locator network and that can help you find a shop in your neighborhood that can do something like this for you. But if you're gonna give it a go, hang around. We'll go ahead, pull into the garage and get started on it now. To begin our installation, we're gonna be here at the front of our Trax and you can pop the hood. Along this cover here, we're gonna have a total of six fasteners, three on each side. And they're gonna have a T15 torx bit head. So, we'll get these all removed. (drill motor buzzing) From this point on too, whatever we do to one side of our vehicle, we're also gonna do to the other side. So, you set up the same way. (drill motor buzzing) Can move to your wheel walls now and it definitely helps if you turn the tire out. It gives you more room to work. But we'll have some fasteners we need to remove. First one being up here, it's just a push pin type fastener. So you can take a screwdriver, trim tool, pry down on the head of it, then you can pull the whole thing out. And along the edge we're just gonna be some T15 screws. (drill motor buzzing) I believe a total of three. (drill motor buzzing) And there'll be one more kind of tucked in almost behind the wheel. Here's that other one that I just mentioned. (drill motor buzzing) It's a T15 as well. Underneath of our vehicle, right here we're gonna have a couple T15 fasteners. (drill motor buzzing) And these three are holding on this little air dam deflector piece. (drill motor buzzing) I will set that aside and we can pull these three out. (drill motor buzzing) We are gonna have another T15 right here. (drill motor buzzing) And one in the center. We can switch out for a seven millimeter socket. We'll have three bolts along the back edge and one push pin fastener as well. So just like the one we removed from the wheel wells, work the same way, pry down on the head, pull the base out. Back to your wheel wells. We're gonna have to remove this little plastic trim piece to get to a fastener that's behind it. So, if you grab on the liner. Kind of peel that out of the way. This is held in place by some push pin fasteners. And I just like to kind of grab it and work it and start to kinda loosen everything up. And it's gonna be pretty tricky to see and I'm doing here, so I kinda have to explain it. But you can come in from the back and kinda squeeze the fasteners. And while you're squeezing and apply some outward pressure and we'll start to release. So once we get a couple more going it can peel us away somewhere. I'll show you what I'm doing back here. You need to just go about halfway up with this. This is kind of a better look at those fasteners. So I was doing, you know, come in from the back and I'm kind of putting a little bit of forward pressure on this, right Pushing it into the car deeper. And then while I'm doing that I come in in the back there, kinda squeeze this and then while you're doing that then you can start to pull this out and it'll release. If you have to, you can come in with a pair of needle nose or something too to give you a little extra leverage. But we'll just continue up until it's about halfway off here. Peel this back and that's the fastener that we need to remove. It's a seven millimeter. Thing I forgot to mention too, in case you're wondering. All this tape that I put on here, it's just just painter's tape. And I do that. That way while we're working in this area, we don't actually accidentally scratch anything. You can do that if you'd like. And a good way to keep this piece of trim pulled away too. If you take a piece of foam or a rag or something, put that in there. It kind of gives you a little more working room. We can get our fascia removed now. Definitely helps if you can have someone give you a hand with this part. And what you wanna do is just start at the corner. And these just unsnap from the vehicle. Just gonna take your time with it. Get each side about this point and then you kind of lift up on this. Okay, that way it'll clear everything. I pull it off. You may or may not have some wiring connected. And in our case it looks like over here on the driver's side you will have a connector down there. Here's the connector. We'll just push back on that red tab and then down on the center to release it. And then this little piece, it's just a piece of plastic kind of keeping this all in. Ideally come back with a trim tool and get this out, which I might have to do. I don't wanna break this by prying on it with my hand. So I'll grab that real quick. It should make it a little bit easier. And honestly you might even be able to get in here before you take the fascia off and remove this if you need to. Might be worth checking. But I think that's it and we should be clear now. Get the fascia off and set off to the side. We need to trim a little portion of this plastic off of our vehicle. There's a diagram of instructions. I marked everything out here. I like to use a multi-tool to trim this plastic. It just cuts it nice. But a pair of Snaps or Dremel tool will work as well. (multi-tool buzzing) (multi-tool buzzing continues) If you look at your bumper beam, on each side of it, there's gonna be four bolts holding it in place. They're 15 millimeter head and we'll get these removed. (drill motor buzzing) The beam will still be in place when we pull all these out. There's little brackets that hold it up. You don't need to worry about removing them. We kind of want it to hang here. (drill motor buzzing) What I've done, I took our base plate and roughly put it into position just to see how it's gonna fit. And something that is pretty obvious right off the bat is that it was hitting these additional full support pieces that are in here. I mean really no way around it. We had to cut all these out. That way this is wide open, and we won't have any interference. We'll grab our base plate. (base plate clanks) And roll that into position there. For now, we'll just take one of the factory bumper beam bolts and just get it started hand tight. You can move over here to the passenger side of her vehicle and we have our washer fluid reservoir. We're gonna have to kind of move this out of the way. It'll make stuff a lot easier. So we'll first start by coming to the filler tube and there's a push pin fastener there. We can work that out and then we should be able to just kind of grab the tube, work it back and forth, and pull it completely out. It's gonna be a handful of fasteners securing the washer fluid reservoir to the vehicle. One of them is right here, it's a 10 millimeter nut. We'll go ahead and pull that off. Definitely a little tight but that's all right. And then there's another one kinda tucked inside down there. The other one, it's right there. It's a 10 millimeter as well. (drill motor buzzing) It looks like we'll have one more. On the side over here. There's that final 10 millimeter nut. (drill motor buzzing) With all the fasteners out, what I did, I just took the reservoir, kind of lifted it up and over off the frame of the vehicle and then just took a bungee cord and secured it outta the way. It just gives us a little bit more room to work over here. Over here on the driver's side we're gonna have a wiring harness. It's connected to the frame. We'll just use a trim tool to break that free. And then just kind of lift up and out on this lets you remove it there. And again, we'll just kind of tuck that off to the side. You can look now. So this little opening there, inside of it you'll see two holes in there. And what you can do, take one of the bolts that they give you in the kit and just see if the factory holes are large enough, so that bolt will pass through. In our case, they are. If your vehicle happens to have a hole that's too small for that bolt to pass through, then you can simply just drill that portion out or that opening out to the size indicated in the instructions. What you can do now is take one of these bolts. I have a 14 millimeter socket, you can use a 9/16s too. And I just take a little piece of paper towel. Do one of these deals. And the reason for the paper towel is now that bolt isn't gonna fall out or anything, right It's solid in there. And you'll put a bolt through each one of these holes and line it up with this bracket. So the bracket, it's not gonna set like that, it's gonna sit on the inside portion on the backside rather. We will line everything up, push the bolt through the frame and through the bracket. The other side where the bolt comes out, we can get a nut started on it. What you wanna do too, all the hardware that we're gonna use is secure the base plate. It's gonna receive some of this blue Loctite, so put that on the threads. And then I'm just going to have a nut. And go ahead and get this started hand tight. I got the other attachment points started as well using that same exact hardware combination that we used here on the top. The other end of that bracket, that's gonna line with these two holes in our base plate. Use that same exact hardware combination that we just did. We'll put our bolts through, hold them in place. And then take the nuts, same ones, and get 'em started. You wanna come back to our bumper beam and we'll line everything up. Take one of the factory bolts, put your Loctite on it. Get that started. And that one that we originally put in, what we'll do is remove it. (drill motor buzzing) That way you can put some Loctite on the threads and get it, reinstall 'em. (drill motor buzzing) Let's snug all these down. I like to hit 'em, one a couple times to kind of help draw everything in evenly. Now at this point you can grab your 9/16s and tighten up these bolts. (drill motor buzzing) And we'll do the same for the ones back here. (drill motor buzzing) Once all this hardware snug, you wanna make sure to come back with a torque wrench and completely tighten everything down to the amount specified in the instructions. (torque wrench clicking) The base plate is gonna come with some safety cables and so what I done on each side, I just stick the cable, bent it in half, you know, fold it in half, attached the ends to the provided D link, put the D link through a little hole in the base plate and then I just wrapped them around our frame. Put the other end of it through that D link. And one thing I like to do is come back with a few zip ties and just kind of secure everything. That way it stays put and it's not gonna rattle or clunk around. On the passenger side, I reinstalled our washer fluid tank the opposite way that we removed it earlier. And now would be a great time to install any of your other flat towing components like your braking system or your tow bar wiring. And I say it because with the fascia removed we have a lot more room to work. So that's exactly what I'm gonna do. And once we have that wrapped up we can come back and figure out how to get our fascia back on if you need to trim it or anything like that. I got our other components set up and we're ready to get the fascia back on now. I think what I'm gonna do is take our fascia, we'll set it on the vehicle and kind of trim as needed. It don't look like we should have to take out a whole lot. But one thing I did do, they give you this bracket here that allows you to mount up your wiring and things like that. And on the bottom of our license plate frame, it's pretty solid, believe it or not. And so I just utilized that, I took our bracket, made a couple holes in it and used some nuts and bolts to secure that down. So we'll grab our fascia and just start to line everything up. And just roughly get it into position here. I'm holding the fascia in place. It looks like everything is centered and shouldn't have to trim out too much. I just made a couple marks. I think I'm gonna go from here to here on each side and we'll see if the fascia wants to slide on a little bit more. If not, not a huge deal. We'll come back and cut out a little bit more plastic, but you can always remove material, right It's a lot harder to put back. So, go ahead. I'm just gonna use a multi-tool and we'll get this trimmed out. (multi-tool buzzing) So, that fits on there good. I'm gonna come back, trim off this little piece here that's kind of hanging me up. Didn't really have to do much more trimming. Really just from, you know, right here and over a little bit, cut, push a fascia on, cut a little bit more and went from there. It's all popped back into position now. And at this point we can simply just resecure it the opposite way that we removed it. I'll go ahead and get that done. And if I run into any issues or anything that gives me trouble, we'll touch base on it then. I got everything back together, didn't run into any issues or anything like that. And with that wrapped up, that'll do it for our look at and our installation of the Demco base plate kit on our 2024 Chevrolet Trax.

Do you have a question about this Tow Bar Base Plate?
Info for this part was:
At etrailer.com we provide the best information available about the products we sell. We take the quality of our information seriously so that you can get the right part the first time. Let us know if anything is missing or if you have any questions.


Thank you! Your comment has been submitted successfully. You should be able to view your question/comment here within a few days.
Error submitting comment. Please try again momentarily.