
To see if this custom-fit item will work for you please tell us what vehicle you'll use it with.
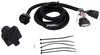
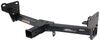
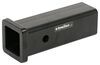
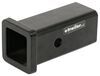
This fully welded trailer hitch receiver bolts onto your vehicle's frame with no welding required. Textured black powder coat over e-coat shields against rust and corrosion. Mounting bracket for wiring is welded on for a clean look.
Features:
Specs:
At etrailer.com we're committed to the products we sell, and to our customers. Our experienced and knowledgeable staff are available via both phone and email to address your questions and concerns for the lifetime of your hitch. The technicians at etrailer perform hitch installations on a daily basis, making them a valuable resource for do-it-yourselfers. The one-on-one, personal service you'll receive comes straight from an expert in the towing and automotive field. We've installed it, we've wired it and we've towed with it, so whatever your question, we can answer it.

California residents: click here
Videos are provided as a guide only. Refer to manufacturer installation instructions and specs for complete information.
Hi, I am Daniel with etrailer, and today, we're gonna take a look at, I'm gonna try to install the Blue Ox Trailer Hitch on our 2018 Ford F-150. If you're wanting to get a hitch installed on your F-150, getting a bumper mount hitch is a good idea because they have an option right here. If you take this, you can put a ball mount here, but getting a 2-inch x 2-inch hitch receiver is a lot better. 'Cause you can put, basically, a variety of accessories back here, like bike racks, cargo carriers, or obviously, do some towing with it. When towing, it's important to know your max weight capacities. And for this hitch, the total towing is going to be 6,000 pounds.
That's gonna be your trailer plus what's inside of it, and the tongue weight is gonna be 900 pounds. That's the weight rushing down on the hitch. Now, this one is compatible with weight distribution systems, and that will actually pump those numbers up to 10,000 pounds, total towing, and 1,500 pounds, total tongue weight. Now, you will need a 5/8-inch pin and clip to secure your accessory in your hitch. I would recommend getting a locking pin, so you have that extra sense of security.
Nobody can come and take your accessory. When it comes to hooking up your safety cables, there's gonna be a welded plate with loops cut out, (clangs) and that can easily accept a Clevis style or an S-hook (clangs) safety cable. Now, to get you a couple measurements. So, from the ground to the top of the inside of the hitch receiver, it's gonna be about 20 inches. So, that'll help you level out a trailer and get a ball mount that's the right height.
And the next one is gonna be from the center of the hitch pin hole to the outside the bumper. That's be about three inches. So, that'll help you determine if you can fold up a bike rack or any folding accessories you might have and not hit your bumper. If you have any further questions about what hitch is gonna work best, feel free to reach out. I'd be happy to point in the right direction.
And as far as install goes, if you're not wanting to do this yourself, you can check out our dealer locator and find a professional in your area to get this installed for you. If you wanna do it yourself, follow along, and we'll walk you through it. Starting off, I've already removed our spare tires, we're gonna have some more room to work under here and over on our passenger side, there's a ground wire. I'm gonna use a 10-millimeter socket and get this removed. (power tool whirring) We can now get our hardware fished into the frame. We're gonna be using this hole near the rear and then the hole closest to the ground. So, I'll get my coiled end of the fish wire. And in the end of this, put my coiled end through the hole we're using and out this larger hole in the end. Now, I can take our spacer block and bolt, I'll thread this on. I'll push that through the frame, (clangs) and get it pulled up through the hole. Now, I'll just push this back just a little, so it'll leave room. We can put our hitch in place. Now, we can fish all of our hardware into the frame. And we're gonna be using this hole closest to the bumper, and this hole closest to the ground a little bit further back. I'm gonna take one of our fish wires. I'll take the coiled end, put it through the hole we're using and straight down. And there's a slot down there where that coiled end will come through. And I'll put our spacer block on and then our carriage bolt, and I'll thread this in, and I'll take the block, slide it up into the frame as well as our bolt, (bolt clanging) pulled through. And now, I'll just push it back just a little, so we can slide our hitch up. Once you've got those rear bolts fished through the bolts closest to the cab, you want to use this larger hole right in front of it to fish your hardware through. (bolt clanging) For that rear, bolt I'm gonna take one of our U-shaped spacers set around the bolt, and I'm actually gonna tape this, so it stays in place. So, I just have some packing tape. I'll try and get it centered. I'll use some more tape, and I'll tape our other spacer to the back of the hitch, line those holes up, and get this taped. (tape ripping) (tape crinkling) We'll just cut some of that tape away, so we can get our bolt in easy. And now, once you've taped everything up, we can lift this in place. I got Matt over here giving me a hand, so we can lift this up. We're gonna get our fish wires and put these through the corresponding holes. Now, we can lift it up. (hitch clanging) Once you get it up, you can pull our fish wires and once the bolts through on both sides, it'll hold the weight for us. Now, I'll take the fish wire, and take this off, and put a washer and a nut, and we'll do that for all of our hardware. Again, tighten and torque everything down. I have a 24-millimeter socket. Tighten everything up. (power tool whirring) Before you fully tighten everything down, we did notice it's a good idea to line up this bottom hole with that threaded hole that your ground bolt was in. So, I'm gonna take our ground wire, and we're gonna put this back. So, I'm gonna bend this tab flat and then your kit will come with new hardware. So, we'll get a split washer, a flat washer, put that through. I'll get this lined up and get this tightened in. (power tool whirring) And with that tightened down, we can go back and tighten the rest of our hardware. (power tool whirring) So, everything's snugged down. We can come back with a torque wrench (clanging) and torque it down to the specified instructions. And if you don't have a torque wrench at home, you can usually rent one (beeping) from a local auto parts store. (torque wrench clanging) Once you've torqued everything down, last thing to do is put your spare tire back up. Lower everything down, you can start using your Blue Ox Trailer Hitch on your 2018 Ford F-150.

The metal plates that went inside frames of truck were to short so I could tighten nuts to bolts bc they just spun around. I like hitch but it cost me alot of headaches trying to tighten hitch bolts. Feel free to compensate me $50 f my time and money spent to get it done.
Info for this part was:
At etrailer we provide the best information available about the products we sell. We take the quality of our information seriously so that you can get the right part the first time. Let us know if anything is missing or if you have any questions.


Thank you! Your comment has been submitted successfully. You should be able to view your question/comment here within a few days.
Error submitting comment. Please try again momentarily.