
# 1
Thule Passage Trunk Bike Rack for 2 Bikes - Hanging Style
Really fast and information about shipping was right on!! Would not hasitate to use again!!

great! works really well, and a lot easier to attach than I anticipated. We drove with bikes across the country from south west all the way to North east. solid rack!
# 2
Swagman XC2 Bike Rack for 2 bikes - 1-1/4" and 2" Hitches - Frame Mount
Rack was easy to assemble and holds the bikes well. even the comfort bike fits. Only problem I had was that the 2 inch adapter was installed and the bolt holding it was really tight. If you don't have quality allen heads it could be hard to remove. This could have been an isolated instance.
I am very happy with the product. It was very easy to put together and to install on the vehicle,and thanks for all your help
# 3
Swagman XTC2 Bike Rack for 2 Bikes - 1-1/4" and 2" Hitches - Frame Mount
I haven’t opened the box yet, but my experience with e trailer was very smooth and fast with a very fair price.
I was sent additional mounting materials that don't correspond with my hitch or my bike rack. See the photo below. Are these materials for my Swagman STC2 Bike Rack Item #S64670?
# 4
Thule Passage 3 Bike Carrier - Trunk Mount
This is definitely more of a 2 bike carrier vs 3 bikes. I had to take the front wheels off two bikes to get three bikes on this carrier. Also, it rubbed the paint off on the trunk of my Subaru legacy.
Way too light duty for what is advertised. It seemed to be made out of 1/2 inch electrical conduit. I would never put three bikes on that rack. I only had two bikes on the rack. While on trip through Idaho the wind was so strong that one of the bikes partially blew off the rack. We traveled 1,800 miles and upon arriving home I actually sawed the bike rack up and threw it away so that no one else would use it and cause an accident. I've already found a different brand that is HEAVY DUTY and I will stick with that brand.
# 5
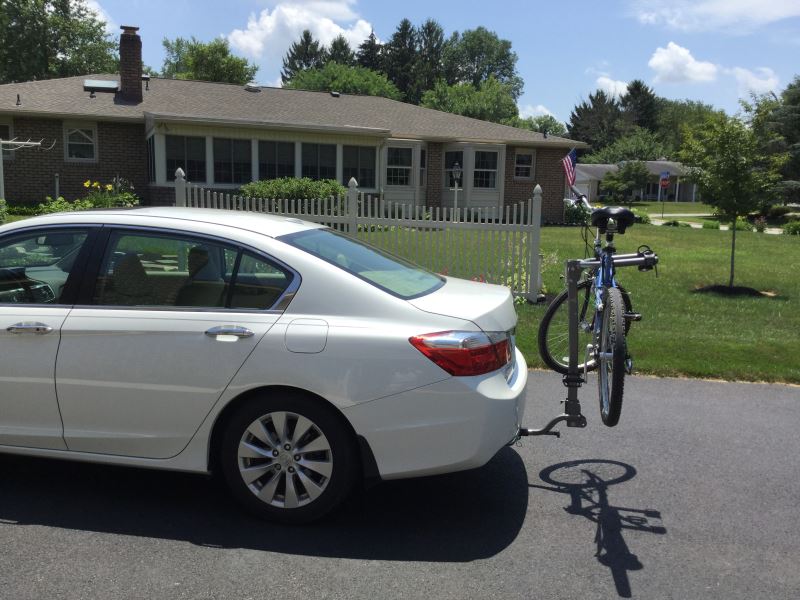
Kuat Beta Bike Rack for 2 Bikes - 1-1/4" Hitches - Tilting
The quality of the bike rack was excellent, but I was unable to use it because I couldn't open and close my trunk (Honda Accord 2012) when the bike rack was closed. It may have worked if I had a different trailer hitch, but I didn't want to spend the extra money on a new trailer hitch. Unfortunately, I will need to return the bike rack.
I was looking for a light weight bike rack for my 2015 Honda Accord. Your videos stated that the Kuat Beta was light and easy to install. You were right. I opened the box, read the instructions, and had it installed in about 10 minutes. I don't use a rack lock. It is so easy to pop on and off the hitch that I keep the rack in my car trunk.
# 6
Kuat Trio Roof Bike Rack - Fork Mount - Clamp On - Aluminum - Black and Polished Chrome
Installed all products after having watched videos and read through pdf instructions. The Yakima JetStream roof rack system is outstanding (with one exception) - instructions and videos facilitated the installation. The Yakima system is the only one I could find for my car (Mercedes E450 Coupe), as the car's panorama roof glass extends to the edges near the fixed mounts. The Yakima system is quiet, thanks to the ability to modify the crossbar pitch angles, and has a high-quality appearance that complements my car. And it is rock solid. The Kuat Trio bike tray is an outstanding low-cost, simple solution - well-designed and well-executed and installs to the Yakima JetStream bars flawlessly. I would recommend that Kuat include a 12mm x 100mm thru-axle in the Trio kit, as I had to purchase that part separately. Only disappointment is in the Yakima Landing Pad Covers that ship with the Landing Pad 22 (LP 22) kit. The covers do not snap tightly into place, and appear as if they were designed for a different Landing Pad. In summary, my Yakima/Kuat bicycle roof rack system exceeds expectations (except for the LP 22 Covers), operates flawlessly, looks great, and stores easily. It has given me high confidence in Yakima, in Kuat and in etrailer.com. Well done.
Product arrived quickly, and with all the necessary parts and pieces. Installation was quick and easy, and the product performs exactly as I had hoped.
# 7
Swagman Upright Bike Rack for 1 Bike - Roof Rack Crossbars - Frame Mount
I bought a couple of these for my new OEM VW roof rack with elliptical bars for my 01 Jetta. They fit nice, are made better than expected, and were easy to install, requiring only a 10mm and 12mm ratchet. I will be retrofitting thule lock cores into the the locking knobs on these bike carriers so that i can match the key to my roof rack. I haven't had a chance to put a bike on them yet, but will definitely be taking a bike ride this weekend.
Great product for the price. Pretty easy to set up. Only issue I have is my mountain bike, which is an XL frame with 27 inch wheels, is pushing the limits of the base. Wish this rack was just 4-5 inches longer that way you have the perfect overlap amount in the middle without pushing the current frame to the limits. With that said it does hold my bike just have to find the sweet spot. But this fits my son’s youth bike perfectly!
# 8
Yakima RidgeBack Bike Rack for 4 Bikes - 1-1/4" and 2" Hitches - Tilting
Check out my other review on the hidden hitch for a 2015 BMW 4 Series for the majority of the review, but this thing is great. Easy setup and install, does all the things it's supposed to do. Mounting and removing bikes is a snap with the included clips (big difference from some of the cheaper variants with nylon ratchet straps). Fits very snugly in my 2" receiver, and pretty solid on the highway and over bumpy roads.
This is a great bicycle rack that is well built. When I received the rack, the box was damaged from shipping and the lock keys were missing. I contacted the staff at etrailer and they were incredibly quick to provide a solution. Awesome customer service! Will gladly do business with etrailer again.
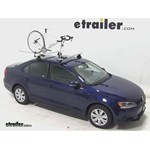
DIY 2014 Volkswagen Jetta Installation for the Thule Passage Trunk Bike Rack for 2 Bikes
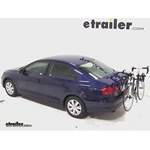
Today on our 2014 Volkswagen Jetta, we'll be test fitting the Thule Passage trunk mounted 2-bike rack, part #TH910XT. With the fit dial to #7 according to the included instructions we'll begin our test fit by placing the bike rack up onto the vehicle's trunk. The bottom part of the bike rack should rest on the upper tier of the rear bumper. We'll now take the top clips and hook them to the top part of the trunk, the side clips to side part of the trunk and the bottom clips to the bottom part of the trunk. We'll then loosely tighten them down to get them in place. Once the straps are in place and the bike rack can support itself, we'll fully tighten them down securing the bike rack to the trunk. After the securing the excess slack, we're ready to load up our bike. With the cradle straps already undone we'll simply place our bike into the frame cradles, bring the rubber coated straps around the frame and secure them. And with our bike all loaded up that will complete today's test fit for the Thule Passage, part #TH910XT, on our 2014 Volkswagen Jetta.
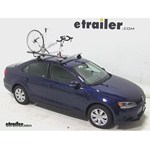
Thule Gateway Trunk Mount Bike Rack Review - 2014 Volkswagen Jetta
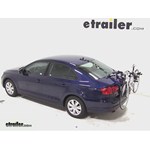
Today, on our 2014 Volkswagen Jetta, we'll be test-fitting the Thule Gateway trunk mounted 2 bike rack, part number TH9006XT. With the fit dial set to number seven, according to the included instructions, we'll begin our test fit by placing the bike rack up onto the vehicle's trunk. The bottom portion will rest on the upper tier of the bumper. We'll then take the top clips and hook them to the top part of the trunk, the side clips to the side part of the trunk, and the bottom clips to the bottom part of the trunk. We'll then tighten down the blue straps to secure the clips to the vehicle. Once everything is all tightened down and secure, we'll go ahead and secure the excess strap with the included hook-and-loop fasteners. With this done and our bike rack secure, we're ready to load up our bike.
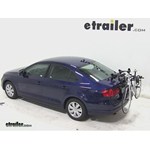
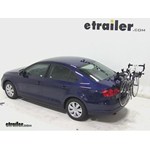
Thule Archway Trunk Mount Bike Rack Review - 2014 Volkswagen Jetta

Today, on our 2014 Volkswagen Jetta, we'll be test fitting a Thule Archway trunk mounted 2 bike rake, part number TH9009XT.With the fit dial set to number 7, according to the included instructions, we'll begin our test fit by placing the bottom part of the bike rack on the upper tier of the rear bumper. This will allow the top portion of the bike rack to rest on the top part of the trunk.We'll now take the top clips and hook them on the top part of the trunk, the side clips to the side part of the trunk, and the bottom clips to the bottom part of the trunk. We'll then tighten down the straps to secure the bike rack to the vehicle.With the bike rack secured, we'll go ahead and secure the excess strap with the included hook and loop fasteners. Now with this done, we're ready to load up our bike. We'll flip out the gray levers on the left and right hand side of the bike rack to swing out our cradle arms.Keep in mind, the cradle arms do need to be level or slightly angled up. With the cradle arms in position, we'll simply snap down the gray levers.
Thule Big Mouth Roof Bike Rack Review - 2014 Volkswagen Jetta
Today on our 2014 Volkswagen Jetta, we'll be test fitting the Thule Big Mouth Roof-Mounted Bike Rack, part number TH599XTR. With a Thule traverse track system on our vehicle, we'll begin our test fit by first placing the bike rack up onto the vehicle's load bars. Starting at the front, we'll position the L-brackets to go around the underside of the front bar. We'll then insert the T-bolt into the slot of the L-bracket. We'll then loosely tighten the black wing nuts. We'll now move to the rear, where we will remove a wing nut to position the bracket around the underside of the rear bar. We'll then re-install our black wing nut, making sure it is loose.
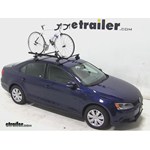
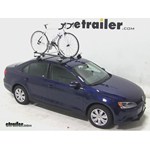
Setting up the Swagman Upright Bike Rack for 1 Bike on a 2014 Volkswagen Jetta

Today on our 2014 Volkswagen Jetta, we'll be test fitting the Swagman upright roof mounted bike rack, part number S64720. With our thule rapid traversed roof rack system on our vehicle, we'll begin our test fit by placing the bike rack up onto the vehicles load bars. Starting at the front, we'll take the silver U bolts to go in the underside of the front bar and up through the predrilled holes to the front of the bike rack. We'll then take our black wing knots to thread down onto the silver U bolts. We'll then repeat the same process for the other side. Now moving through the rear of the bike rack, this time we'll take the silver U bolt and slide it down through the predrileld holes of the bike rack. We'll take the black plate to go on the underside of the rear bar and use our black wing knots to tighten it down.
Setting up the Swagman Fork Down Roof Mounted Bike Carrier on your 2014 Volkswagen Jetta

Today on our 2014 Volkswagen Jetta, we'll be test fitting the Swagman fork down roof mounted bike rack, part number S64710. With the thule rapid traversed roof rack system on our vehicle, we'll begin our test fit by placing the bike rack up onto the vehicles load bars. Starting at the front, we'll take the silver U bolts to go on the underside of the front bar up to the predrilled holes to the front of the bike rack. We'll then take our black wing knots to thread down onto the silver U bolts. We'll repeat the same process for the other side. Now moving to the rear, we'll take the silver U bolts to go on top of the bike rack through the predrilled holes. We'll take the black plate to go on the underside of the rear bar and we'll use the black wing knots to tighten it down.
SportRack Roof Mounted Bike Rack Review - 2014 Volkswagen Jetta

Today on our 2014 Volkswagen Jetta we'll be test fitting the Sportrack Roof Mounted Bike Rack, Part #SR4622. With a Thule rapid reverse roof rack system on our vehicle, we'll begin our test fit by placing the bike rack up onto to the vehicles load bars. Here at the front of the bike rack, we'll take the rubber coated U-bolts to go around the underside of the front bar, up through the pre-drilled holes at the head of the bike rack. We'll then take our black wing nuts to thread down onto the U-bolt. We'll then repeat the same process for the other side. Here at the rear of the bike rack, we'll take the black bracket which will go in between the top of the rear load bar and the bottom of the bike rack. We'll then insert our black bolts through the pre-drilled holes of the bike rack and the bracket. We'll take the rubber coated steel bracket around the underside of the rear bar, making sure the bolts go through the pre-drilled holes. We'll then use the black wing nuts to thread onto the bolts and tighten it down. Now we're ready to load our bike.
SportRack Frame Mount Roof Mounted Bike Rack Review - 2014 Volkswagen Jetta
Today our 2014 Volkswagen Jetta, we'll be test fitting the sport rack roof mounted bike rack part number Sr4611. With the Thule rapids reverse roof rack system on our vehicle, we'll begin our test fit by placing the bike rack up onto the vehicle's load bars. Starting there at the front, we'll take the rubber coated U-bolts around the underside of the front bar, up through the pre-drilled holes of the bike rack. We'll then take our black ring nuts to threat down onto our U-bolts. Now moving to the rear, we'll take the thick black bracket to go in between the bottom of the bike rack and the top of the load bar. We'll then take our black bolts to go down through the pre-drilled holes of both the bike rack and the bracket. We'll then take the rubber coated steel plate to go on the underside of the rear load bar and use the wing nuts to tighten it down. Once everything is all tightened down and secured, we're ready to load up our bike.
RockyMounts TieRod Roof Bike Rack Review - 2014 Volkswagen Jetta

Today on our 2014 Volkswagen Jetta, we'll be test fitting the Rockymounts TieRod roof mounted bike rack, part number RKY1014. With the Thule Rapid Traverse roof rack system on our vehicle, we'll begin our test fit by placing the bike rack up onto our vehicle's load bars. We'll start off by removing the black plastic cover at the front of the bike rack and bring the rubber coated straps around the underside of the front bar. We'll then hook them into the connection points, and move to the rear of the bike rack. We'll use the included Allen wrench to remove one of the Allen bolts to position the rear bracket around the underside of the rear bar. We'll then reinstall our Allen bolt and tighten down using an Allen wrench. Moving back up to the front, we'll use the included Allen wrench to tighten down the silver bolt to tighten down the straps up against the front bar.
RockyMounts TieRod Stretch Roof Bike Rack Review - 2014 Volkswagen Jetta
Today on our 2014 Volkswagen Jetta, we'll be test-fitting the Rockymounts Tierod Stretch roof-mounted bike rack, part number RKY1011. With a truly rapid traverse roof rack system on our vehicle, we'll begin our test-fit by placing the bike rack up onto the vehicle's load bars. Starting at the front, we'll remove the black plastic cover to position the rubber-coated steel straps around the underside of the front bar. We'll then hook them into the connection points and move to the rear of the bike rack. We'll use the included allen wrench to remove one of the allen bolts to position the rear bracket around the underside of the rear bar. We'll reinstall our allen bolt and tighten it down with the allen wrench. Moving back up to the front, we'll use the included allen wrench to tighten down the silver bolt to tighten down the straps up against the front bar. Once everything is all tightened down and secured, we're ready to load up our bike.
Installing the Kuat Trio Roof Bike Rack on your 2014 Volkswagen Jetta
Today on our 2014 Volkswagen Jetta, we'll be test fitting the Kuat Trio Roof Mounted Bike Rack, Part #RU01. With a Thule Rapic Traverse roof rack system on our vehicle, we'll begin our test fit by placing the bike rack up onto the vehicles load bars. Starting at the front, we'll take the rubber coated u-bolts to go on the underside of the front bar. They'll go up through the pre-drilled holes at the head of the bike rack. We'll then use the cylindrical black nuts to thread down onto the black u-bolts. We'll then repeat the same process for the other side. We'll then go ahead and use the included tightening tool to tighten down the nuts to secure the front part of the bike rack to the front bar. Now, moving to the rear we'll remove one of the black wing nuts and position the rear bracket on the underside of the rear bar. We'll reinstall the wing nut and tighten it down. Once everything is all tightened down and secured, we're ready to load up our bike.
Hollywood Racks Expedition Trunk Bike Rack Review - 2014 Volkswagen Jetta
Today on our 2014 Volkswagen Jetta we will be test fitting the Hollywood Racks Expedition trunk-mounted 2-bike rack, part #HRS6-2. We will begin our test fit by placing the bottom part of the bike rack onto the upper tier of the rear bumper. Next, we'll flip out the black levers on the left and right hand corner of the bike rack. This will allow us to position the top portion of the bike rack onto the top portion of the trunk. With it in position, we'll clamp down the levers and we're ready to go. We'll take the top clips to the top part of the trunk, the side clips to the side part of the trunk, and the bottom clips to the bottom of the trunk. We'll then tighten down the straps to secure the bike rack to the vehicle's trunk.
Hollywood Racks Baja 2 Trunk Bike Rack Review - 2014 Volkswagen Jetta
Today on our 2014 Volkswagen Jetta, we'll be test fitting the Hollywood Racks Baja trunk mounted 2 bike rack, part number HRB2. We'll begin our test fit by placing the bottom part of the bike rack onto the upper tier of the rear bumper. We'll then flip out the levers on the upper left and right hand corner of the bike rack to swing out our dual arms and position the top part of the bike rack on the top part of the trunk. Keep in mind, the cradle arms do need to be level or slightly angled up. Once we've established this position, we can clamp down the black plastic levers. We'll now take the top clips and hook them to the top part of the trunk, the side clips to the side part of the trunk, and the bottom clips to the bottom part of the trunk. We'll then tighten down the straps to secure the bike rack to the vehicle. Once everything is all tightened down and secured, we'll go ahead and secure the excess strap. With this done, we're ready to load up our bike.


What our customers are saying:
"Everyone that bought before me was right! I got my rack in time for my next days off and putting it together was fast too. And I'm a grandma!! Thank you for being fast and honest! You beat anyone in my town hands down!"