
To see if this custom-fit item will work for you please tell us what vehicle you'll use it with.


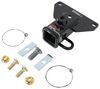
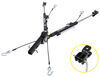
This custom-fit base plate kit lets you hook up your tow bar to your vehicle. The main body remains hidden for a clean, unobtrusive look when your vehicle is not being towed. Simple, bolt-on installation with included hardware.
Features:
Specs:

California residents: click here
Videos are provided as a guide only. Refer to manufacturer installation instructions and specs for complete information.
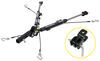
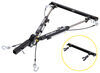
Hey guys, it's Jake here with Etrailer. Today we have a 2023 Jeep Gladiator and today we're gonna be taking a look at and I'm gonna show you how to install the Curt Base Plate for flat towing. Adding the base plate to the front of your Jeep is gonna allow you to safely flat tow it behind your vehicle or behind your RV. The way that a base plate is gonna work is that it mounts up, it bolts to the frame rails of your Jeep and it's gonna give you two strong pull points to be able to pull it behind your motor home. With this particular base plate, it doesn't have any additional bells or whistles. It doesn't have a tab for your six pole to mount to, or a tab for your breakaway switch to mount to, which in my personal opinion, are very, very helpful and useful.
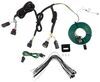
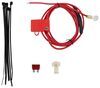
This one I had to get kind of creative to make a six pole bracket to mount our six pole to, but nonetheless it's gonna work just fine. It is a exposed cross tube so you can see the whole base plate. There's a lot of other base plates out there for Jeeps that look really, really good. They may just take a little bit more customization to get 'em installed because it's just gonna be these little tabs that are gonna be sticking out of the front. All of this is gonna be hidden behind the skid plate, so it's up to you.
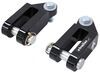
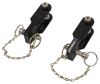
This one will have these removable tabs, just like all those other base plates out there. They, you can take these out whenever you're not flat towing. And then this is all that's left on the front of your Jeep. Integrated in the end of our base plate is gonna be these nice large loops for our safety chains to attach to in order to get hooked up to our RV. When it comes to the installation of this base plate, some people think that these are easier to install.
Some people think that the individual base plates at one goes on one frame rail, one goes on the other and there's no crossbar. Some people think those are easier to install, but either way you're gonna have to drill for either one of them. So for this particular one, you just have to drill one hole on each side. For some of those other ones, you gotta drill a couple holes, so it's just up to you, whatever you decide will look best. In my personal opinion, all of them are gonna function exactly the same, but whichever one is gonna look best on your Jeep, I think that's probably the one you're gonna want to go with.
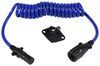
But with that being said, let's go ahead and pull it inside and show you how to get it installed. To begin our installation, we're gonna have two plastic push pin fasteners up here on top that are holding this plastic plate in place. There's two little notches on it. If you just take a flathead screwdriver, slide it in the one of those notches, pop out the center section and then pop out the base. I need to take a 5/16" socket or an eight millimeter and remove the two screws that are holding the bottom of our skid plate in place. (tool buzzes) Across the top of our skid plate, but the bottom of our bumper, we've got a bunch of these push pin fasteners we have to remove. Take a flathead screwdriver. If you have a push pin fastener removal tool, you can use that too. But same concept is pop out the center and then we can pop out the base. This should just rotate out of place and we'll set it to the side. Now we'll grab a 16 millimeter socket. We're gonna take this attachment point off, (tool buzzes) set it to the side. Now on the side of our bumper, this is gonna be on the passenger side. We're gonna have this plug that we need to disconnect. Just push this little tab and pull the plug apart. Now on the backside of our bumper, we're gonna have eight bolts, four on this side, four on the other side that we have to remove. Take an 18 millimeter socket and get those loosened. (tool buzzes) Now you can get an extra set of hands if you need it. Typically these aren't too super heavy, but we'll just kinda wiggle each side off. Just wiggle it loose and then you'll get the threads to pass through those holes. And then we'll take our bumper and set it to this side. On each side of the frame rail or on each side of the vehicle on the outside of the frame rail, we'll have this support bracket. We're gonna take that off, just the outside, leave the inside ones. We shouldn't have to worry about those. (tool buzzes) Now what we're gonna do is we need to take this bottom hole here and open it up enough to where we can get our hardware to fit in through it 'cause this needs to be on the inside of the frame to be able to pull out of the frame. What I'm gonna do, they tell you to just open it up with a die grinder or something like that. I tried using one on the passenger side already and it's very difficult and frustrating. So what I'm gonna do is I'm actually just gonna cut a slot up and just make it, essentially make it a taller square so we can fit our hardware through. (tool buzzes) Now you may end up needing a die grinder after all to be able to trim the side out a little bit because our bolt, this head is round and has to fit. You kinda have to spin it in place. So we'll go ahead and get that grind down. (tool buzzes) Now with an extra set of hands, we're gonna take our, these little side brackets. The reason we took it out is 'cause we needed to get the bolt out anyway, but we're gonna get that taped back on just to hold it in place and then we can lift up our base plate and put that factory bolt back into place temporarily just to hold it up. Now to get our next set of our hardware in place, we're gonna take one of the smaller bolts that comes in our kit, put the block on it and then you wanna put it on your fish wire. We'll get it back here. You wanna put a slight bend in it 'cause we're gonna be going through this hole right here to come out of our base plate. Grab one of your plates, match it up to these three holes here. This is just a handle so you can hold onto it. We're gonna slide it back here, line up those factory holes and then we're going to find that opening with our fish wire like this, push it out, grab the end of it, toss that bolt and spacer block in there. Move this around, we'll pull it out. Now we're gonna repeat that process with this lower hole. You know, we'll have to spin this around to where they match up and then this hole here. Now we can take our fish wires, pull those off and then top each one of these bolts off with the appropriate nut. For this rear bolt, for a half inch bolt, there are gonna be two slightly longer ones. We're gonna save that, save those bolts for when we put this bolt in up here 'cause it has to go from the inside of the frame rail all the way out. Now what you want to do is you wanna make sure that your base plate is level. What I'm gonna do is I just kind of nudge it up. There's not a whole lot of wiggle room here anyway, so I'm just letting it rest on the bolts. I do have all my bolts pulled through and straight because we repeated that same process of the bolts over here. Now what I'm gonna do is just take that 16 millimeter socket, snug this factory bolt back down. (tool buzzes) That's gonna allow the base plate to not move. Now that we've got our base plate kinda locked in by this bolt, we need to drill out a hole in the side of our frame rail to a half inch. (tool buzzes) Once you get your hole drilled out to a half inch, we're gonna take this spacer block. It's really thick, it has a round hole in it. We did end up having to trim a little bit off the end, but it's gonna be based off how much space you have here at the end. You just wanna get this lined up with this hole in your plate and the hole you just drilled. And then what we can do is we're gonna need our longer carriage bolts and our spacer blocks that I was just referring to earlier. What we need to do is take our fish wire, we're gonna run it back through our base plate, through our spacer block there and then we're gonna come out of that hole that we drilled at the end of our frame rail just like that. We'll take that bolt and the spacer block, thread that on and we'll pull it out through that hole just like that. Make sure that our carriage bolt is seated inside that spacer block. Then take your fish wire, pull it off and follow this with a nut. And we're gonna take a 19 millimeter socket, snug the two larger nuts down and a 14 millimeter socket to snug down the smaller ones (tool buzzes) and grab a torque wrench and we'll torque all of our hardware to the specifications in the instructions. Now we need to put our safety cables on. What we did here is we just ran it up through this body mount location and then they give you this hole on the base plate down here at the bottom to be able to attach our two end points here with a quick link. And then what I like to do is I like to take some of the slack out, get it as tight to the vehicle as possible, pull the slack from the other side closer in because again, this is the Jeep, so if they do any off-roading, we don't have to worry about the tire hitting the extra cable. Just use some zip ties and zip tied off to a couple of these points here just to make it nice and tight. Now we can take our bumper, we'll lift it back up into place. It'll line up all the holes or all the studs. You wanna make sure that your wiring harness is not getting in the way over here so it likes to kind of veer that direction. Next thing you're gonna wanna do is we gotta trim our skid plate. I went ahead and did it so that way, I could tell you specific measurements and stuff like that 'cause the instructions do not help you when it comes to trimming these out. So if you look, if you take your skid plate, you hold it right up to it, there's gonna be, remember those push pin holes that we, we took the push pins out of the top of this panel, the second one in on both sides. That is directly in line with these rails. So what you need to do is just the width of that opening will cut about a 1" slit all the way down. You're gonna run it 6-1/2" down to here. I like to use a small hole saw or a step bit tool to drill a nice clean radius here. But then just take a multi tool, cut it out, you can use a razor blade to score it and just keep scoring it until it breaks. But essentially, yeah, 6-1/2" from that top down here, you wanna go straight down and do that on both sides of the vehicle. And it turns out really nice and clean and the reason I go with an inch and not just, you know, the width of this is that way it gives you a little bit of wiggle room to be able to lift it up into place and you know, get it back on like it was from the factory. You can try to make those a little thinner. Make 'em a little bit narrow and if you gotta trim a little bit more or a little bit more, you can do that. I go with an inch usually and it works perfect every time. After all, you're not really gonna ever see this because we're under the vehicle, but otherwise standing by the vehicle, you're not gonna see it. Other than that, that's gonna do it for the installation. Well guys, hopefully this video helped you decide whether or not this Curt base plate is right for you and your 2023 Jeep Gladiator.
Customer Satisfaction Score:
99% were satisfied with this product
1% of customers were not satisfied
Ratings & Reviews

Do you have a question about this Tow Bar Base Plate?
Info for this part was:
At etrailer we provide the best information available about the products we sell. We take the quality of our information seriously so that you can get the right part the first time. Let us know if anything is missing or if you have any questions.


Thank you! Your comment has been submitted successfully. You should be able to view your question/comment here within a few days.
Error submitting comment. Please try again momentarily.