

To see if this custom-fit item will work for you please tell us what vehicle you'll use it with.

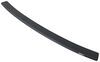
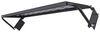
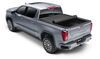
Make it easier to climb into your vehicle with running boards. The added step helps family and friends get into your vehicle independently, and can also assist you with accessing your roof. Sporty, streamlined boards are custom fit for your vehicle.
Features:
Specs:
California residents: click here
Videos are provided as a guide only. Refer to manufacturer installation instructions and specs for complete information.
Hello neighbor, this is Curt with etrailer and today we're taking a look at the Romik RAL-B running boards and we're gonna see how they install and how they look with our 2025 Jeep Wrangler Unlimited. Now a running board or a Nerf bar is an excellent way to make exiting and entering your vehicle safely in particular when you have a vehicle like we have today with a higher ground clearance. Adding that step is gonna cut several inches on your step, all the way up and down, in and out of here. And it's just gonna make it a whole lot safer and easier on you to do it. Now Romik running boards are known for their kind of customization, I guess you could say. They're really easy to kind of modify.
They allow you to push them forward and move them back. They allow you to get 'em closer and further away from the vehicle. A lot more modification with these that are allowed than some of the other running boards and Nerf bars out there. So from a position standpoint, what we did with these is we've actually got them pushed kind of all the way to the back. It gave us the best second row coverage to have it done that way because there's plenty of room for it up here in the front.
Now these are gonna have a powder coated steel bracket attaching it to the vehicle, but the running boards themselves are made out of aluminum. So between that powder coated steel and the aluminum these are gonna do a really good job of keeping that corrosion and rust outta these and helping them last for a very long time. One of the more functional things that we've got here are these little squares that we see at the top are actually a rubber. So it provides a really good grip for you while also being designed in a way that it's not gonna trap any water up here. In fact, we have this nice lip running along the back with the vehicle and it's gonna really kind of force any liquids to run off of our running board this way.
So let's go ahead and see how much these are gonna help us getting in and out of our Wrangler Unlimited. So in order to get all the way up here into the door threshold, we're at a height of 26 inches and our running boards are sitting at a height of 18 inches. So we took eight inches off of our step getting up in and outta here. Again, just gonna help us out in those situations, you know, just keeping everything safe. The step itself is gonna be 5-1/2 inches wide and you'll be able to use most of that.
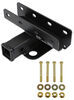
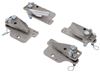
It does kind of tuck under the lip of your door a bit, but it's still wide enough to make for a good safe step. It's also gonna offer a 400 pound weight capacity. Now installation of these is really, really simple and straightforward. There are three different mounting points on here. Each of them only takes three bolts. The bolt holes are already in the vehicle itself, so there's not gonna be any drilling involved on your part and all of the hardware is included. So follow along and I'll show you exactly how we got these on our vehicle today. So to start our installation, we'll begin with our brackets. And first we need to talk about bracket placement. There is certain brackets that you want to put in each of the three mounting locations that we find on each side of the vehicle. So we're gonna be working on our driver's side right now and our front bracket, you'll see these tabs that kind of come over from the main body of it. Our front bracket, those tabs need to be facing the back of the vehicle. And then our middle and our back bracket, this tab needs to be facing the front of the vehicle. Now each of these are attached by putting this piece on the outside where these open bolt holes are. Each of these will get a bolt and then there's a bolt that's gonna go vertically into a pre threaded hole in the frame. So we're gonna work on the front bracket. So I've got the appropriate bracket, my tabs are facing the rear of the vehicle, and this is gonna line up just like this. We've got this part here on the outside lined up with these two bolt holes here and here. And that is gonna help line up our vertical bolt hole right here. So I'm gonna hold this in place and I'm going to take my M8 flange bolt and my M8 flat washer and am just gonna hand thread that bolt in for now. And once I've got that in place, I'm not tightening it down completely, I just want to keep it up and in the air. And at this point I'm going to grab another one of my M8 flange bolts along with the M8 flange nut. We're gonna feed this right through the front, just like so. And I'm just gonna hand tighten this down a little bit too. Again, I'm not trying to tighten these down completely. I want to keep them somewhat maneuverable until I get the actual running board on the brackets and I can make any adjustments that I need from there. And finally, we're gonna do the same thing as we did with this bolt through this hole right here. So with all of our brackets in place and we didn't tighten 'em down completely, we left them a little bit maneuverable in case we need to. We're gonna turn our attention to the running board itself here. So here is our running board. I'm gonna go ahead and turn it over on its back. And what we're gonna find are these two tracks back here and we're gonna have three T bolts in each track. Each of these T bolts are also gonna have a nut and a washer with them. And they're gonna come essentially like this kind of all the way tightened down. What we wanna do is loosen that bolt or that nut rather until it gets to the top of the bolt and creates a gap here that we're gonna be able to slip into our bracket. So with all of those loosened up to a degree, I'm gonna shift them around a little bit and kind of line them up with where our brackets are. And what I'm gonna do is just do my best to turn these over with them moving as little as possible and slide our board onto the bracket. Now the good news is that because this running board is made out of aluminum, it's really easy to maneuver. If there's a steel running board that was being mounted like this, it probably wouldn't be too easy and I probably want to do it from underneath to get these lined up. But this is lightweight enough that I can kind of maneuver it on my own just with my hands here. So once we have it positioned on our bracket, we could actually move it a little bit to get it just how we want it. So I have the ability to move it forward and back. I also have the ability to move it slightly in and out, and that's gonna be the one that I'm working on first because it might be tough to see from up there. But my front end here forces me to keep it a little bit further away than my back end back here does. So I'm gonna want to bring this out a little bit to get it even. And I'm also gonna make sure that it's positioned evenly front to back. So now that I've got my running board position right where I want it, I'm gonna take my 13 millimeter socket and I'm gonna use it to tighten the bolts on the running board onto the bracket. Now that those are tightened down, I'm gonna keep my 13 millimeter socket and I'm gonna go ahead and tighten down the bolts to my brackets going into the vehicle frame. And I've also went ahead and grabbed a 13 millimeter wrench to help me out here with these ones on the side that we have both a nut and a bolt to tighten. Now once you have everything tightened down, there's just one final step. You're gonna want to grab your torque wrench and set it to the specific foot pounds that it requires in the directions. Now Romik has a different torque spec depending on the size of bolt. Now all of the bolts on this set of running boards are M8 so they'll all take the same torque spec. You just want to pay close attention to what that is. And once you've got that, your torque wretch set, go ahead and get 'em all tightened down. So that's a look at the Romik RAL-B running boards on our 2025 Jeep Wrangler Unlimited. And if after watching this video you decide that these are the running boards for you, you've got some questions about 'em or you've been able to use 'em and you've got some thoughts that you want to share, go ahead and leave those in the comments below. We would love to share your experience with other neighbors so they can make the best decision for themselves. Once again, this is Curt with etrailer. Thanks for stopping by.


Very nice , had them professionally installed at Ziebart and they look and feel great
Product arrived in a timely manner and was well packaged. Install was a bit of a challenge but they are installed and look great. The instructions could be a bit more clear but that seems to be a common issue with most products these days. Overall I am satisfied and would purchase them again.
Running boards look great and the hardware is really nice.
Please note…. The 2026 Aviator has (apparently new) threaded fasteners that interfere with the bracket mounting. Unable to line up the brackets easily. I was able to modify them to get the correct fit. Probably took three extra hours to install. They look great and I’m very happy with them. Very nice product!
Info for this part was:
At etrailer we provide the best information available about the products we sell. We take the quality of our information seriously so that you can get the right part the first time. Let us know if anything is missing or if you have any questions.


Thank you! Your comment has been submitted successfully. You should be able to view your question/comment here within a few days.
Error submitting comment. Please try again momentarily.