


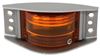
Be seen with this 3/4" round amber LED light for clearance or side marking. Mounted in a UV-resistant bracket for easy installation on flat surfaces. Quick wiring with an 8", stripped, 2-wire pigtail - just connect and go. PC rated.
The corrosion-resistant, gray polymer bracket makes installation easy on flat surfaces - no recessed hole required. The included rubber grommet holds the LED light firmly in place, while the 8", stripped, 2-wire pigtail makes wiring easy. No complicated setup - just mount, connect, and go. Works with 12V systems.
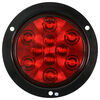
Built to handle wet conditions, this light features a sealed, waterproof housing that protects against rain, road spray, and full submersion. Whether you're towing through storms or launching a boat, you won't have to worry about water damage shortening the life of your lights.
Also known as bullet lights, these compact LEDs are popular for more than just visibility. Used in multiples, they help keep your trailer street legal while adding a custom look. Whether lining your trailer, truck, or RV, they provide both function and style.
A PC-rated light produces a 90-degree angle of light to either side of its centerline for a total of 180 degrees of coverage. This beam pattern makes the light visible from the front and both sides, enhancing visibility and safety. When properly installed, it functions as both a front clearance light and a side marker light or as a rear clearance light and a side marker light.
California residents: click here
Videos are provided as a guide only. Refer to manufacturer installation instructions and specs for complete information.
Hi, everyone. Steven here with etrailer.com. Today, we're looking at our LED clearance slash side marker light in a rectangle bracket. It's submersible and it's a one diode amber color. Now folks, this may be small, but it is bright. As you can see, I've got it wired up here.
Let's go ahead and shut off the interior lights here in my studio. So again, it's in a nice, what I would call a wedge or rectangular bracket. So if it was from the clearance marker from the side, that's kind of how it would look. Then obviously straight on from the side, you can see it's nice, vibrant, bright, and it's gonna do the job. So I apologize for the camera adjusting there, the light and everything.
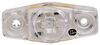
Let's go ahead and pop the lights back on. Now looking at the backside of this, you can see again the plastic housing. The light itself is sealed up. You got a black and white wires. Those center holes there are three inches apart on center, as far as mounting, there's no hardware included.
You need to source that locally or separately. You got about 3 and 15/16th overall, so not quite four inches long by about 1 and 5/16th inches deep and 1 and 5/8th inches tall. You have a nice range of voltage here between nine to 16 volts. So that's gonna be perfect for 12 volt systems. And this is PC rated, giving you maximum visibility as I was showing you both from the peripheral angle and from the front.
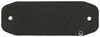
Well, folks, that is gonna wrap it up for our quick look together. One last thing to go or know before we go. You don't have to worry about cutting a hole in your trailer again, because you can just surface mount this with two screws sold separately. I'm Steven, that's gonna wrap it up. Thanks for watching.

Info for this part was:
At etrailer we provide the best information available about the products we sell. We take the quality of our information seriously so that you can get the right part the first time. Let us know if anything is missing or if you have any questions.


Thank you! Your comment has been submitted successfully. You should be able to view your question/comment here within a few days.
Error submitting comment. Please try again momentarily.