
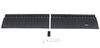
Revolutionize the way you load up! These game-changing transition plates let you roll your gear from the ground right onto your trailer floor. Fit most enclosed trailers, making them the perfect upgrade if you're looking to save time and energy.
Features:
Specs:
California residents: click here
Videos are provided as a guide only. Refer to manufacturer installation instructions and specs for complete information.
Hi, I'm Matt with etrailer. If you're someone who has a trailer and you're looking for something that's gonna be an little bit of an easier process for loading your gear in and out of your trailer, whether it's at the section between your lift gate and the trailer itself, or the lift gate to the ground, then the etrailer transition plates, that's gonna come in a kit of two, are gonna be a great option for you. So let's check 'em out. This is gonna be great if you're someone who's not only trying to protect the trailer so it lasts a longer time so they can even use it longer for older future loads, but you also trying to protect the gear that you're trying to load up in here too. So for example, our videographer Josh, he's, in the past, loaded up a bunch of sound equipment in the trailer. And in the past, it has been very difficult because when you're trying to load it in there, your gear can be bouncing all over the place, and some of it is pretty expensive items.
And if that we inchesre to fall over or have constantly bounce into it, it's probably gonna get damaged. This is gonna help something with that process. Or with Aidan, one of our co-workers who works down here, he's loaded up a couple trailers for band equipment, and that stuff is just really heavy. And after a long day being out in the field, trying to load that back into a trailer, it can be a lot. Something like this is just gonna make that process a little bit easier.
Something we wanted to do real quick is just gonna show you how loading on your trailer is gonna be without having those transition plates. Now, everyone's trailer, it's gonna be a little bit different, but this is gonna give you an idea how it's helping this trailer today. And to help illustrate that, we have three different items. So some of these are gonna be for common uses like a power wash or a generator you might find yourself in but what I like most about all these is they're all gonna have different weights. The items on them are gonna react differently to this loading process.
And they're all gonna have different wheel types so we can really see how each wheel's gonna handle this. First up is the power washer. So let's give it a try. Now this power washer is a little bit smaller so it's not super heavy, but immediately, when I'm making contact with the ramp, it does not want to go up. So I'm gonna have to lift up on this a little bit or try to lift up one side and just almost kind of climb up here.
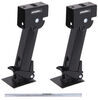
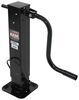
Really not too much of a strain there. If anything, just more inconvenient. And then we still have this second location, and that's gonna be the hinge at this lift gate. And this is gonna drop down, cause a little bit of noise. And this is just constantly dropping right here, that could really damage something over time. Now we're gonna have our generator, and this is a pretty hefty generator. It is very heavy. So we'll see how this handles. Now, it does have bigger wheels, but initially, yeah, just immediately stopping right here. Another thing to keep in mind too is if this isn't lifting off the ground too much, you might just make contact with the actual gate itself. So with this, you actually have to lift up a little bit too, and it does feel heavy. If I'm just trying to pull straight like this, I have to use my whole body weight. What you also could do, again, try to get in one wheel up here to climb. But at the end of the day, this is not gonna be fun to deal with. And once we got you get it in here, we got that big drop right there. Kind of annoying, kind of noisy too. Not big fan of that. And the last one is gonna be that blue cart. Now there's two things that stand out about this one. So we're gonna have those smaller wheels. That's gonna be a lot harder for this to really get it in place here. And just gonna have a loose load on top. So we got some tire chain and some salt on the bottom, and we're gonna see how that shifts when we're try to fight with this. And since these wheels are so small, I'm definitely gonna have to pull from one side. And just like that, there's no way those wheels are going over that bump there. What I'm gonna have to do is have to lift at some point. Luckily, my heavy spot is on the backside of this, so when I lift up, it shouldn't fight me too much. And this is a a pretty aggressive first hit here. If I had some type of ramp, that would kind of ease on into that and make it less likely you have anything falling off. These wheels are just so small. I had to really pivot pretty highly up here and is making this load very unstable, and I'm having to put a lot of strength into it. As you get it back in place, you now I have to do it on the other side now. Going down's not too bad. We'll just make that last drop. (floor thudding) And we've lost our tire chains. And now we're gonna load all three of these items onto our trailer. Same type of test, just testing how the wheels are gonna handle the different weights and the different types of loads that we have. Pulling the power washer on, we're gonna see how that handles. That pretty much glides up here effortlessly. (floor thudding) We do have a little bit of a drop after the plate and lemme try going back over it from this side though. So there's gonna be a little bit of resistance here. You can see. You'll probably have to kind of push it up. But other than that, everything feels pretty smooth, and this is definitely an upgrade. We will see how those wheels handle it gotta pull up a little bit, but that is mostly due to this just being an up and incline, and we'll go over the next bump. I didn't feel any difference there. (floor thudding) That is a big upgrade in terms of really loading up heavy objects. Now, I'll try going backwards. Yeah, we're gonna have a little bit of resistance here, If I keep pushing though, actually the lift gate lifts up some and allows this to work way better. And honestly, for heavy objects, I think this is working phenomenal. And the last one is gonna be a cart with the loose load. Try this out. And yeah, there's barely anything there. That's a pretty smooth movement. Has just a resistance for a second. But other than that, it's pretty much night and day with how this is gonna work. I'll try going backwards now. Now I'll say, this is a little bit tough to get over. I am having some issue here. So I'll have to probably do that same technique. I'll lift up one tire, lift another one. But again, these are some pretty small tires and it's pretty heavy on this back half. But everything other than that, it's working just fine. Got a little bit of a bump there. There's a pretty big difference between how it's gonna work compared to not having one and having these. And what's even more is I thought it worked best with those heavy loads. And what's really nice about that is these are gonna have the weight capacity of 1,000 pounds. So really they're designed for heavy loads too, so they're gonna last a long time. And what's also great is when I'm stepping on them, when you have those heavy loads too, things can kind of slip or lose control of something, especially when it's wet outside. And what's nice about this is when I step on it, it's gonna gimme a lot of traction, and that's gonna because we have this type of tape on top, and this is gonna be our attraction tape, and that's gonna help give us a lot more traction when we are moving those heavy loads. What's nice about this kit of two, unlike with the kit of one, with the kit of one, you have to choose if you wanna make it easy to load up from the lift gate or to the trailer. This one, we're getting the best of both worlds, so this gonna be a full smooth transition like that. I will say it does make the whole process a little bit heavier. You'll notice when you lift up on these, sometimes will have some flex of it. That's just 'cause that heft because it is rated pretty highly. These are gonna be about 45 pounds, roughly, per one. So you are adding a lot of weight to your lift gate. But what's nice is we could actually secure these down, make sure it's gonna be nice and compact. And with these brackets they come with is gonna prevent any rattling from driving down the road. And it's also gonna help 'em engage as soon as you're ready to load up. But I'll show you now. Right now, this is pretty heavy. I'm actually having to use a decent amount of force to push it up. So I do recommend one of few things. Probably getting this recalibrated by an expert so you can make sure you are safely lifting this up, or you might even have to invest in a new one if it's not gonna be ready for the same amount. But honestly, I'd rather have to put a little bit more effort into lifting up my lift gate as opposed to working a hard long day, maybe in the heat, we have to lift your items back into your trailer. You definitely don't wanna fight it with it at that point. Now, if we're actually installing it, there's really not too much that goes into it. You're really just drilling into the lift gate, a little bit of the inside of your trailer. Now, if you're someone who already owns this, we'd love to hear what you have to say about it, what that installation look like and what you use with it on a daily basis. Whether you're using this more for work or more for recreational uses. But if you are curious to see what that installation looks like, just stay tuned, we'll walk you through it. So to begin the installation, I like to get my parts ready to go. So let's go over what's gonna come over in your kit. So with your kit, you are gonna get three pieces of the plate. So this is gonna be the center one, the ones for the side are gonna have this bracket on them. (metal thudding) It's gonna be on the opposite side of one another, and that's what it'll look like. So I'll put that back in place. And then you're gonna have the hardware. I like to leave the hardware in the bag for right now. But we'll go over to a little bit more in detail later on just so I don't lose any of these components. And you'll also have two brackets. We'll talk about that a little bit later. And then we're gonna have these hand knobs that come with them. Now something that I recommend you kind of grab to get this kind of rolling is gonna be a tape measure just so you can measure everything out. And we're gonna make sure we have our drill and then we're gonna have a hex socket adapter. And the two sockets we're gonna be using are gonna be a 10 millimeter and a 13 millimeter. The first step really is just gonna be making sure if we need this sensor plate or not. The way we're gonna be doing that is by roughly placing out or mapping out where these plates sit. So way I'm gonna do that. I'm gonna start off with this hinge point on our lift gate. And what I'm gonna do is get these in a rough idea of where I want them to sit. We don't want something like this 'cause there's gonna be a pretty big gap right here. That's not going to give us a very clean look, and it's just gonna not be a good fit for when we are using this. So I'm gonna make sure everything's contoured a little bit better. So I'm gonna pull it in, just like that. That's a smoother transition right there. Doesn't have to be perfect at this point. We're just getting a rough estimates. And then I'm gonna check over here on the side. So if I had this pushed over more, you notice, this tie-down point is gonna get in our way, and we don't want that. So I'm gonna bring that in just a tad bit. And that's looking pretty good there. Nothing's gonna interfere with us. I'm gonna repeat that on this side over here too. And this one's already looking good. And what we can do at this point is grab our tape measure. What I'm gonna do is go to the widest point on the first bracket, or the first plate, and then go to the widest point over here too. And we're looking at a little bit over 63 inches. And why this measurement is gonna matter for you is if your measurement is under 58 inches, you're not gonna need that center plate. If your measurement is over 58 inches, you are gonna need the center plate. So in my case, I'm gonna be installing that too. And we just wanna double-check that everything is in the right orientation. And what I mean by that is with these plates, this one right here, you'll notice this bracket is closest to the wall. You wouldn't have to look like that on either side. And also just double-checking that we have this traction tape facing up. Now, what we're gonna do, in my case, I'm gonna grab my transition plate, or the center one. And if you're using just two plates, you're just gonna have these overlapping one another. I'll show you that process a little bit more here in a second 'cause we wanna line up these holes now. But with the third one, you're just gonna lay that on top, check it as centered as possible and lower it down. (metal thudding) And our goal here is to line up these holes, and I'm already starting to line up with some of them over here. So that's looking pretty good. And then I'm gonna just double-check that on the other side here. And I'm not lining up with anything. So I'm just gonna adjust this a bit. I'll probably lift up, see where those holes are exactly. And I might be able to push this out, just a tad bit. Now, if I run into this situation, where we're gonna make contact with something out here, then I'll probably stop, but we're looking good, we're not gonna interfere with these tie-downs. Now if you are gonna interfere with something, just bring it in instead. But once we have this kind of roughly mapped out, then we can kind of grab some of our carriage bolts and mount this together. We got our hardware now. So we're gonna start off with some carriage bolts. And what I'll do is find those holes. We wanna find the ones that we'll be using. So I'll put those through. And what's nice about this is so it'll help keep everything aligned. Now you are gonna have a total of eight of these. You'll notice there's gonna be more than eight holes too or so, what I'll do is keep 'em on the outside ones. Lot of times, these ones in the center aren't gonna be used anyways. It's also going to depend on the size of your lift gate. Try not to lose 'em too. Again, this is just gonna help us keep everything aligned before we lift this up. Now lifting this up can be a little bit tricky sometimes. Reason being is not everything's together quite yet. And these are a little bit heavy too. So I'll show you how I'm gonna handle this one here in a second. With that kinda roughly in line, I'm gonna start from one side. If you can have someone help you, that'll help go a long way. But sometimes, you don't always have some along the way. So I'll just start here, up here, lift it up like that. This is a pretty good start and then I'm just gonna grab a washer, push it on there, and then I'm gonna grab a nylon lock nut, put on the very end. We're not gonna tighten this down old away quite yet. We just wanted to kind of get at the hold in place for the time being. It'll do half the work for us so we're not fighting it the entire time, having bolts fall out on us. But yeah, you'll just repeat this for all the bolts that you've put in your plate. And I laid this all the way down and this time we have the nuts facing up that's gonna apply pressure to the heads and that's gonna help 'em push through those little square holes to keep 'em in place. And then we're just gonna come back over here. We're gonna grab our 13 millimeter socket. We have our adapter on here and we got our drill, and we can tighten this down the rest of the way down. (drill whirring) And you'll just repeat that for the rest of them. (drill whirring) (drill whirring) (drill whirring) If you just used in the two plates, what we inchesre you gonna do instead is when I push this up, you notice hold little holes we used earlier, instead of using that third plate, these two set ones on the side are just gonna align at one point, or multiple points, just depending on the width of your trailer. But we can actually start installing this now. So what I'm gonna do is realign this with the gate of my trailer. Kind of push this into place. Again, we wanna make sure we have that smooth, even transition. What I'll do a lot of times is grab my tape measure and we'll make sure everything's even because I'm gonna go to either side. Right here is gonna be a little bit easier. So we'll just measure from the side of the lift gate to the edge of this. Just make sure it's the same on the other side. If it's not, we'll just adjust that a little bit. With that adjusted sum, I also wanna make sure that it's also pretty squared off. So what I'll do here is measure how far this edge is sitting from the inner edge of your lift gate. And we're just gonna double-check the other side too. And this will let us know if it's squared or not. And again, if it's a little bit off, we'll just adjust it from there. We're gonna find our little bracket on either side. We're gonna grab the screws that come with your kit and we're gonna bolt one of those holes down. We're gonna do that on either side too. So I'll just make sure when I'm doing this, I'll grab my drill and I'm gonna grab a 10 millimeter socket, secure this into place. (drill whirring) There we have it. I'm gonna repeat this process on the other side. We got one screw in each one of those brackets and I'm just gonna test this out to make sure it's moving smoothly, we're not having too much interference with it. I don't need to move it up all the way quite yet, just enough to make sure it's not gonna get caught on anything. And that's feeling pretty smooth just as is. So what I'm gonna do from here is the rest of those holes you have on either side of the bracket, we're just gonna put the rest of the screws in place to secure it fully down. (drill whirring) (drill whirring) The last step is just gonna be installing these brackets. Now they're gonna be two of them. And then do that, we're actually gonna have to close up the trailer. So I'm gonna do that now and I'll get inside from the other side. You got two options. You could either try to drill into this now and put this into place. So really what you're doing is find two spots on the side and putting the two hole in against the door. That's the way it's gonna sit. And what's gonna happen is this plate is gonna slide up right into place. The other way, which I'm gonna do, is I'm just gonna kind of place it where I want it to sit and just make some markers now. And then I'm gonna push my lift gate down, just so when I'm drilling into this, my door isn't pushing away from me. And now I got those spots marked out. I'll just install this now (drill whirring) I wanna make sure this is pretty square. Tighten that down the rest of the way. And repeat that for the second one. (drill whirring) So with both sides secured down, then I can lift up my lift gate and make sure everything is properly getting into place and not missing at the mark. (lift gate thudding) And there we have it. One down, one more to go. So with this one, same process as the other one for assembling it together. You know you're just making sure that when it is in use, it's not gonna interact with anything or make contact with anything on your lift gate. And you're just finding the right spots for them to really see into each other to assemble the whole piece. But there is a little bit of a difference for putting on your lift gate. So what we're doing this time is a little bit different. What we're doing is we're finding this cutout right by this hinge. And this hinge, we want this edge here to be lined up with the edge of our lift gate that we're drilling into. Once we've done that on both sides and we've measured out from the sides to get this centered up, then we can start drilling into this. I'm gonna do the same process, like we did with the other one, where I'm gonna just drill into one of these. And then do that on both sides and make sure this is gonna work properly. Now we can test it out. And I will say, with this one in this spot, you're probably gonna run into some complications. A lot of times, it's gonna want to catch here in the center when you lift this up. We'll see if it happens now. Okay, that's pretty smooth. So right now, good, we didn't get caught on anything. What will happen sometimes is this point here, when you reach about, I wanna say close to 45-degree angle, it'll get caught up on the edge of that lift gate and kinda tear through that wood sometimes. If you're running into that issue, just shift us down, just barely down, just so enough to avoid that. But now we're not having any complications. So what we can do is secure the rest of those screws into place. And the last step for this side too is installing that bracket. All right, now this one's gonna be a little bit different from the other side. I'll kinda show you what I mean. So we're gonna start off by lifting this up and lay this down. And you probably notice, working with these, there are some holes on either side. We're gonna actually line this bracket up with those holes. Again, the bracket is gonna have the two holes on it. That's the side that is against your gate. And then we're gonna have our hand knob. What this hand knob is gonna do is it's gonna go through that plate and secure into this bracket we have. So I'll do that now. I'll push that bracket underneath until that holes are lined up. This seems like a pretty good spot. Secure this hand knob, like this. Make sure it's pretty well secured. Then from here, we're gonna grab our screws, and finish the job securing this bracket all the way down. (drill whirring) Might need to adjust that a little bit. (drill whirring) Might need to loosen up the hand knob. Sometimes if you have it too tight, it won't line up properly. I'll try the other side too. (drill whirring) (drill whirring) (drill whirring) But that'll do it for our look at the installation and some of the features of the etrailer transition plates that's a kit of two. But again, I'm Matt, and thanks for watching.
Customer Satisfaction Score:
99% were satisfied with this product
1% of customers were not satisfied
Ratings & Reviews

Very well made. They do leave a gap on the 8.5 wide trailer. Functionally no issues. But looks it does look little odd.
Info for this part was:
At etrailer we provide the best information available about the products we sell. We take the quality of our information seriously so that you can get the right part the first time. Let us know if anything is missing or if you have any questions.


Thank you! Your comment has been submitted successfully. You should be able to view your question/comment here within a few days.
Error submitting comment. Please try again momentarily.