
To see if this custom-fit item will work for you please tell us what vehicle you'll use it with.


Features:
Specs:
 Alternate Instructions
California residents: click here
Videos are provided as a guide only. Refer to manufacturer installation instructions and specs for complete information.
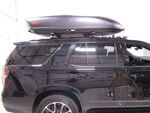
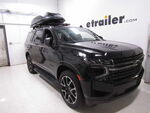
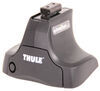
How's it going neighbors Today we're gonna take a look at the Thule WingBar Edge and see how well it fits on our 2025 Chevrolet Trailblazer. Being a trailblazer owner, you know, cargo comes at a premium. You have kind of a small cargo area. So when you have that bigger, bulkier gear, (hands clap) this is gonna allow you to get it out for your adventure. So, let's take a closer look at it and see how well it fits and see what it does for us. So as you can see on our rooftop that you have a little bit of gap as far as how it sits on top of your raised rail.
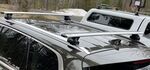
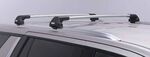
You may be able to even see the light here. When you're going down the rope, that can produce a whistle, that could be obnoxious, but it also can work as a feature to let you know everything's still on your roof. Now, the style of the bar is a wing bar 'cause it's shaped like an airplane wing and it's designed to help reduce that wind drag noise that you can hear from the inside of the cabin. Now I think that this guy gives you a nice sleek look, again, with these flush mounts. So that's one of the things that really stick out on the trailblazer to me.
On the inside here, you can actually take advantage of your T channel slot. You can slide things in here like, tie down loops or anything that goes down the track. And that just makes it (plastic rattles) super convenient and versatile for anything that you use. (plastic snaps) Now, as far as your setup, everything you need is in the box. You don't have to worry about measuring 'cause you're using fixed points and all the tools are included.
So let me show you how to get it done. I've already installed the rear bar, so I, the setup is pretty straightforward. I actually had a harder time getting the plastic stoppers out of the threads than it took to get the screws installed for the base. So what we're gonna do from here, we're actually gonna go ahead and remove our end cap here. (plastic snaps) Just throw it in the pit.
And now, we're gonna be able to assemble our clamp system. So, you're gonna have labels on each one of the components. The 045, that's gonna be your A, so it goes in first. It's gonna slide right here (metal rattles) with this stud sticking through. Now in the bottom, you're gonna, your B portion is actually this rubber foot. And you're gonna be able to throw this guy right here. And it's only, it only goes on one way so you can't mess it up. And now, we're gonna go with C. C hooks through this slot and that stud comes through right here. So now, you're just gonna take this double-sided nut here and we're gonna put our thread right onto the stud. (metal screws) Just enough to bite to keep everything together 'cause this is what clamps across the top. So let's go ahead and add this to our bar and then we'll get to the roof. Out the box, you may not have the weather stripping in here. Sometimes they come with it, sometimes they don't. I mean, as far as pre-installed. So, that's something to just look for. But what we're pulling back is to see this little square here on our bar. That's actually where our contact point four, (metal snaps) our foot is actually gonna go in. I'm just gonna press it down to get it to clear the edge and then we'll just (metal snaps) shove it in. And now, we're able to (metal snaps) pull this guy out. So from here, I'm just gonna reinstall the weather stripping, (people chattering) grab my little rubber edge that just fell off and go to the roof. (metal clicking) So, we're gonna get our towers installed and it's just two pieces of hardware. You wanna make sure that this hook ridge is pointing away from the vehicle and this hook on the inside is pointing towards the inside. You're just gonna take your screws and get those guys started in. Now I'm doing it blind, (metal clatters) but you know, it doesn't take much. And these are actually thumb screws, so you can get 'em started using your hands. You are going to need to use the included security Allen key that's with it. Well, it's a star key, that's with it. That's gonna make it easy for you to basically have everything locked down without locks. 'Cause they'll be on the roof, you can't remove everything without that tool. So a little bit of security already built in. (metal screws) Once I get this guy seated a little bit, we'll get the wrench on it and we'll fastener down. (metal hits) So now that we have our platform for this guy to connect to, we're just gonna extend it across the rooftop. (bar thuds) And now I'm just gonna get this guy seated here. Now it's positioning where it goes on top of the bracket and grips around. So I'm gonna go to the other side and make sure that (metal screws) it's where I want it positioned before I start tightening it down with a torque wrench. However, I will just clamp it a little bit to hold my position. All right, and now I'm going to make my adjustment on the passenger side, get this guy lined and put together, seated correctly. (metal screws) Now, it's time to torque 'er down. We're gonna make sure that we have it locked in, but you can already see just hand tight, you're starting to get a little bit of resistance on the roof. So, from here, you just have two points that you're gonna tighten down. You're gonna wanna make sure you fasten down your clamp that we already tightened with our thumb, and you're gonna have an adjustment on each side right here that's gonna lock in your crossbar spread. So I'm gonna go ahead and start here. We're gonna start fastening this guy down and we're just gonna listen for our click. Once it clicks, we know we hit the torque spec. (metal clicks) All right, and we're gonna do the same down here. Making sure we're good to go. (metal clicks) Now I'm gonna go to the other side and do the same thing, but as you can see, I'm rocking the whole car. At this point, if you added the lockable course, you would put this onto your cover. This comes with plastic cores that you can lock with a key (plastic snaps) or a coin or anything that's flat. Now having that single key is gonna come in handy, especially if you add (plastic hits) a rooftop box (hand smacks) or you have a tool bike carrier. You can just have one key for all your fun stuff. Now, once you add the wing bar edge to your trailblazer, you're gonna be able to do just about anything with your rooftop that's within the limitations. And when you put it to work, I would love to see how you're going to use it. Now, again, this is Ed with etrailer.com, taking a look at the Thule WingBar Edge on our 2025 Chevrolet Trailblazer. Have a great day.


Do you have a question about this Roof Rack?
Info for this part was:
At etrailer we provide the best information available about the products we sell. We take the quality of our information seriously so that you can get the right part the first time. Let us know if anything is missing or if you have any questions.


Thank you! Your comment has been submitted successfully. You should be able to view your question/comment here within a few days.
Error submitting comment. Please try again momentarily.