
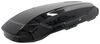
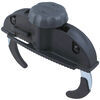
Thule WingBar Edge Roof Rack for Flush Rails - Aluminum - Black - Qty 2


To see if this custom-fit item will work for you please tell us what vehicle you'll use it with.


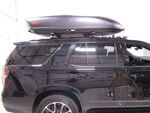
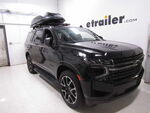
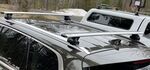
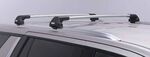
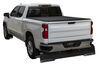
This aerodynamic Thule roof rack mounts flush on your roof for a sleek, factory look. Crossbars with split rubber strips in top channels work with channel-mount and clamp-on accessories. Installs to flush rails on your vehicle's roof.
Features:
Specs:
 Alternate Instructions
California residents: click here
Videos are provided as a guide only. Refer to manufacturer installation instructions and specs for complete information.
Hi Matt at etrailer. Today we're gonna be talking about the Thule Roof Rack on top of our 2024 Jeep Wagoneer L. Now the one we have today is gonna be the flush option. You can get this as an overhang option as well, but the flush option's just gonna give you that more clean look, more of an OEM feel to it. So, let's kinda take a closer look at it. So, one of the things you do wanna check to make sure this is gonna work with your roof, is just to make sure you have the right roof type, type.
With the Wagoneer L, it should mainly be a flush rail option, but just in case you don't know if you have that, or let's say you have a different one you, the way you can tell is, if you notice where our roof rack is sitting, this is rail that it's really laying on top of, that's gonna be a flush rail option. Now a naked roof option isn't gonna have any type of rail like that at all. It's gonna be completely seamless or flat on top. And then if you have a raised rail option, you can actually get your hands underneath those rails. Now, if you're not sure which one is gonna be the best for you, you can actually plug in your vehicle's information into our fit guide to find the right one for you.
And now when there are different types of roof racks, it's just gonna depend on what you're mainly trying to use this for. So if you're looking, like I said earlier, from that OEM finish, I think this is gonna be a great option for you. It's gonna be perfect if you need to throw any type of boxes, ski carriages, bike racks, anything like that that you can't fit inside your vehicle, this is a great spot for it, or anything extra long. So when you have those skis, putting 'em inside your vehicle isn't gonna be ideal. So we can actually take a closer look at more of the features of this roof rack.
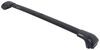
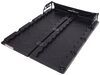
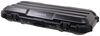
This kit is gonna come in three parts. So we're gonna have the crossbar itself, we're gonna have the tower, and then we're gonna have the fit kit that makes it unique to this vehicle. So let's kind of start with the crossbars. So with these crossbars they are gonna be cut more fitted to this roof width and we're gonna have the front one gonna be 44 and a half inches. The back one's gonna be 41 inches.
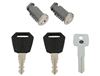
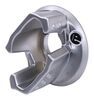
And you notice a few things with this. First it's gonna be that shape, it's gonna be thicker in the front, thinner in the back. That's gonna help it be more aerodynamic, help to reduce that wind noise. Something else that's gonna help reduce wind noise is gonna be this weather strip at the very top of it. And this is designed so you can put your T-channel accessories. So let's say you have some type of clamp on accessory and it's just not working very well, because maybe something underneath your roof or that clamp on accessory you just don't like using, you'd rather just use the T-channel one. You can do that with this and this weather strip's not only gonna keep out any type of wind from creating noise, but it's gonna keep out any debris and water from kind of clogging this up. Now if I take off this end cap, that's kind of what gives us this more seamless design. You can tell we have a lot of hardware underneath here, a lot of things going on. And this is what kind of makes this whole system work. While it looks a little bit complicated, it's actually pretty easy to use, once you put it together. But your tower is what's kind of holding this onto your fit kit, being that more middleman. And this one is just kind of giving us a seamless look and also hiding where some of the parts for a fit kit. The way this fit kit is working is we're gonna have two of these clamps that grab on to this bracket that's connected to your flush rail. And this is actually doing a really good job. Now if you look underneath this fit kit, that rubber section here, you might be able to just see a little bit of daylight, really not much at all though. And as far as fit kits go or how roof racks fit on top of your roof, this one's doing a really good job. This is very seamless and I do like the look of this. But now let's get a few measurements just to see how this is sitting up here. So the first measurement I want to get is in the distance underneath our crossbar to see what we're dealing with. And on this raised section here, that's gonna be just a little bit under three and a half inches, which is pretty good. That's gonna give you plenty of room, in most cases. Now that is something to consider, if you have some type of sunroof or moon roof on top of your roof and if that expands any at all, it might kind of block or get in the way of some of your clamps. If you don't have anything on here at the moment, this is more than enough room. The roof we have today actually doesn't have a sun roof, so we really can't show that off. But actually leads me into my next thing and asks me the total length of this that adds to your roof. And typically you could just go from the roof itself, but since this is sitting on our rails, I'll go from that instead. And this is gonna add at the very most four inches to your roof. Which isn't pretty bad at all, that's pretty standard for most roof racks. I think this is just gonna be a good fit for this roof. It's not extending too high, but it's also not too low where it's gonna interfere with things on top of your roof. I also will mention, we do have a third point where we can put a crossbar back here. So you have two options. You could either keep your crossbars up front or you could shift them backwards so, you'll be using more of the back half of your vehicle. Or you could get a third crossbar and put it back here. And if you did do that, I'd recommend a 41 inch crossbar. I will say though, you just need to watch out, if you are trying to maximize all this. If you're trying to use this for more of a platform style on top of your roof, you wanna put a rooftop 10 up here, it'll be great for that. But still just make sure you know what your roof is rated for, because the crossbar themselves are rated pretty highly. In my opinion, I think this is a solid choice if you're looking for more of that clean aesthetic to the top of your roof. Now if you're someone who's wanting to really maximize what you can put up here, take up all that real estate that you can, then I naturally recommend the ones with the overhang. 'Cause while these do have that nicer aesthetic to 'em, the overhang is just gonna give you more real estate to work with. And if you have anything like those ski carriers or bike racks, it's just gonna make it a little bit more manageable to grab. I will say though with the the Wagoneer L, we do have these running boards on the side. So, this actually kinda gives you an edge. So when you are grabbing those items, it makes it a little bit easier. Or even if I have to step inside my vehicle, I'm gonna step closer. So this right here isn't too bad, but, at the end of the day, I'm more of a fan of the ones with overhang just 'cause, again, they are gonna give you more space to work with. But if you like that cleaner aesthetic more, I think this is great too. Now as far as how it installs, it's actually gonna be pretty straightforward, but if you do need a hand with it, just stay tuned, we'll walk you through the process. To start off installation, I like to layout all my parts. So furthest away from me, we're gonna have our crossbar and we're gonna have the weather stripping that comes with it. Now you're gonna have two of these and they're gonna be two different lengths, and I'll talk a little bit more about that in a second. But next to that, we're gonna have our towers and the end caps that go along with them. And then we're gonna have all the hardware to actually install this on top of a roof. This is gonna be our fit kit here. You'll also have some included tools. You're gonna have this torque device right here. You can touching down your accessories and items and this additional Allen key. What I recommend grabbing is gonna be some type of trim tool, so you're gonna remove some tabs. And a tape measure so you can make sure everything's even. Now, the reason why I only have one of them on here, is 'cause I have the other one installed on my roof at the moment. And when you do this, the crossbar on the front of your vehicle is gonna be the longer one and the crossbar on the back of your vehicle is gonna be the shorter one, but they are gonna install the exact same way. Now where I like to begin is gonna be on top of your roof, which is gonna get everything kind of prepped. So to do that I'm gonna grab that trim tool and we're gonna find we have these little tabs. There's will be two per spot. And right now on the center set, there's gonna be one closer to the back end of your vehicle, one close to the front end of your vehicle and you can use whichever ones you wanna go with. But the unfortunate thing to keep in mind is you want 'em to be relatively close or you wanna make sure they're gonna fit with your gear. And if you're hauling anything that's extra long, you might wanna go with the two widest spots, but in most cases you're gonna want go with two right next to one another. And that's what I would recommend doing. And to remove these tabs, you'll just use that trim tool, pry underneath this tab. If you have a new vehicle, this will be pretty easy. Now if yours is a little bit older, then you might be finding with this a little bit, 'cause sometimes if there's lot dirt and grime on it, it can be kind of a pain to get out. And with those removed, I'm gonna grab my hardware. The hardware that I'm gonna be grabbing is gonna be two of those smaller bolts, and we're gonna be grabbing this bracket. Now this bracket's gonna look a lot different from the other type of clamps in your kit. And this one's gonna have two holes, right here and this third larger one in the center. We're gonna be using those two holes to put our bolt through and those tabs that I just removed are gonna be aligned with those two holes. You wanna make sure that the lift end, the side that hangs over, is hanging over your side rails or your flush rails. And once you've done that, then we're just gonna hand tighten these into place. Once you get this all the way tightened down, I have a little Allen key with me, that's gonna be the one that has a little star bit into it and a little hold in the center for your security bolts. Now you can use this the tighten down the rest of the way and once you have this all the way down, you can do this same process on the other side. We're gonna move over to prepping our crossbar. The way we're gonna do this, is gonna make sure everything's in the right orientation. So right now I'm just gonna flip this around for me. It makes it a little bit simpler, just like that. You notice I have the thicker side closest to me and the thinner side behind this, the thicker side's gonna be the front side of this. You also notice we do have this little square hole. This will be on either side. I'll talk a little bit more about that later on when we're installing our towers, but I just wanna make note of it now. And we can actually start installing this weather strip. Now this is originally gonna come together in most cases. Typically you'll just pull on this and it will kind of separate. Once you get it separated, then all you have to do is line this up with the seams. Notice how these arrows are facing forward We wanna make sure that's facing the front of our crossbar. This little tab here is gonna go into this little channel. We're just gonna press into place. You just do that the rest of the way down, making sure you got a good seal. With that on, if you have any excess, you can come by with an exacto knife and trim that off. Typically you won't have too much though. And then, with the other side it's that same process, only, you just need to make sure that that little tab again here, this is gonna line up with this opening right here. We're just gonna be pressing it into place, making sure it's seated all the way down, all the way across. Very, very similar process like we did on the front side. The way our tower's gonna go in place, you notice this section right here, this is gonna kind of match the shape of our tower here. So we have a thicker side and a thinner side. Just match it up with the thinner and thicker side over here. And our goal here is the lineup this little tab here, you'll notice it has this little metal block on it. It's gonna have a little bit of flex to it too. I can actually press down on it. You wanna make sure it's kind of far back here. If this little nut here is further down and this is not allowing you to do that, you might need need to loosen this up some, you just need to loosen up this bolt right here. But in most cases you should be fine with it straight outta the package like this. And what we're gonna do is just push this into place. Well you're gonna find you can't push it anymore. What you're gonna have to do is apply pressure to the top of this and push at the same time. I actually find it's easier to have it pushed out a little bit more like this and pushing like that. You know this is just kind of barely caught underneath there and you just push more until it's sitting like this. Once you push it in old away, that little tiny hole that I showed you inside of this crossbar, that block is now caught in there. So when I try to pull this out, it won't come out all the way, 'cause it's seating into place. And then you can just repeat this on the other side. Next up we're gonna start getting our clamps ready to go. And what I'll do like about the clamp system is, each one of these is gonna be marked. So this one's gonna have an "A" marking on it and this one's gonna have a "B" marking on it. And this third one is gonna have a "C" marking on it. Next one, I'll mark the order in which you put 'em on. So I'm gonna put a on first. Now I'll flip this around, so it's a little bit easier for you to see. The way this is go on, is you're gonna have these two little tabs. These are just gonna sit right on top here. And that bolt in the center is gonna go through. Then I'm gonna flip this around, give you a little more visuals of the on this. We're gonna have these old tabs here or these openings and that's gonna pretty much just match up with the tabs that we have on our rubber base on piece B. And we're just gonna put that into place. Just like that. This is gonna grab on. Now, typically, you'd put part C on now and the way part C is gonna go into place is it's just gonna grab on to the very end and go on top of your vehicle. Now, as you like to leave this off, because sometimes this is gonna be a little loose, sometimes it might fall off or it might scratch up your vehicle. So, as you like to put that on after I already have this on top of my vehicle. So, now I'm just gonna repeat this process on the other side. This is gonna have a lot of adjustment to it, so we're just gonna roughly place it up here to begin with. Again, we wanna make sure we have the thicker side facing forward and the thinner side facing behind us. I'm just gonna try to line this up to those little brackets we have on top of our roof. And it's not gonna fit up there perfectly, but once we have it just roughly in place, we're can adjust it afterwards. Now get that perfect fit, we're gonna be doing two things. The first thing we're gonna be doing is properly getting the seated into place. So this rubber base is gonna be on here all the way. And we're gonna have bracket A, it's gonna have this little tab in the very bottom here. Notice how it has that lip. There's gonna be an opening on the back side of this bracket that's gonna seat into place with. So I'm just gonna line that up. Got a better fit there. And there we go, that's a good fit. This is properly seated on here all the way. Next thing we're gonna do, is look on the very top of our crossbar. You gonna notice there's a bunch of letters right here. We wanna make sure this letter setting is the same on either side or close to being the same on either side. So what I'm gonna do is, if I have it on setting L here, then I wanna match it to the L on the other side. If I need to adjust it, all I'm gonna do is push or pull this away from me until it's even. What I'm gonna do now is grab our clamp C, put it at the very end here, and try to line it up with that bolt. With that lined up, I'm gonna grab these more cylinder nuts. One side's gonna be fitted for an Allen key, the other side's gonna be threaded. I'm gonna grab that threaded side and just hand tighten it into place. We don't wanna fully tighten this down quite yet, just enough to have some resistance. 'Cause if you tighten one side too much or all the way down, typically you're gonna get an uneven fit. So, once we get this one hand tightened with a little bit of resistance, then we're gonna repeat this on the other side, and then we're gonna come back with a torque tool. How the torque tool's gonna work is, you stick it in here, tighten it down some. I've already gone back and forth a couple times, so we're almost there. And here pretty soon, you're gonna start to hear this click. (torque tool clicking) Just like that. Best letting us know this is all the way tightened down to the specs recommended. And once we get here, then we can start doing that on the other side and then put the end caps in place. And when you put in this end cap back into place, I already have mine on the other side. You just grab that flathead screwdriver, if you still have the plastic lock cores in here, it'll seat into place. Now if you have the metal ones, you can actually just straight those out and use your key to lock that into place. But from here I'm just gonna give this a good shake test, make sure this feels pretty sturdy. It's not gonna come off our roof and this is feeling pretty good. And then we can take it out for a ride. And now's just a look at the Thule Roof Rack, on top of our 2024 Jeep Wagoneer L. I'm Matt. Thanks for watching.


Do you have a question about this Roof Rack?
Info for this part was:
At etrailer we provide the best information available about the products we sell. We take the quality of our information seriously so that you can get the right part the first time. Let us know if anything is missing or if you have any questions.


Thank you! Your comment has been submitted successfully. You should be able to view your question/comment here within a few days.
Error submitting comment. Please try again momentarily.