
Custom Fit Roof Rack Kit With Y01156 | Y03541 | Y33TR
Item # Y68BB
Our Price: $623.85
Confirmed to Fit
2010 Subaru Forester
Will this fit?
To see if this custom-fit item will work for you please tell us what vehicle you'll use it with.
This item qualifies for Free Shipping


- All Info
- Reviews (142)
- Q & A (0)
- Videos (7)
- Photos
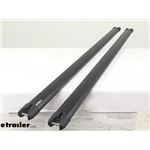
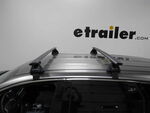
Yakima Roof Rack - Y68BB
- Crossbars
- Square Bars
- 2 Bars
- 55 Inch Bar Space
- Yakima
- Black
- Overhang
Heavy-duty crossbars mount to Yakima towers (sold separately) to create an aftermarket roof rack. Top and bottom channels let you add channel-mount accessories. Tie-down points in endcaps let you easily secure cargo.
Features:
Yakima HD Bar-SM:- Heavy-duty crossbars let you build an aftermarket truck bed rack or roof rack for your vehicle
- Pair with Yakima truck bed towers or roof rack towers and a fit kit (sold separately) to create a complete system
- Full-length design maximizes space for carriers and accessories
- Versatile crossbars accommodate accessories that mount in the T-slots or clamp around the bars
- Accessories can be mounted in top and bottom channels
- Rubberized strips in top channels reduce wind noise and drag
- Keep dirt and grime out of crossbars
- Provide cushioning and slip resistance for your cargo
- Bottom channels allow for easy installation on Yakima truck bed rack towers
- SL adapter (Y03541 - sold separately) allows bars to work with BaseLine, TimberLine, SkyLine, and RidgeLine towers
- Etched measurements on bottom of bars help center rack on your vehicle
- Heavy-duty yet lightweight aluminum bars are durable and rustproof
- Plastic endcaps help to keep water and debris out of bars
- Integrated tie-down points make it easy to secure gear
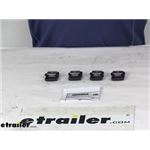
Yakima HD Bar SL Adapter:
- Adapters let you mount your Yakima HD crossbars on BaseLine, SkyLine, TimberLine, or RidgeLine roof rack towers
- Can also be used as replacement adapters for JetStream crossbars
- Easy installation with included tool
- Simply slide adapter into bar's channel and secure it to the tower
- Kit includes 4 adapters
Yakima TimberLine Towers (4-pack) (w/new covers):
- 4 Heavy-duty towers mount Yakima crossbars to your vehicle with raised, factory side rails
- Pair with 2 Yakima crossbars (sold separately) to create a complete roof rack
- Versatile BarBeds are curved to accommodate the elliptical shape of Yakima CoreBar and JetStream crossbars
- Also fit RoundBar crossbars with adapter (Y03536 - sold separately)
- Safe and easy installation with rubber-coated stainless steel straps
- Straps wrap completely around raised side rails for maximum security
- Included torque tool clicks 3 times when straps are secure - eliminates fear of under- or over-tightening
- Lockable with Yakima Same Key System (SKS) lock cores (Y07204 - sold separately)
- Weather-resistant stainless steel, glass-reinforced plastic, and elastomer construction
8001156 Yakima HD Bar T-Slot Crossbars - Aluminum - Black - 55" Long - 500 lbs - Qty 2
8003541 HD Bar Adapter for Yakima StreamLine, BaseLine, TimberLine, Skyline, and RidgeLine Towers - Qty 4
8000164 Yakima Timber Line Roof Rack Towers for CoreBar, JetStream, and RoundBar Cross Bars - Raised Side Rails - Qty 2
Replaces 8000147
Video of Custom Fit Roof Rack Kit With Y01156 | Y03541 | Y33TR

Videos are provided as a guide only. Refer to manufacturer installation instructions and specs for complete information.


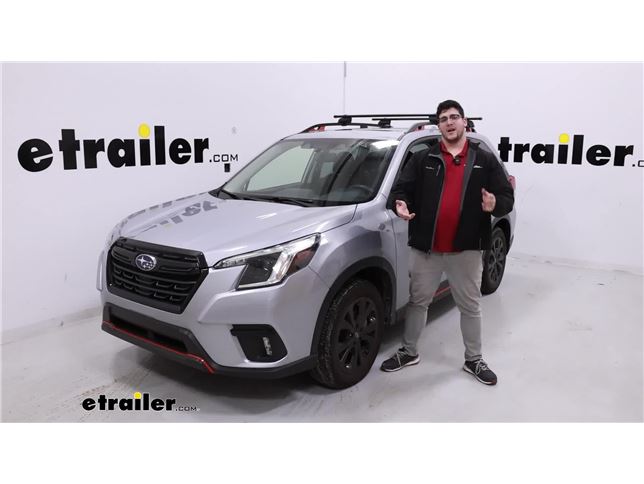
Video Transcript for Yakima CoreBar Crossbar Roof Rack Kit Installation - 2023 Subaru Forester
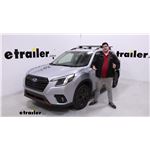
Hi, Matthew of etrailer. And today, we're gonna talk about the Yakima Roof Rack System with the CoreBars on top of our 2023 Subaru Forester. That's gonna be a great option for you if you're really trying to get a lot more space out of the Forester, whether you have a lot of people with you, or it's already filled up with other luggage or items. So that's gonna be great if you have any longer items like skis, kayaks, or roof boxes. It's also gonna be a great system if you want to get this key to like with any of your other Yakima gear. So let's take a closer look at it.
Our system today is gonna be comprised of two parts. That first part is gonna be our 50-inch CoreBar crossbars, and the second part is gonna be our Yakima Towers. So we're gonna take a closer look at the crossbars. You'll notice we're gonna have these brackets up top, and that's gonna grab around here, and that's gonna be used to attach our towers to. You'll notice we also have this arrow shape to 'em and the arrow shapes will help 'em be more aerodynamic to help reduce that wind noise.
Moving to the tower, you notice we have this end cap at the very back of it. What I do like about that is it's gonna hide all your hardware. So this is gonna give you more of a clean finish, and that's actually underneath here is where your strap is gonna attach to. This strap is gonna be made of rubber, so it's not gonna be likely to scratch anything up. And since it wraps all the way around, it's gonna give you a very secure fit.
And one last thing to know about this is this plastic core we have in the back of it. You can actually go into our website and get that replaced, and put a metal locking core in that, and get that key to light to any of your other Yakima accessories. So there's gonna be a few things that set this system apart from some of the other crossbars you might see. The first thing is this is actually gonna be constructed from steel, rather than aluminum, and it's not gonna have that T-track up top, so you're not gonna be putting any T-track accessories on here, but it's gonna be great for this clamp on accessories, especially since it is made out of steel. It's also gonna have a higher weight capacity of up to 220 pounds.
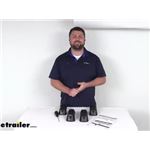
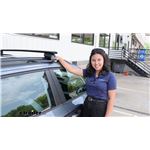
But what I'd recommend doing is just checking what your roof is rated for and then going from the lowest rated component. As for how this is gonna sit up here, if I go from the top of our raised rails to the top of the crossbar, that's gonna be a little bit under three inches, which isn't too bad. What I suggest doing is taking the total height of your vehicle plus your crossbars, and then if you put any accessories on top of that, include that as well, so you know what areas you can make it under. As we overhang, we go from our tower to the end of the crossbar. There's gonna be about 3 1/2 inches which isn't too far. You're not gonna be likely hitting your head on here, but you should have some room to put some smaller accessories at the very end of here, like a ski carrier. And then talking about our next measurement is gonna be our spread. And since we have raised rails today, that's definitely a plus 'cause you can maneuver these wherever you need 'em to be and adjust for different crossbar spreads. Now, for what we have today, we have about three inches of crossbar spread, and I try to put 'em back as far as I can. They'll give you an idea of how this is gonna sit up here, and it's gonna sit at the very edge of the sunroof we have at the top. So you don't have to worry about that covering your sunroof. Now, if you have any really long accessories up here, you wanna open your hatch. That's something to definitely think about because if you have this too far back, it could impede you opening up the hatch. Overall, I think it's gonna be a great system for you if you really are trying to get a lot more space out of your Forester, especially if you like those towers too with how they secure to your raised rails and how they have that locking core at the very back of it to get it key to like the any of the other gear. Those crossbars are made of that steel which is very durable and has that higher weight capacity. Just make sure you don't overload your roof too. Now one of the downsides of these crossbars though is since they are made of steel, they are gonna be more prone the rusting. They do have that black vinyl coating on top of them, but if that coating gets scratched off, then those areas will be more prone to rusting. Now, if you want something that is gonna have a T-channel on top that can accommodate those T-channel accessories, and it's gonna be made of aluminum, so it's less likely to rust, then I'd actually recommend the Yakima JetStream Roof Rack System. It will be very similar to this, only with a different crossbar that could accommodate T-channel accessories and be made of aluminum. But if you like this one because you don't really plan on using any T-channel accessories, then I think this is gonna be a great option for you. As far as the installation, it is pretty straightforward, pretty easy to get on and off of here, but if you need a hand with it, just stay tuned, and we'll walk you through it. To start off the installation, we're just gonna lay everything out. So up front, we're gonna have our crossbar and the towers that go along with it and then the hardware that's gonna help us install the towers onto the crossbar. You have your end caps and then this tool with this built-in torque device. I also recommend grabbing a measuring tape just to make this a lot easier. We're gonna need this adapter, so we can put our towers onto our CoreBar. And when you place this on, you wanna make sure the side with the ridges is facing up. I like to place it on at an angle, putting one side in first, (adapter snaps) applying pressure until the other side clicks into place. Then you repeat this process on the other tower. We're gonna come over to our crossbar now and remove our end cap just by pulling it right off. Also recommend flipping it over. This makes this a little bit easier than grabbing the brackets that go on. And you wanna make sure you put this in the right orientation, or it won't fit on into place. So if you do have it upside down, make sure that threaded side is facing up and match the size together, so it just slides right on. If you get the first one on there, just suggest put you all the way to the other side and grabbing the second one, and repeating that process. And just make sure you put your end cap back into place. We're gonna come over to our tower now. I like to start with it upside down, and it just gonna look just like this. You'll notice we have this hole. You'll see this bolt that's inside of there, and if I push our strap in, you'll notice we have a bolt right beneath there, too, that we'll be able to tighten from the side. Now, if you don't see it, because this one's in the way, all you have to do is loosen that bolt up, until you push that strap and you're in the clear. At this point, I'd have to get control of that bolt. You can see it popping out on the other side. I like to line it up with this bracket with a threaded side, and you just place it right on top and bolt it into place. Another thing I'll note too, I just wanna make sure this isn't in the right orientation. So the side with the bolt is facing out, and the side with the strap is facing in. You just tighten that all the way down, until you hear that torque device start to click (clicks) just like that. We got both towers on. We're just gonna roughly place it on top of our roof. Now, before I get it up there, we wanna make sure this is in the right orientation, so I wanna make sure that this thicker side is gonna face forward and this thinner side, behind us. Once we have adjusted for that, we're just gonna place it up here. Try and get those straps underneath the raised rails, until it's just sitting on up here. You'll notice we already have a rear crossbar up here, and the process is gonna be the same for both of 'em. So at this point, what I like to do is make sure our tower's gonna be parallel with our other crossbar. So you can do that just by finding a point that's gonna be the same on both sides and measuring out. And if both of your towers at the, are at the same point, then you're good. We can also talk about getting the correct crossbar spread now. So if you already have one crossbar on here, what I suggest doing is just measuring from one to another, and make sure this is gonna be able to accommodate the gear that you have. Now, we can get our overhang, and what I like to do is just go from our tower to the end of the crossbar, and then I have to make sure this is equal on both sides. A way you can adjust this is just by grabbing onto your tower either pulling or pushing on the crossbar. What this is just doing at this point is just grabbing that strap and attaching that metal rod to these metal hooks. And then we're gonna come over to this bolt, not this one on the bottom, but the one above it right here. And I wanna tighten this one all the way down on both sides. (bolt clicks) We can move to the bolt below it now and tighten this. The one up top is to tighten your towers to your crossbar, and this one on the bottom is to tighten the strap itself. So when we're tightening this down, we wanna tighten it enough where it's just gonna make contact with your raised rails at first. After when it makes contact with those raised rails, then we wanna go to the other side and repeat that process, just going back and forth, so we don't tighten one side more than the other. And we have both sides tightened up. We can put on our end caps just matching it up to the shape of our tower, so it clicks in the place. I like to give it a good shake test at this point. Make sure everything feels secure and if it does, then you can load it up with whatever accessories you have and hit the road. But if you liked everything you saw today, that's just a look at the installation and some of the features of the Yakima Roof Rack System on top of our 2023 Subaru Forester.
Customer Reviews
Custom Fit Roof Rack Kit With Y01156 | Y03541 | Y33TR - Y68BB
Average Customer Rating: 4.8 out of 5 stars (142 Customer Reviews)
Heavy-duty crossbars mount to Yakima towers (sold separately) to create an aftermarket roof rack. Top and bottom channels let you add channel-mount accessories. Tie-down points in endcaps let you easily secure cargo.by: Maureen02/12/2024
etrailer was a great place to order, quick and easy. Yakima products however are over priced and overly complicated.
by: Mike D07/16/2023
The customer service in ordering theses par tea was amazing!! I spoke with a wonderful specialist named Kate F, and she was super helpful and patient answering all my questions and helping me make sure I had the correct parts I needed for my type of car. The bars are very sturdy and have proven very worth the money!!
by: Layne 02/11/2024
These adapters were easy to install and made my system fit together nicely.
by: Wade 03/09/2024
Your service is nothing short of excellent! Thank you
by: Hurtlocker08/11/2023
Really Easy to Install! Solid and Strong amount to Roof Rack.


by: Bill K07/01/2023
Hyundai
I ordered the Yakima roof rack for a 2019 Hyundai Ioniq. I went with the heavy duty one for extra strength but it is quite a bit thicker, likely increasing wind noise. So I might have chosen the aerodynamic lighter weight one if I was to do it again. Also, I needed to get larger bolts for my kayak holder to get around the crossbar. The instructions and video on website were very helpful but they did not explain well how to adjust the toe and pitch. For the toe adjustment, you have to push the metal post with the tool before tightening. That was not obvious. For the pitch, it helped to do that once the towers are attached to crossbar. Then you can tilt tower while cross bar is laying flat (upside down). I ended up having to add tilt on both front and back crossbars for them to be flat when installed. Website said only front one would need to be pitched. I am very pleased with the look and sturdiness of the product. My Hyundai Dealer had zero options for this car.


by: Paul 07/15/2023
Easily supports the RoofNest! The Customer Service with Roger was Excellent!
by: Dan 11/06/2023
Great company. Fast delivery.
by: Robert07/13/2021
The Yakima products are doing great. Just got home yesterday from a 18 day trip using them in Michigan's upper peninsula. Love them. Great products. Thanks again.


by: Steven 10/16/2023
Great product. Great service.
by: Ryan 06/20/2023
This part adapted like no other adapter
by: Diane 07/28/2023
SIMPLE & EASY!
by: Vincent 05/20/2023
Have worked quite well for what we need. Very happy.
by: Donald 07/13/2022
These Yakima crossbars are very HD, just what I was looking for. The Small size was hard to locate but etrailer had them in stock and delivered in short order. Instillation was quick and straight forward.
by: Donald03/26/2023
I had a difficult time identifying whether these were the correct adapters for the rack towers that I was purchasing to fit my tracks but that has more to do with yakima doing everything a-la-cart instead of having kits that include everything you need if I hadn't already had the HD bars on my other rack and wanted to be able to transfer them to this rack I probably wouldn't have went to this expense because I think they are overpriced.AS far as etrailer is concerned I always receive great service and products and they are always well packaged and never damaged by poor delivery care and always fast delivery speed.
by: Steve01/24/2023
The fit is good on the 22 Wilderness but there is definitely wind noise and I will add a diverter soon.
by: SueCanoe02/10/2023
They do the job. I can't say that they look like they were custom-made for my new vehicle, but I trust them to stay on and keep my boat on the car. They hold securely.
by: Blaine04/26/2021
Ford
Great product and even better was the service with etrailer! These guys make it happen and delivery was super fast. Thanks for a fantastic experience, will be a return customer.
Yakima HD bars 60”
2018 Ford Expedition


by: Jonathan04/25/2021
Toyota Highlander
They fit perfectlly and solidly on my 2021 Toyota Highlander. The instructions are clear and entirely accurate.


by: Lynn04/17/2022
Toyota Highlander
Christian took the extra time to figure out what I needed to attach a hullavator to my Highlander when others were unable to help. The order came quickly too.
by: Puente Hills03/18/2020
It looks just as pictured :) Great product and superior service! William took the time to help us decide what we actually needed and would work for us. He is knowledgeable in regards to his products and has an overall helpful attitude. It was such a pleasure working with him.
Thanks again and buy William lunch today!!
p/s we have not installed the product yet so I will send a picture once its taken care of
by: Mart09/15/2020
Quality stuff. Will work as needed. Great service with etrailer!
by: Richard05/02/2022
Required for Yakima HD crossbars using timberland tower system.


by: Chad 06/12/2021
Fast delivery, product came in excellent condition. Bars are larger then they appear, def need the wind fairing to abate noise.


25
195
Show More Reviews
See what our Experts say about this Yakima Roof Rack
- Cross Bar Options And Kayak Carrier For A 2022 Hyundai SonataWe do have a couple of cross bar options for your 2022 Hyundai Sonata that will work great for you. -First we have the Yakima JetStream Crossbars # Y00425 with the BaseLine Towers for Yakima Crossbars # Y28TR, the fit kit # Y06180 & # Y06153. These are aerodynamic cross bars that measure 50" long, and have a maximum weight capacity of 165lbs. -Next, we have the Yakima CoreBar Crossbars # Y00421, with the same towers # Y00146, and fit kits # Y06153 & # Y06180. These cross bars share...
view full answer... - Recommended Roof Rack for Mounting a Thule Hullavator Pro on a 2021 Toyota RAV4The Thule Hullavator Pro, part # TH898, does in fact need crossbars that extend 4" - 8" beyond the feet. To use the flush rails on your 2021 Toyota RAV4, you will need a roof rack that has feet that are compatible with the rails. With those two stipulations in mind, the Thule WingBar Evos don't look like they will provide enough clearance with their 47" of crossbar length. Instead, I recommend the Yakima HD Crossbars, part # Y01156. They are 55" long, so they will have the extension you...
view full answer... - Roof Rack & Attachments For 2010 Toyota Tacoma TRD SR5I would get the Yakima HD Bar Roof Rack System. You'll need the HD bars # Y01156 Skyline Towers # Y53TR HD bar adapter # Y03541 and landing pad # Y74FR. You can then use the JayLow Kayak Carrier # Y04073, Off-Grid Cargo Basket # Y07139 or Skybox Cargo Box # Y95AV. These are just my suggestions for accessories but there is much much more on our website if you're wanting something different!
view full answer... - Are Thule Accessories Compatible With Yakima HD CrossbarsThe Yakima HD Crossbars are 3" wide x 1-1/2" tall, so most Thule accessories are compatible with them, so long as the Thule accessories mount to channels or bars of that width (you didn't mention the specific accessory for me to verify). The Yakima HD crossbars come in a number of different lengths: - 55" Long: Yakima HD Crossbars # Y01156 - 60" Long: Yakima HD Crossbars # Y01157 - 68" Long: Yakima HD Crossbars # Y01158 - 78" Long: Yakima HD Crossbars # Y01159 I have added a link...
view full answer... - Recommend Roof Rack for a Bike and Kayak on a 2018 Honda CR-VIn order to add a roof rack to your 2018 Honda CR-V I recommend using the Yakima Roof Rack made of parts # Y01156, # Y53TR, # Y03541 and # Y00245. This system has heavy duty yet lightweight aluminum cross bars that are durable and rustproof. This option will also be far more cost effective than an OEM roof rack as I am sure you will come to find out. If you need a kayak carrier then I recommend the Rhino-Rack Nautic Roof Kayak Carrier part # RR570. It is side-loading and it comes with...
view full answer... - 2016 Lexus GX 460 Flush Mounted Rails Fit KitFor your 2016 Lexus GX 460, you will need the Landing Pad 30 for Yakima SkyLine And Control Towers - Qty 6, part # Y25ZR, and not a RidgeClip. This kit works for Yakima HD Crossbars - Aluminum - Black - 55" Long - Qty 2 part # Y01156. You will also need the HD Bar SL Adapter for Yakima BaseLine, SkyLine, TimberLine, and RidgeLine Towers - Qty 4, part # Y03541. The last thing you will need is the Yakima RidgeLine Towers For Yakima Crossbars part # Y00145. This rack will have a weight limit...
view full answer... - Roof Rack For Thule Tepui Tent on 2018 Jeep Compass TrailhawkIt's always a tough question to answer when you're a company that specializes in roof racks as the liability of the setup could get them in trouble. That being said, it can be done but they are probably concerned with the manufactures weight capacity of the roof on your 2018 Jeep Compass. All I can do is give you the heaviest duty rack and it's up to you to make sure your compass can handle the weight. I would get the Yakima HD bars # Y01156 which are extremely strong. You'll need the...
view full answer... - Recommended Roof Rack for a 2023 Kia Sorento w/ a Naked RoofTo attach a roof rack to your 2023 Kia Sorento, with no roof rails, you will want the roof rack by Yakima and it includes the following parts: Yakima HD Crossbars - Aluminum - Black - 55" Long - Qty 2 item # Y01156 BaseLine Towers for Yakima Crossbars - Naked Roofs - Qty 4 item # Y28TR HD Bar SL Adapter for Yakima BaseLine,Towers - Qty 4 item # Y03541 BaseClip Fit Kit for Yakima BaseLine Roof Rack Towers - Qty 2 item # Y06175 BaseClip Fit Kit for Yakima BaseLine Roof Rack Towers -...
view full answer...
- Yakima HD Bar Roof Rack For A 2022 Lexus GX 460 With Factory Raised Rails And Fixed Mounting PointsYes, you certainly can use the fixed mounting points on the factory rails of your 2022 Lexus GX 460 to mount Yakima HD crossbars. To do so you will need the following parts; Crossbars - Yakima HD 55" # Y01156 Towers - Yakima Skyline # Y53TR HD Bar Adapter # Y03541 Landing Pad # Y25ZR The 55" HD bar will have minimal overhang on a 2022 Lexus GX 460. it will have a very nice clean, factory look once installed.
view full answer... - Lowest Profile Roof Rack that Fits 2022 Outback WildernessThe lowest profile roof rack that fits your 2022 Subaru Outback Wagon is the Rhino Rack Stealthbar roof rack part # JA7970 which will only add right at 1-3/8 inches.
view full answer... - Heavy Duty Roof Rack Recommendation for 2021 Subaru Outback WagonFor your 2021 Subaru Outback Wagon the Yakima HD roof rack kit part # Y01156, # Y00148, # Y46VR, and Y03541 is a confirmed fit and would work great. This is a higher capacity roof rack that has crossbars that are rated for 220 lbs. This does not require removing the roof rails either. I attached install instructions link for this for you to check out as well.
view full answer... - Recommended Roof Rack With Yakima HD Crossbars for 2018 Mazda CX-5For your 2018 Mazda CX-5 the roof rack I recommend consists of the following: Yakima HD Crossbars -55" Long - Qty 2 # Y01156 BaseLine Towers for Yakima Crossbars # Y28TR BaseClip Fit Kit # Y06130 BaseClip Fit Kit # Y06154 You may also be interested in the Replacement Load Stops # 753-3761 which are also compatible with those bars.
view full answer... - Recommended Roof Rack for a 2021 Mercedes-Benz GLC 300 SUVI would be happy to help you and yes we do have a roof rack for your 2021 Mercedes-Benz GLC suv. It is the 2021 Mercedes-Benz GLC Roof Rack by Thule and it includes the following parts: Thule WingBar Edge Crossbars - Aluminum - Black - Qty 2 item # TH96FE Edge Flush Rail Feet for Thule Edge Crossbars - Flush, Factory Side Rails - Qty 4 item # TH89SC Fit Kit for Thule Evo Flush Rail and Edge Flush Rail Roof Rack Feet - 6020 item # TH186020
view full answer... - Long Crossbar Roof Rack for 2017 Honda HR-V to Install Thule Hullavator Assisted Kayak CarrierThe Thule Hullavator part # TH898 can fit aftermarket roof racks like the Rhino Rack you have but the bars of the rack have to stick out past the feet of the rack 4 to 8 inches. If you need a longer crossbar roof rack the longest option we have is the Yakima JetStream bars # Y00425, # Y00145 and # Y06023 which will give you 60 inch long crossbars. To add locks you'd need just the part # Y07204.
view full answer... - Thule Hullavator Kayak Carrier Mounting RequirementsTo install Thule's load-assist Hullavator kayak carrier # TH898 on a vehicle's roof rack the ends of the bars must extend out past the roof rack feet by at least 4-inches. You can see this requirement illustrated in the linked diagram. The comparable Yakima ShowDown carrier # Y04081 also has a similar bar space requirement. If your roof rack is a Subaru factory type whose bars do not extend past the rack feet/rails then you can still use the Hullavator but you'll need to add a different...
view full answer...
- How To Carry 1 Canoe And 1 Sea Kayak On A 2003 Dodge Caravan With Bare RoofIf you have the factory tracks running front to back and do not have raised rails, then the longest option is Yakima HD Crossbars - Aluminum - Black - 55" Long - Qty 2 # Y01156 which measure 55" long and have a weight capacity of 150lbs. To install these onto your roof you will also need Rhino-Rack Vortex Aero Crossbars - Aluminum - Black - 49" Long - Qty 2 and Rhino-Rack SX Series Legs for Vortex Aero Crossbars - Raised Factory Side Rails - Qty 4, parts # RRVA126B-2 and # RRSX100. When...
view full answer... - Will The Yakima BedRock HD Towers Work With The Rhino-Rack Vortex Crossbars For Retrax XR?The Yakima BedRock HD Towers for Truck Bed Rails # Y01160 are only compatible with Yakima HD crossbars such as the Yakima HD Crossbars - Aluminum - Black - 55" Long # Y01156. These towers will not be compatible with any Rhino-Rack crossbars. The Rhino-Rack Vortex Crossbar System for Retrax XR Series and Mountain Top EVO-M Tonneau Covers # RRVA180B-RRRLT600 is only meant to be installed onto the Retrax XR Tonneau Cover rails, so if you want to use a truck-bed rack without the Retrax cover...
view full answer... - How to Fit Yakima HD Crossbars on a 2009 Subaru Forester for a Roofnest Sparrow Eye 130 TentI have a great solution for you to get Yakima HD crossbars on your 2009 Subaru Forester with factory raised rails to use with your Roofnest Sparrow Eye 130 tent. Unfortunately, the Evo Raised Rail Feet for Thule Crossbars - Factory Raised Rails # TH710401 only work with Thule-brand crossbars. Sadly, Thule does not make HD crossbars that are compatible with your vehicle. However, with that being said, Yakima does have all the parts you need to mount an HD crossbar system on your raised...
view full answer... - Roof Rack For a 2020 Subaru Outback With Factory Raised Rails and Stowable CrossbarsIt sounds like you are wanting a roof rack for your 2020 Subaru Outback that has raised rails with stowable crossbars that will allow you to have a higher weight capacity. If that is the case, then you can use the 2020 Subaru Outback Wagon Roof Rack by Yakima which consists of: - Yakima HD Crossbars # Y01156 - SkyLine Towers for Yakima Crossbars # Y53TR - HD Bar SL Adapter for Yakima SkyLine Towers # Y03541 - Landing Pad 27 for Yakima SkyLine Towers # Y46VR This will provide you with...
view full answer... - Do the Yakima HD Bars Fit A 2015 Lexus ES 350 With A Glass Sunroof?I went ahead and spoke with Yakima and they said that you actually can use the Yakima HD Crossbars # Y01156 with the BaseLine Towers for Yakima Crossbars # Y28TR, the HD Bar SL Adapter for Yakima BaseLine, SkyLine, TimberLine, and RidgeLine Towers # Y03541 and the fit kits # Y06175 & # Y06160 with your 2015 Lexus ES 350 that has a glass roof. We list this as a "non-fit" due to the fact that you could potentially damage your sunroof while this system is installed, but it'll physically fit...
view full answer...
- Which Bars Do I Need For Yakima BedRock HD Towers for Truck Bed Rails The Yakima BedRock HD Towers part # Y01160 for Truck Bed Rails will only work with the Yakima HD crossbars part # Y01156 for 55" part # Y01157 for 60" and part # Y01158 for 68" bars so the Thule Xsporter bars would not be compatible.
view full answer... - Roof Rack Needed for 2021 Jeep Grand Cherokee Limited For Thule HullavatorFor your 2021 Jeep Grand Cherokee that has the flush roof rails that have the chrome center section for a roof rack the Yakima 55 inch HD bar setup part # Y01156, # Y53TR, # Y03541, and # Y00244 would be a really great option with plenty of capacity and bar space for roof top cargo. Now you'd only be able to fit two of the Hullavators part # TH898 based on how much space they take up and how they fold down etc. This rack can easily detach for the Yakima bars as it would fit into the top...
view full answer... - Recommended Roof Rack for a 2022 Toyota Rav4 w/ Flush Mount Rails to Use a Thule HullavatorThe roof rack that I recommend for your 2022 Toyota Rav4 to use the Thule Hullavator # TH898 is going to be the 2022 Toyota RAV4 Roof Rack by Yakima. This rack consist of the Yakima HD Crossbars # Y01156, SkyLine Towers for Yakima Crossbars # Y53TR, HD Bar SL Adapter for Yakima # Y03541 and Landing Pad 23 for Yakima SkyLine and Control Towers # Y98FR. This will provide you with everything needed for a roof rack on your Rav4 that has the necessary 4"-8" of extension past the mount feet needed...
view full answer... - Off-Road Roof Rack Recommendation for 2019 Jeep CompassBasically all of the roof racks aside from the ones offered by Thule have been rated for 165 lbs for your 2019 Jeep Compass. Since you'll be going off-road I recommend going with the Yakima roof rack system that utilizes HD bars: Yakima 55" HD Crossbars - # Y01156 SkyLine Towers - # Y53TR HD Bar SL Adapter - # Y03541 Landing Pad 19 - # Y00245 (these mount to the sides of your raised rails as opposed to inside an opening like what you mentioned) This roof rack is on the higher-end when...
view full answer... - How to Carry Bikes on a 2018 Volkswagen Golf Alltrack with a SunroofUsing the JetStream Crossbars # Y00425 along with the TimberLine Towers # Y33TR will be taller than using the Yakima RailBar Crossbars # Y00432-0433 for your 2018 Volkswagen Golf Alltrack but you do need to note that every roof rack manufacturer states that a sun or moon roof should not be used with a roof rack installed. Roof racks do have some wind noise which the aero style bars, although cause less noise, are not immune from. There is also the issue of clearance as well as possible...
view full answer... - Recommended Roof Rack for a 2014 Honda Ridgeline We have a couple of options for roof racks depending on whether or not your 2014 Ridgeline has the raised rails that run down the length of the roof. Both of these options have a 165 lbs capacity. I have listed them below: For a naked roof with no rails. Yakima JetStream Crossbars - Aluminum - Black - 60" Long - Qty 2 item # Y00426 BaseLine Towers for Yakima Crossbars - Naked Roofs - Qty 4 item # Y28TR BaseClip Fit Kit for Yakima BaseLine Roof Rack Towers - Qty 2 item # Y06186 BaseClip...
view full answer... - Recommended Roof Rack for 2020 Subaru Forester With Raised Rails for Rooftop TentThe roof rack I highly recommend for your 2020 Subaru Forester with raised rails that will allow you to carry any cargo and use your Yakima SkyRise HD Tent # Y07437 is a rack from Yakima, which consists of: - Yakima JetStream Crossbars # Y00425 (Black) - TimberLine Towers for Yakima Crossbars # Y33TR The accompanying photo shows this rack on a Subaru Forester so you can see how it will look when on yours. It has the needed capacity for your tent, and the bars are aerodynamic so you can...
view full answer...
- Roof Rack Recommendation for Raised Rails on a 2011 BMW 3 SeriesI have a way for you to use longer crossbars for a roof rack on your 2011 BMW 3 Series but since the Thule crossbars have a limiting slot on the underside we need to use a different brand roof rack system and for that I recommend Yakima as they're the only ones with a slot all the way through so you can literally fit any crossbar length. I'm only seeing from all of our manufacturers that a 2011 BMW 3 Series has raised rails so for that Yakima recommends the following parts (if you have...
view full answer... - How to Attach Yakima Round Crossbars for a Thule Hullavator on a 2006 Toyota Highlander w/ RailsSince you already have the necessary round bars to mount the Thule Hullavator item # TH898 to the roof of your Highlander, you will just need the parts listed below. TimberLine Towers for Yakima Crossbars - Raised, Factory Side Rails - Qty 4 item # Y33TR RoundBar SL Adapter for Yakima BaseLine, SkyLine, TimberLine, and RidgeLine Towers - Qty 4 item # Y03536 The TimberLine Towers are confirmed to mount to the factory roof rails on your 2006 Toyota Highlander. You will need the adapter...
view full answer... - Roof Rack for 2016 Toyota 4Runner to Fit Two Thule Hullavator CarriersSince the Thule Hullavator part # TH898 takes up up to 28-1/2 inches of bar space you'd need a roof rack with longer crossbars installed on your 2016 Toyota 4Runner like the Yakima Jetstream part numbers # Y00426 and # Y33TR which is a confirmed fit for your vehicle to fit two of the carriers. This rack has 60 inch crossbars. This would give you a very solid and high quality roof rack and kayak carrier setup.
view full answer... - Recommended Roof Rack for a Hullavator on a 2014 Ford Expedition w/ Raised Side RailsTo use the Thule Hullavator item # TH898 on your 2014 Ford Expedition you're going to need to install a set of crossbars that extend 4" - 8" past the roof racks legs. This allows the lift assist function of the Hullavator to work. Since your Expedition has the raised side rails, I recommend the Roof Rack by Yakima and it includes the following parts: Yakima JetStream Crossbars - Aluminum - Black - 60" Long - Qty 2 item # Y00426 TimberLine Towers for Yakima Crossbars - Raised, Factory...
view full answer... - Roof Rack Weight Capacity on 2019 Ford Escape with Moon RoofI checked your owners manual and the weight capacity of 100 lbs without moonroof or 45 lbs with moon roof are for the factory crossbars. Granted, aftermarket crossbars won't greatly increase the capacity, so carrying two kayaks on a moon roof Escape is not a great idea. If you don't have the factory roof rack, then I recommend the Yakima JetStream Crossbars - Aluminum - Black - 60" Long - Qty 2 # Y00426 and TimberLine Towers # Y33TR which are rated for 132 lbs. These ratings are based...
view full answer... - Are Yakima TimberLine Towers Compatible With Thule Wingbar Evo Crossbars?No, you cannot use Yakima Timberline Towers # Y33TR with Thule crossbars; you must use the same brand for the roof rack system as different brands are not made to be compatible with each other. The only parts that may be compatible among several brands are the industry standard T-slot channels on top, and the standard roof tracks for camper shells or naked roof. In order to install the Thule Wingbar 50" crossbars # TH711300 that you already have, you'll need Feet # TH710601 and custom...
view full answer... - What Comes with the Annex for 2 Person Yakima SkyRise Tents # Y07421The Annex for 2 Person Yakima SkyRise Tents # Y07421 is just the enclosure that you see pictured beneath the Yakima SkyRise tent in the attached review video. This is a fit for the (discontinued) SkyRise Y07407 (Red) or SkyRise HD # Y07436 (Tan and Red). The SkyRise tents are compatible with your Crosstrek but you will need to use a different roof rack if the one you currently are using is the OEM roof rack according to Yakima. Roof rack systems where the crossbars end inside the legs...
view full answer... - Two Load-Assist Kayak Carrier Recommendation for a 2015 Jeep CherokeeEach Hullavator requires 28.5-inches of space on the crossbars. So you would need 57" long crossbars with 4-8 inches of crossbar overhang on each side. That can be accomplished with the Yakima Jetstream 60" Roof Rack System with part numbers # Y00426 and # Y33TR. Your 2015 Jeep Cherokee has a load capacity of 150 lbs with a roof rack according to the Owner's Manual. The Thule Hullavator Kayak Carriers # TH898 weigh 40-lbs each by themselves plus your 72 lbs worth of kayak would be a total...
view full answer... - Recommendation on a 1 or 2 Kayak Carrier for a 2010 Subaru ForesterIf you looking for a kayak carrier that will work with factory, Aero, round, or square crossbar roof racks, then I recommend the Thule Stacker # TH830. The Stacker carrier can carry 1-2 kayaks at a time. The Stacker includes hardware and tie-down straps to help secure your kayaks to your roof rake and vehicle. It carrier can be mounted on a vehicle with a minimum crossbar spread of 24 inches. I you are looking for a carrier that will carry up to 2 kayaks and can be loaded easier form the...
view full answer... - Yakima Roof Rack that Fits 2024 Subaru Crosstrek with Raised Side RailsFor your 2024 Subaru Crosstrek has raised side rails you'd want the Jet Stream roof rack part numbers # Y00425 and # Y33TR.
view full answer... - Best Roof Rack for 2020 Mercedes-Benz GLB with Raised Side RailsThe best roof rack for your 2020 Mercedes-Benz GLB with the raised side rails is from Yakima because it will give your Mercedes a rack that is both quiet and strong while maintaining your Mercedes' distinguished look. The rack is made up of just a couple parts: - Yakima JetStream Crossbars # Y00425 - TimberLine Towers for Yakima Crossbars # Y33TR - Same Key System Lock Cores (Optional) # Y07204 The aerodynamic shape of the JetStream crossbars, along with their built-in WindRidges, ensure...
view full answer... - Is There a Platform Rack For a 2019 Ford Expedition That Mounts To Side RailsIf you want to use a platform rack and mount it directly to the side rails on a 2019 Ford Expedition (Includes Max) then I do have an option for this in the Yakima LockNLoad Platform Roof Tray Kit part # Y05045, part # Y05042-2, and part # Y33TR. The Yakima LockNLoad has integrated channels which allows you to use channel mounted accessories and it uses horizontal cross sections which allows you to use accessories that clamp on as well like a rooftop tent.
view full answer... - Recommended Roof Rack Solution for 2016 Ford F-150 That Could Possibly Be Used on Different VehicleAs long as your 2016 Ford F-150 is a Super or Super Crew cab, you can certainly use a Yakima CoreBar roof rack. The rack would consist of these parts: • Yakima 60 inch CoreBar crossbars, part # Y00422 • Yakima BaseLine Towers, part # Y28TR • Yakima BaseClip fit kit, part # Y06122 You could install the crossbars on the 2015 Forester, but you'd need different roof rack towers. You'd want to use the # Y33TR Yakima TimberLine towers. This would allow you to use the crossbars with the roof...
view full answer... - Roof Rack For Roof Top Tent On A 2007 FJ CruiserSince your roof rack on your 2007 FJ Cruiser is rather large compared to others, I recommend getting the Yakima HD Crossbars # Y01157 with these feet # Y33TR. They wrap around your factory roof rails and will ensure a tight fit. You'll need these adapters # Y03541 for the feet to connect properly to the HD bars. This is the strongest bar setup and is the best for a Roof Top Tent Setup. Since you have a roof rack, you won't be able to get a platform on your roof and these HD bars are built...
view full answer... - Roof Rack and Cargo Box Recommendation for 2020 Ford ExplorerI checked with Yakima and they have their Jetstream roof rack part numbers # Y00426 and # Y33TR as a confirmed fit for your 2020 Ford Explorer with raised rails and the moonroof. They recommend carefully watching the setup so that the bars don't interfere with the sunroof as you open it but the bars can be positioned so that it would work fine. Then for an easy to use cargo box that fits this rack and also has best clearance for opening the rear hatch you'd want the Thule Motion XT part...
view full answer... - Parts Needed to Install Yakima CoreBar Roof Rack on 2015 Toyota SiennaThe 2015 Sienna is equipped with rails that run fore and aft along each side of the roof, so you'd need the # Y33TR TimberLine towers to connect the # Y00423 CoreBars to the rails. No separate fit kit would be necessary!
view full answer... - How to Use Longer Yakima or Thule Crossbars for a 2009 Dodge JourneyIf you have longer bars from Yakima, like the 70" JetStream part # Y00427OR the 70" CoreBar # Y00423, then all you need for your 2009 Dodge Journey are the TimberLine Towers # Y33TR. If you happen to have Yakima round bars then you need the adapter # Y03536 as well. For your Thule bars you will need to use the Evo Raised Rail Feet # TH710401 with the 69" ProBar Evo Crossbars # TH713600 as the aero-style Thule bars have a limited mounting space underneath them and I don't think it will...
view full answer...
- Using a Roof Rack on a 2015 Subaru Forester And When To Remove ItYou can leave a roof rack on your vehicle at all times except when going through a car wash, as this will cause damage to the roof rack and vehicle. The Timberline is actually incredibly easy to remove, as it uses a steel coated rubber strap to mount directly to the raised factory rails and can install in minutes. Because of this, we do recommend getting a set of Yakima SKS cores, part # Y07204 to secure the rack to the vehicle at all times. These will insert into the tower's covers and...
view full answer... - Yakima Q Tower Roof Rack System for a 2017 Volkswagen GTI 4 DoorFits for vehicles change often, or the different body variations for a vehicle can have completely different fits, even if they are largely the same vehicle. At this time, Yakima has started to retire the Q-Clip system in favor of their newer BaseClip fits. However, for your vehicle, you will need Clips Q63 and Q112. If you have an existing round bar, or want to add a new kit to your vehicle, I recommend the following: If you don't have any raised siderails: Round CrossBars, 48...
view full answer... - Will the Erickson Ladder Rack Fit My 2021 Honda Ridgeline?I have a great solution for you. Unfortunately, I confirmed with Erickson that the Erickson Truck Bed Ladder Rack w/ Load Stops # EM07705 is not confirmed to fit your 2021 Honda Ridgeline with bed dimensions of 60"L x 50"W. In addition, we currently don't carry any truck-bed ladder racks that will fit your vehicle. For a great alternative solution for transporting a ladder rack or other long cargo, I recommend the Rhino-Rack T-Load Extender # RTL002 along with a single crossbar on your...
view full answer...
- Best Roof Rack For A Rooftop Tent On A 2021 Subaru AscentThe best set up for a rooftop tent would be the Yakima JetStream roof rack system because it's easy to use, reliable, and has a weight capacity of 165 lbs. To connect this to the raised rails on your 2021 Subaru Ascent you need the 60" JetStream Crossbars # Y00426 along with the TimberLine Towers # Y33TR. To add locks to the TimberLine Towers you can do so with the kit # Y07204. This will help prevent a passerby from being able to remove the roof rack easily.
view full answer... - Adding A Roof Rack To A 2020 Ford F-350 Crew Cab For Additional Cargo Carrying CapacityYakima OverHaul HD Adjustable Truck Bed Ladder Rack - Aluminum - 500lbs - 68" Crossbars # Y01151-58 has an on-road capacity of 500lbs, off-road capacity of 300lbs, and static capacity of 800lbs. The correct roof rack for your 2020 Ford F-350 Super Duty Roof Rack by Yakima would be the following parts: Yakima HD Crossbars - Aluminum - Black - 60" Long - Qty 2 # Y01157. BaseLine Towers for Yakima Crossbars - Naked Roofs - Qty 4 # Y28TR. HD Bar SL Adapter for Yakima BaseLine, SkyLine, TimberLine,...
view full answer... - Cross Bar Options And Kayak Carrier For A 2022 Hyundai SonataWe do have a couple of cross bar options for your 2022 Hyundai Sonata that will work great for you. -First we have the Yakima JetStream Crossbars # Y00425 with the BaseLine Towers for Yakima Crossbars # Y28TR, the fit kit # Y06180 & # Y06153. These are aerodynamic cross bars that measure 50" long, and have a maximum weight capacity of 165lbs. -Next, we have the Yakima CoreBar Crossbars # Y00421, with the same towers # Y00146, and fit kits # Y06153 & # Y06180. These cross bars share...
view full answer... - Recommended Roof Rack for Mounting a Thule Hullavator Pro on a 2021 Toyota RAV4The Thule Hullavator Pro, part # TH898, does in fact need crossbars that extend 4" - 8" beyond the feet. To use the flush rails on your 2021 Toyota RAV4, you will need a roof rack that has feet that are compatible with the rails. With those two stipulations in mind, the Thule WingBar Evos don't look like they will provide enough clearance with their 47" of crossbar length. Instead, I recommend the Yakima HD Crossbars, part # Y01156. They are 55" long, so they will have the extension you...
view full answer... - Recommended Fairing for Rola Roof rack on a 2009 Honda Accord SedanYes! Out of the variety of fairings that we have to offer I recommend the 40" long Inno Fairing # INA261 because it will fit perfectly with the 38" long Rola Sport Series Roof Rack # 59757 for your 2009 Honda Accord. If you let me know what you are wanting to use the roof rack for I can make additional recommendations for you. I have also attached an installation video and a picture of this roof rack on a 2009 Accord Sedan that you can reference.
view full answer...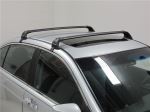
- Roof Rack & Attachments For 2010 Toyota Tacoma TRD SR5I would get the Yakima HD Bar Roof Rack System. You'll need the HD bars # Y01156 Skyline Towers # Y53TR HD bar adapter # Y03541 and landing pad # Y74FR. You can then use the JayLow Kayak Carrier # Y04073, Off-Grid Cargo Basket # Y07139 or Skybox Cargo Box # Y95AV. These are just my suggestions for accessories but there is much much more on our website if you're wanting something different!
view full answer... - Roof Rack For Roof Top Tent On A 2007 FJ CruiserSince your roof rack on your 2007 FJ Cruiser is rather large compared to others, I recommend getting the Yakima HD Crossbars # Y01157 with these feet # Y33TR. They wrap around your factory roof rails and will ensure a tight fit. You'll need these adapters # Y03541 for the feet to connect properly to the HD bars. This is the strongest bar setup and is the best for a Roof Top Tent Setup. Since you have a roof rack, you won't be able to get a platform on your roof and these HD bars are built...
view full answer... - Recommend Roof Rack for a Bike and Kayak on a 2018 Honda CR-VIn order to add a roof rack to your 2018 Honda CR-V I recommend using the Yakima Roof Rack made of parts # Y01156, # Y53TR, # Y03541 and # Y00245. This system has heavy duty yet lightweight aluminum cross bars that are durable and rustproof. This option will also be far more cost effective than an OEM roof rack as I am sure you will come to find out. If you need a kayak carrier then I recommend the Rhino-Rack Nautic Roof Kayak Carrier part # RR570. It is side-loading and it comes with...
view full answer... - 2016 Lexus GX 460 Flush Mounted Rails Fit KitFor your 2016 Lexus GX 460, you will need the Landing Pad 30 for Yakima SkyLine And Control Towers - Qty 6, part # Y25ZR, and not a RidgeClip. This kit works for Yakima HD Crossbars - Aluminum - Black - 55" Long - Qty 2 part # Y01156. You will also need the HD Bar SL Adapter for Yakima BaseLine, SkyLine, TimberLine, and RidgeLine Towers - Qty 4, part # Y03541. The last thing you will need is the Yakima RidgeLine Towers For Yakima Crossbars part # Y00145. This rack will have a weight limit...
view full answer... - Roof Rack For Thule Tepui Tent on 2018 Jeep Compass TrailhawkIt's always a tough question to answer when you're a company that specializes in roof racks as the liability of the setup could get them in trouble. That being said, it can be done but they are probably concerned with the manufactures weight capacity of the roof on your 2018 Jeep Compass. All I can do is give you the heaviest duty rack and it's up to you to make sure your compass can handle the weight. I would get the Yakima HD bars # Y01156 which are extremely strong. You'll need the...
view full answer... - Recommended Roof Rack for a 2023 Kia Sorento w/ a Naked RoofTo attach a roof rack to your 2023 Kia Sorento, with no roof rails, you will want the roof rack by Yakima and it includes the following parts: Yakima HD Crossbars - Aluminum - Black - 55" Long - Qty 2 item # Y01156 BaseLine Towers for Yakima Crossbars - Naked Roofs - Qty 4 item # Y28TR HD Bar SL Adapter for Yakima BaseLine,Towers - Qty 4 item # Y03541 BaseClip Fit Kit for Yakima BaseLine Roof Rack Towers - Qty 2 item # Y06175 BaseClip Fit Kit for Yakima BaseLine Roof Rack Towers -...
view full answer... - Yakima HD Bar Roof Rack For A 2022 Lexus GX 460 With Factory Raised Rails And Fixed Mounting PointsYes, you certainly can use the fixed mounting points on the factory rails of your 2022 Lexus GX 460 to mount Yakima HD crossbars. To do so you will need the following parts; Crossbars - Yakima HD 55" # Y01156 Towers - Yakima Skyline # Y53TR HD Bar Adapter # Y03541 Landing Pad # Y25ZR The 55" HD bar will have minimal overhang on a 2022 Lexus GX 460. it will have a very nice clean, factory look once installed.
view full answer... - Heavy Duty Roof Rack Recommendation for 2021 Subaru Outback WagonFor your 2021 Subaru Outback Wagon the Yakima HD roof rack kit part # Y01156, # Y00148, # Y46VR, and Y03541 is a confirmed fit and would work great. This is a higher capacity roof rack that has crossbars that are rated for 220 lbs. This does not require removing the roof rails either. I attached install instructions link for this for you to check out as well.
view full answer... - Parts Needed to Add Yakima Rack to Diamondback SE Tonneau Cover on Ford Super DutyWe can get your Ford Super Duty set up with a Yakima rack for your Diamondback SE tonneau cover. The Q Towers are no longer made and aren't compatible with Yakima's latest racks, so you'll need a new set of towers for the system. Here is exactly what you'll need: - Yakima 72" HD Tracks for Diamondback Truck Covers # Y92AR - Yakima HD Crossbars - 78" Long # Y01159 - SkyLine Towers # Y53TR - HD Bar SL Adapter # Y03541 - Landing Pad 26 for Yakima SkyLine Towers # Y75ZR You'll need a...
view full answer... - Will Installing Track Roof Rack System on A.R.E. Topper Void WarrantyInstalling a track system roof rack like the Yakima parts # Y01126, # Y00221, # Y8890027, and # Y00410 won't void the warranty for your pickup but from what I could find it looks like modifying your A.R.E. topper will void that warranty. Since we aren't an A.R.E. dealer I can't really confirm this, but from my research it is very likely that your warranty will be void. So you can have the track system professionally installed but that would be your choice whether you want to pursue this...
view full answer...
- Using Existing Yakima Bars on a 2007 Buick LaCrosseIt looks like the 2007 Buick LaCrosse uses the Yakima BaseLine Towers. For every Yakima crossbar set that is compatible with this LaCrosse, the towers are part # Y28TR, and the fit kit is the BaseClip Fit Kit, part # Y06170. These are the only parts you need for the JetStream Crossbars and the CoreBar Crossbars. If you have the Round Crossbars, you will also need the RoundBar SL Adapter, part # Y03536. If you have the HD Crossbars, you will also need the HD Bar SL Adapter, part # Y03541. If...
view full answer... - Yakima HD Roof Rack For 2023 Toyota RAV4 With Flush Side Rails For 2 Thule HullavatorsYou do have the correct Landing Pad, but you will need the 60 inch Yakima HD bars on your 2023 Toyota RAV4 to use and fit a pair of the Thule Hullavator Pro Kayak Carriers # TH898. Here are all the parts you'll need for the Yakima HD roof rack on your 2023 Toyota RAV4 with flush side rails: - Yakima HD Crossbars - 60" Long # Y01157 - SkyLine Towers for Yakima Crossbars # Y53TR - Landing Pad 23 # Y98FR - HD Bar SL Adapter # Y03541 The only other thing I recommend are locks to lock...
view full answer... - Yakima Showdown on a 2021 Telluride With Flush RailsWe can get you setup so you can carry two kayaks on the roof of your vehicle. However, you will not be able to install two Yakima ShowDown Kayak or SUP Carrier and Lift Assist w/ Tie-Downs - Side Loading - Clamp On, part # Y04081, on your vehicle. The crossbars of your vehicle cannot extend beyond the mirrors of your vehicle and with the length of the Yakima Showdown being just greater than 42", there is not a crossbar that accepts two Yakima Showdowns on the roof of your vehicle while...
view full answer... - Roof Rack Recommendation for 2017 Jeep Grand Cherokee TrailhawkFor your 2017 Jeep Grand Cherokee Trailhawk that has the factory black roof rails the best roof rack for carrying a roof top tent is the Yakima HD roof rack part numbers # Y01157, # Y28TR, # Y03541, and # Y06121 which gives you a very high quality roof rack with higher capacity load bars that are also aerodynamically shaped as well.
view full answer... - Long Crossbar Roof Rack for 2017 Honda HR-V to Install Thule Hullavator Assisted Kayak CarrierThe Thule Hullavator part # TH898 can fit aftermarket roof racks like the Rhino Rack you have but the bars of the rack have to stick out past the feet of the rack 4 to 8 inches. If you need a longer crossbar roof rack the longest option we have is the Yakima JetStream bars # Y00425, # Y00145 and # Y06023 which will give you 60 inch long crossbars. To add locks you'd need just the part # Y07204.
view full answer... - Roof Rack Recommendation for 2022 Mercedes Benz Sprinter 2500 High RoofYes we have the Yakima HD roof rack that fits your 2022 Mercedes-Benz Sprinter 2500 with part numbers # Y01158, # Y00148, # Y03541, and # Y00221. What's great about this rack is that it has a much higher weight capacity, is still aerodynamic shaped, and also has a lifetime warranty.
view full answer... - Parts Needed to Add Yakima Crossbars to Retrax Tonneau Cover with T-Slot RailsFor your setup I recommend the TrackTowers for Yakima Crossbars and Platforms - Track Mount # Y52AV which includes everything you need to mount Yakima crossbars to your Retrax cover (unless you plan on using the Round or HD bars - then you'll need an additional adapter). To mount the SkyLine Towers # Y53TR to your tonneau cover you would need the 2 of the Landing Pad 1 # Y00221 kits as well which is why I recommend the first kit I mentioned. Most truck ladder racks use longer crossbars...
view full answer... - Thule Hullavator Kayak Carrier Mounting RequirementsTo install Thule's load-assist Hullavator kayak carrier # TH898 on a vehicle's roof rack the ends of the bars must extend out past the roof rack feet by at least 4-inches. You can see this requirement illustrated in the linked diagram. The comparable Yakima ShowDown carrier # Y04081 also has a similar bar space requirement. If your roof rack is a Subaru factory type whose bars do not extend past the rack feet/rails then you can still use the Hullavator but you'll need to add a different...
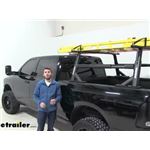
view full answer... - Yakima HD Bar Roof Rack For 2020 Ram 1500I like the look of the Yakima HD Crossbars # Y01158 on the roof of a 2020 Ram 1500 since trucks tend to be used more for utility than recreation. You'll need the bars, the BaseLine Towers # Y28TR, the HD Bar Adapters # Y03541 and the baseplate kit # Y06135. This is my favorite rack for your truck and I've installed it on a 2020 Ram 1500 before so I've included the installation video for you so you can see how it installs and how it looks!
view full answer... - Solution for Roof Rack With Three Crossbars on 2014 Nissan NV 3500Since you were looking at the Yakima HD Crossbars # Y01158 I will assume these are the crossbars you would like for your roof rack. Although there is no separate bundle for an additional crossbar, the parts are available to make this happen. For the roof rack with 2 crossbars you will need the # Y01158, # Y53TR, # Y03541, and two of the # Y00221. Adding the full rack to the cart will get you everything you need from these part numbers. In order to add the third bar you will need the #...
view full answer...
Do you have a question about this Roof Rack?
Info for this part was:

Edited by:
Daron K

Written by:
Alex H
At etrailer.com we provide the best information available about the products we sell. We take the quality of our information seriously so that you can get the right part the first time. Let us know if anything is missing or if you have any questions.
Thank you! Your comment has been submitted successfully. You should be able to view your question/comment here within a few days.
Error submitting comment. Please try again momentarily.