
To see if this custom-fit item will work for you please tell us what vehicle you'll use it with.
 Alternate Instructions
California residents: click here
Videos are provided as a guide only. Refer to manufacturer installation instructions and specs for complete information.
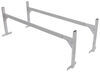
Colin: Hi everyone. Colin here at etrailer. Today we're going to take a look at the line of Rola Rail Extreme RBE Series roof racks. Now with these roof racks, they're going to mount to the flush side rail of your vehicle and to see your vehicle specific fit, just go look at etrailer. We're going to have that for you. With this roof rack mounted, you're going to be able to get your favorite accessories loaded up on top, whether you got a bike rack or a cargo box like we have loaded right now, or even if you have a kayak carrier or a cargo basket, you going to be able to get all of that loaded and secured so that you create more space on the inside of your vehicle for passengers.
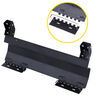
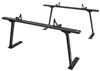
One thing you do want to keep in mind when loading up your RBE Series roof rack is that it does have a weight capacity of 165 pounds, but also be sure to double check with your vehicle's owner's manual and make sure that your roof can handle that weight.This roof rack does come in a couple of different parts. Up Top we have our Rola Rail extreme crossbars. Now these are going to come in a couple of different sizes. We have a 47 inch long crossbars on our roof right now, but there is also 53 inch crossbars if you want to have a little bit more overhang. If that's something you're interested in.
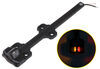
Just see etrailer. Now something I really like about these crossbars is they have that nice charcoal gray look to them. A lot of other roof rack systems out there give you two options between silver and black. This was kind of that happy medium, which is my personal favorite out of the three colors and they also have a nice elliptical shape to them. That's going to help cut down on wind noise and drag, especially when you're traveling at high speeds.We also have these end caps right here with the plastic red locks.
Those can be replaced with Rola lock cores. Those are sold separately here at etrailer. That'll just give more security for both your crossbars and for your end supports. Now if you choose just to stick with these red plastic locks, they do do a great job of keeping the end caps on and no wind is going to be able to pull them off when they're locked. So if you've got a coin, quarter or even just a small flat headed tool like this, whether it's a screwdriver, you can use that to unlock it.
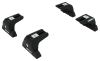
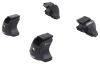
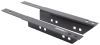
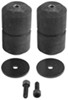
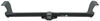
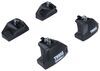
Once we open that up, we can have a look inside. See, we have this rubber strip on top of our Rola Rail crossbars, that's going to not only help reduce that wind noise and drag, but you can remove that strip and then cut it to length for T track accessories for wherever you want to use them on your roof.Then we have them all installed. Put the end cap back on, take that same tool or coin, and then just lock it up. It's going to be secure. And that same goes for down here with our end support end caps. If we want to open it up, we just unlock it and pull it off. We can see our tightening bolt right here. Once we tighten it all down, just close it up and then lock it.The crossbars also have a very lightweight and durable aluminum construction. That's going to help them resist rust and corrosion. Now the Rola Rail end supports are what mounts our cross bars to our flush side rails. They have a nice rubber coating all the way around. That's going to help protect your side rails from any type of scratches or abrasions. Just going to have a hook right here, so once we tighten down that bolt that I showed you guys, it's going to clamp onto the raised side rails. Now with some applications you may need to use the brackets that come with it and install them on your raised side rails to give that hook on your end support a spot to grab onto. Now other flush mounted side rails may already have a spot for that hook, but if you just follow the instructions you'll know if you need to use these brackets.Now I do want to be a little bit nitpicky about this roof rack. I do think it could work on having a different system up top for the T track. A lot of crossbars nowadays have upgraded to having either a split rubber track to where you just have to slide the T track accessories in between them or they even just push down on the rubber strip and slide it in. That eliminates the need to have to cut it to length like you would have to do with our Rola Rail roof rack right here. That's also going to be a hassle for if you ever remove your T track accessories, then you've got to re-insert the strips. It's just much less of a hassle to be able to slide them in without having to worry about cutting it.Where overall, I do think that the RBE Series is a great roof rack. As you can see, it's just going to hold up very well and it's going to be solid and it's also going to be pretty cost effective when you compare it to a lot of other roof racks out there, which is something you always want to keep in mind.Now that we've gone over some of similar features. Let's show you guys how to get this installed. Now the installation will vary depending on your vehicle. Generally, it's going to be close to the same. There might be a few different steps. Just make sure you follow your instructions.With our CRV, we just have to mount a bracket to our flush side rails before we get the roof rack installed. We've already removed the plugs. Now all we'll do is grab our bracket. It's got a nice foam and soft padding to it to make sure it doesn't harm or scratch the finish of your raised side rail. Now making sure that this piece is facing down, we're just going to press it up against those slots. With our hardware, we have a lock washer and a flat washer on it. Just thread those on and now with our included tool, we'll just tighten it down all the way and then just repeat this process for the other side.Now those brackets are installed. We can get our rear crossbar assembled. It's going to be the same process as your front one. Again, this may vary depending on your application, but generally it's going to be very similar. So we'll flip our crossbar over. Now we need to come in and remove this rubber piece. This stripping is going to come with your crossbar. Basically what it's for is if you have any open area on the outside of your bar, let's say your foot is sitting right where my hand is, this is open, you just cut this to length and fill in that space. With our CRV that we're installing this on, it is going to be on the edge so we won't have to worry about that. So we'll just slide that in. It is supposed to be loose like this, so as long as this rubber bracket is in the track, we'll get our end cap installed. Now if it doesn't go in right away like this one will not it's because you need to turn that red piece, which is the lock to where it's horizontal.Put that on. Now, just take a quarter, or a screwdriver, or anything like that, like we talked about earlier and then lock it in place. Once you have that locked, you can see it is secure. So now we're ready to get this on our roof.When you're putting this in place on your roof, if you do have those brackets installed, the hooks right here are going to go under the lips of those brackets that stick out. If you don't need those brackets per your instructions, then the hooks will just go under the lip on your flush side rail. So we'll just spread this across. You do want to make sure you have your feet as wide open as you can get them. So we'll just get this hook, might need to push in a little bit and then get it under that lip, just like that. Now we should do this for the other side as well. Now we'll go ahead and open up our end cap, access to the tightening bolt, and then with our included tool, tighten it down. It would help if you just pushed on the lay a little bit, try to get all that slack out. And now we're just going to keep going. We don't want to over tighten it. We're just going to get it pretty snug and just make sure it's not going to move.Now that we're pretty snug we'll just close up our end cap. We'll grab the tool we use to lock down our end caps.Once everything is tightened down and secure, go ahead and just give you a roof rack a quick shake. Make sure that it's very stable. Once you've double checked that you're ready to load up your favorite rooftop accessories and then hit the road.Thank you all for watching. That's going to do it for our look at the line of Rola Rail Extreme RBE Series roof racks.
Ratings & Reviews

It’s a nice looking item, the only reason I’m giving it 4 stars is because on my 2016 CRV the piece on the front sits flush to the bracket in the contrary; the back piece has 1.5” of overhang on both sides. I guess I should have ordered the longer version instead of the 47”
Info for this part was:
At etrailer we provide the best information available about the products we sell. We take the quality of our information seriously so that you can get the right part the first time.


Thank you! Your comment has been submitted successfully. You should be able to view your question/comment here within a few days.
Error submitting comment. Please try again momentarily.