
Rhino-Rack Sportz Roof Rack for Rain Gutters - Aluminum - Black - Qty 2


To see if this custom-fit item will work for you please tell us what vehicle you'll use it with.


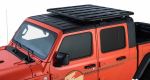
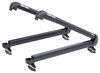
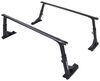
This aerodynamic roof rack gives you the freedom to haul gear and cargo on your vehicle. Full-length aluminum crossbars offer plenty of space for channel mount and clamp-on accessories. Installs to the rain gutters on your vehicle.
Features:
Specs:
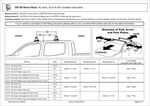
 Alternate Instructions
California residents: click here
Videos are provided as a guide only. Refer to manufacturer installation instructions and specs for complete information.
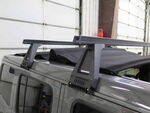
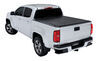
Hi, Matt with etrailer. Today we'll be taking a closer look at the Rhino Rack sports roof rack on our 2023 Jeep Gladiator. Now this would be a great option if you're trying to carry those longer items, and you want something that's gonna look a little bit more rugged. So let's take a closer look at it. Now we do have a lot of roof racks here at etrailer, and I do recommend using our fit guide to find the right one for you, just so it fits on here properly since this will mount to your gutter. But what I like about roof racks in general is we have a lot of space in our bed that we can store items in.
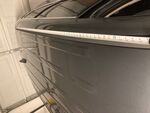
But if you have anything longer like skis or kayaks, not gonna be the best spot for 'em. And a lot of ladder racks can be pretty pricey as opposed to something like this. Now what I like specifically about this one is, like I said, it's gonna have this more of a rugged look to it. You can tell that by the top of it. On the top of it, we're gonna have this really tough looking rubber.
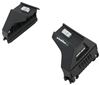
It's gonna be raised in a couple spots. It's gonna get a better grip for keeping your stuff in place, especially if you wanna move around some lumber. If you wanna use it more for work applications as well. Below we're gonna have the tower. It's a fairly simple design.
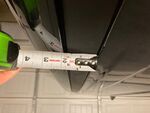
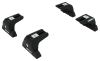
All that's happening here is the back half is going inside of your gutter, and the front half is grabbing on it. And this is doing a fairly good job. This gives me a lot of confidence that this isn't gonna go anywhere. And it is gonna have these T channels that go down the center, that gives you an alternative mounting place for any of your accessories. I like that 'cause it just kind of opens it up to more possibilities.
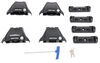
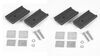
But if you wanna go the old classic way of your clamp on accessories, these are gonna be some wider bars. So just make sure they are gonna be compatible. You can check out the specs of these in our specs part of our page. Now for this space underneath here, so you know if it's gonna work with your specific vehicle is we're gonna have about two inches of space. So those accessories with larger style clamps, they might get kind of close here but it shouldn't make contact. And then for the total height it adds to a vehicle that's gonna be a little bit under 3 1/2 inches. So while it might not sit up very high, I like that because it gives you a little bit more clearance if you're going under any space like a garage. I would recommend though taking the total height of a vehicle through crossbars and any accessories on top of that, so you know if you're gonna make it or not. And the last measurement I like to talk about is gonna be our crossbar spread. So at the moment I have this at about 36 inches, but we still have a lot in place since you can mount this pretty much anywhere on our gutter. So if you need something smaller or wider, this should be able to cover it. So let's start off the process of putting it on. I like to lay out all my parts. You also notice, already have my rear crossbar installed. It's gonna be the same process though. So I do wanna go over the parts. We are gonna have the crossbar, the towers, and I already have installed these adapters that work with our crossbars. I'll go over that later on. And we're gonna have these rubber end caps. You also have a tool that comes with your kit. I recommend having a 10 millimeter socket and wrench on hand. Let's start off with this tower. So with this tower, if you don't already have this installed, I'll show you how to do it real quick. Just remove that. It doesn't take very long. You're gonna have a couple pieces. You're gonna have this bolt, this split washer, and this is gonna go through this larger square washer. Now a pass underneath the tower and connect to this adapter. Now this adapter that is gonna be a little bit uneven. So that part with this section that protrudes out, we want in this orientation. And then we'll stack that smaller square washer on top of here. Should thread right into place just like that. Now we're coming right to the crossbar. Flip that so it's upside down, and we're gonna just pull on this end cap to remove it. And we're just gonna take this off for the time being. And we're gonna fit that square washer through that channel just like this. I like the grab hold of here so it doesn't fall down on me. Makes it a little bit easier to work with. Should slide into place, and I'll throw that end cap back on here. Repeat that on the other side. Now when you get these, these clamps are usually gonna ties them down. So we'll grab the Allen key, loosen 'em up a bit, however you've done that to mine. So it should fall off just like that. Sometimes you might have to wiggle it loose 'cause it'll catch on the threads. And then we'll grab that rubber cap. That rubber cap is gonna go right there. You can tell it goes in this section 'cause this one isn't quite wide enough. Once we've done that, I'm gonna grab my socket, and we're gonna tighten these down to the crossbar a little bit more. First, I'm gonna bring it to the edge a bit closer. That's probably gonna do it for what I need. You notice I'm just doing this by hand 'cause I don't wanna tighten down all the way, 'cause I might need to adjust it when I put it on top of my roof. I'm just gonna roughly put on top of my roof. It doesn't have to be in a perfect orientation quite yet. Right now I'm just aiming to get this a lineup with a gutter on one side. Slowly, lower it down to the other side. We'll make a few adjustments. And what I recommend doing is making sure this is even. So find a point on top of your roof like this section where we have this cut. Now measure from there to the end of my tower. I'm gonna do that on both sides, so make sure it's even and squared off. Once it's in a good spot, we'll come back through and tighten these down. And I've already done it a little bit at this point. Once you get both of these nice and snug, the way I recommend doing it is going back and forth on either side. The reason why I recommend going back and forth is to make sure it's even for tightness, it's gonna give you the best fit. I've already done that, so I'll probably get it a little bit tighter just by turning it by different orientation. That feels a lot better. Give it a good shake, make sure it doesn't go anywhere. And then you can load it up with it with whatever gear you have, and take it out for a ride. Now if you guys have any other questions, let us know here at etrailer. And again, I'm Matt and thanks for watching.
Info for this part was:
At etrailer we provide the best information available about the products we sell. We take the quality of our information seriously so that you can get the right part the first time.


Thank you! Your comment has been submitted successfully. You should be able to view your question/comment here within a few days.
Error submitting comment. Please try again momentarily.